Heidelberg AICurriculum
Track 12 · Advanced
12.5

Self-hosting with Dokploy on Hetzner

Your own git-push deploy platform — on a €8.49/month box you control

5 lessons 2026-08-06 AI-generated

1Overview

A self-hosted deployment platform (Apache-2.0, 2024–) built on Docker + Traefik — point it at a git repo and it builds, deploys, and TLS-terminates your app on your own server.

The chapter that answers "where do I actually put the app I built?" — without Vercel, without a per-seat SaaS bill, and without your data leaving the EU. Dokploy is a free, open-source alternative to Vercel/Heroku/Netlify: install it on a Hetzner Cloud server, connect your git repo, and every push auto-deploys behind Traefik with automatic HTTPS. → Unlike `owning-your-app` (deciding to leave a no-code platform) or `staging-production` (the safe-promotion discipline once you're live), this chapter is the concrete "how": provision a box, install the platform, wire git, get a domain with TLS, and back it up — the one piece nothing else in this curriculum teaches.

1.2After this chapter you can
Provision a Hetzner Cloud server and install Dokploy on it in under 10 minutes
Connect a git repo so every push auto-deploys — no manual SSH, no CI pipeline to babysit
Put a real domain in front of your app with automatic HTTPS (Let's Encrypt via Traefik)
Know what you now own: updates, backups, and uptime — and set up the one backup that matters
1.3Best for

A lab, small team, or founder who wants git-push deploys and EU-hosted data without Vercel/Heroku pricing or a US cloud dependency.

1.4Watch out

You now own the ops: OS patches, Dokploy updates, and backups are on you. Coolify is more feature-complete for multi-server setups (heavier on RAM); CapRover is simpler but has no native Docker Compose support.

1.5Free vs paid

Self-hosting is free forever (capped at 2 concurrent builds); an Enterprise add-on (SSO, audit logs, unlimited builds — price on request) exists if you outgrow that. A Hetzner CX33 (4 vCPU/8 GB) to run it on costs €8.49/month.

2Lessons 5

2.1 Provision a Hetzner Cloud server

Hetzner Cloud is a German cloud provider — hourly-billed VMs, EU data residency, and cheaper per-vCPU/GB than AWS or DigitalOcean. Dokploy needs somewhere to run; this is that somewhere.

Create a Hetzner Cloud server running Ubuntu 24.04 that you can SSH into, sized to actually run Dokploy plus your apps.

Tryssh root@<your-server-ip>

Once the server is created, this is the one command that proves it is really up.

  1. Create a Hetzner Cloud account and project at console.hetzner.cloud (or use an existing one).
  2. Add a new server: choose location, image Ubuntu 24.04, and type CX33.
  3. Add your SSH public key in the server‑creation form rather than a password.
  4. Create the server; Hetzner boots it and shows its public IPv4 address.
  5. Confirm you can reach it with ssh root@ and obtain a root shell.
  • You'll see A root shell on a fresh Ubuntu 24.04 box, reachable at a public IPv4 address.
  • Takeaway Dokploy needs a real server underneath it — CX33 is the tier that survives adding a database, not just the Dokploy control plane on its own
  • Check Why is CX23 (4 GB RAM, clears Dokploy's stated 2 GB minimum) not the recommended tier here?
  • Cost €8.49/month for CX33, billed hourly — so deleting it early only costs the hours it ran, not a full month.

2.2 Run Dokploy and access its dashboard

Dokploy is a free, open-source (Apache-2.0) deploy platform — the self-hosted answer to "where do I put my app" that Vercel/Heroku/Netlify answer with a bill. One shell script installs the whole control plane: Docker, Traefik, and the dashboard.

Do this first Provision a Hetzner Cloud server

Get the Dokploy dashboard live on your Hetzner server and create an admin account

Trycurl -sSL https://dokploy.com/install.sh | sh

Run this over the SSH session from the previous lesson, as root.
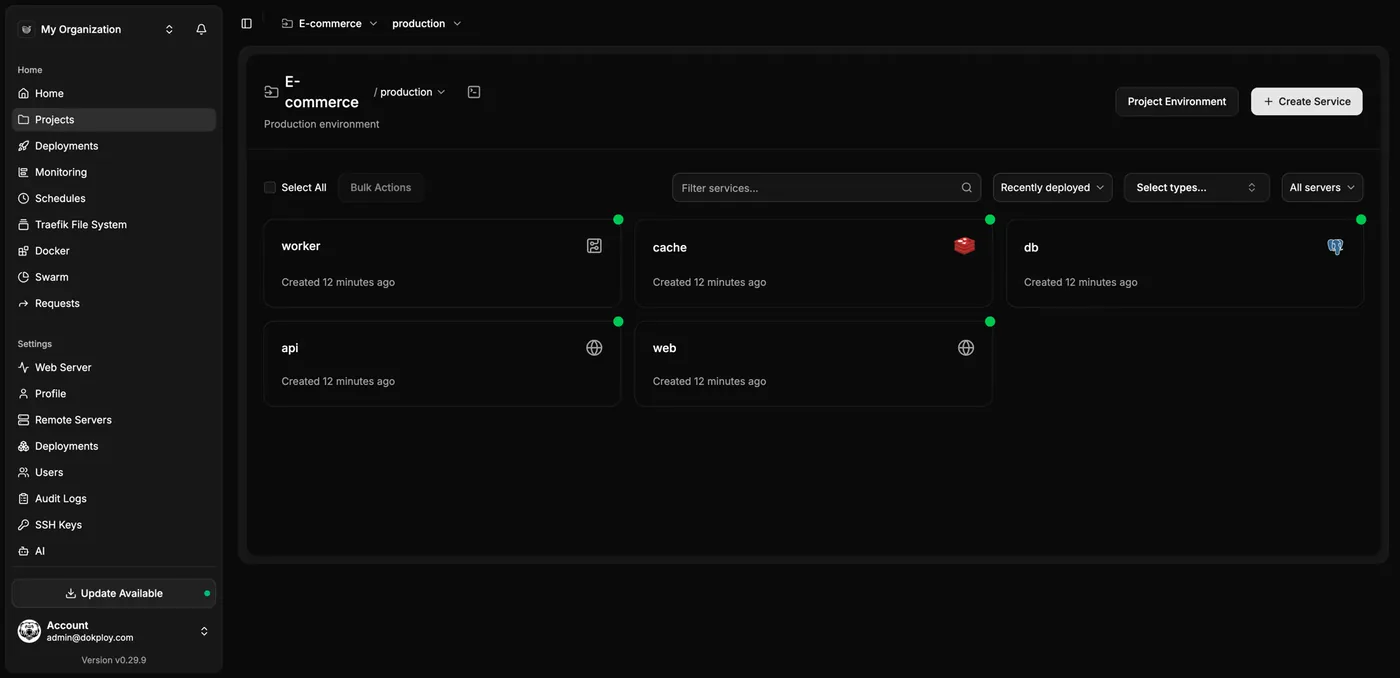
Dokploy web dashboard showing the project view with navigation for Projects, Databases, and server monitoring
  1. 1 Recent deployments view shows latest releases Why this exists →

Best viewed on desktop — tap Enlarge to read the numbered controls.

The Dokploy dashboard. This is what loads at http://:3000 once the install script finishes — your control plane for every app and database on this server. Credit: dokploy.com ↗
  1. SSH into your server using ssh root@
  2. Run the install script with bash <(curl -sSL https://dokploy.com/install.sh)
  3. Open http://<server‑ip>:3000 in a browser after the script finishes
  4. Create your admin account on the login page
  5. Observe the empty project list on the dashboard
  • You'll see The Dokploy dashboard at port 3000, logged in as admin, with an empty project list
  • Takeaway One script turns a bare Ubuntu box into a PaaS control plane — Docker, Traefik, and a dashboard, all running before you deploy your first app
  • Check What three ports does the installer need free, and what happens if one is already taken?
  • Cost Free — Dokploy itself has no license cost; you are only paying for the Hetzner server from the previous lesson.

2.3 Trigger an auto‑deploy from a git push

Dokploy connects to GitHub, GitLab, Gitea, Bitbucket, or Docker Hub and gives you a webhook URL. Push to the configured branch and Dokploy builds and redeploys automatically — the same shape as this curriculum's own Gitea → webhook → auto-deploy pipeline, just running on a server you control.

Do this first Run Dokploy and access its dashboard

Wire a git repo to Dokploy so a git push alone rebuilds and redeploys your app, with no manual SSH step.

TryCreate a new Application

In the Dokploy dashboard, click + New Application, then follow the prompts to select your git provider and repository; after saving, copy the generated webhook URL from the screen.

  1. Create a new Application (or Compose, if your app has a docker-compose.yml) inside a Dokploy project using Create a new Application.
  2. Connect your git provider — GitHub, GitLab, Gitea, or Bitbucket — and select the repository and branch with Connect your git provider.
  3. Copy the webhook URL that Dokdeploy generates and paste it into your repo's webhook settings using Copy the webhook URL.
  4. Push a commit to the configured branch via Push a commit.
  5. Watch the build log stream live in the dashboard with Watch the build log stream live.
  6. Open the app's Dokploy‑assigned URL after the build finishes using Open the app's Dokploy-assigned URL.
  • You'll see A build log streaming in the dashboard after your push, then the app reachable at a Dokploy‑assigned URL — no SSH session, no manual docker compose up.
  • Takeaway Once the webhook is wired, "deploy" is just "git push" — the CI pipeline is Dokploy itself, not something you hand‑build
  • Check You pushed to main but the deploy never triggered. Given the branch-matching behaviour above, what is the first thing to check?
  • Cost Free — this is Dokploy's core feature, not a paywalled one. Note the free tier caps you at 2 concurrent builds; a third push queues rather than failing.

2.4 Serve your app on a custom domain using HTTPS

Dokploy writes a Traefik router for your app and sets certResolver: letsencrypt — Traefik then requests and renews the certificate for you. No certbot, no cron job, no manual renewal.

Do this first Trigger an auto‑deploy from a git push

Your app runs at a real domain over HTTPS with an automatically issued and renewed certificate

TryA → <your-server-ip>

The DNS record to create at your domain registrar before touching Dokploy — an A record pointing your domain (or subdomain) at the server's public IP.

  1. Create an A record at your domain registrar that points to your Hetzner server’s public IP
  2. Enter the domain name in the Domain field of your application’s Dokploy settings
  3. Toggle the Enable HTTPS switch to activate automatic TLS provisioning
  4. Wait while Traefik requests and obtains a certificate from Let’s Encrypt
  5. If the app is a Compose stack, click the Redeploy button to apply the new domain label
  6. Open https://yourdomain.com in a browser and confirm the padlock indicating a trusted certificate
  • You'll see Your app is reachable at https://yourdomain.com showing a browser‑trusted padlock
  • Takeaway Traefik handles the whole TLS lifecycle so you only need to point DNS and enable HTTPS in Dokploy
  • Check You changed the domain on a Compose-based app and the old cert is still showing. What step did you likely skip?
  • Cost Free — Let's Encrypt certificates cost nothing. The only cost is the domain registration itself, which this lesson does not cover.

2.5 Schedule S3 backups for Dokploy

A Dokploy backup zips Dokploy's own Postgres database and its /etc/dokploy config directory and pushes it to an S3-compatible bucket — S3 is currently the only supported destination. This backs up Dokploy's own state (your projects, settings, domain config), not your deployed apps' data.

Do this first Run Dokploy and access its dashboard

Create automated S3 backups of Dokploy’s state and know their limits

Trydokdeploy-hetzner backup create

Enter this command in the SSH terminal on your Dokploy server; the CLI will guide you through selecting the S3 destination you added earlier and then immediately start a manual backup. Watch for the success message confirming the .zip was uploaded to your bucket.

  1. Create an S3‑compatible bucket — use Hetzner Object Storage or any other S3 provider
  2. Add it as a backup destination in Dokploy’s backup settings, supplying the bucket’s access key and endpoint
  3. Schedule a backup with your chosen recurring interval
  4. Trigger a manual backup to confirm a .zip lands in the bucket
  5. Verify a restore on a disposable server to ensure the backup works
  6. Set up a separate backup job for each app’s database so that app data is also protected
  • You'll see A .zip file appears in your S3 bucket containing Dokploy’s database and config directory on the schedule you set
  • Takeaway The backup safeguards Dokploy’s configuration, not the databases used by your apps – those need separate jobs
  • Check Your server dies and you restore a Dokploy backup onto a new one. What comes back, and what is still missing?
  • Cost A few cents per month for object storage — negligible next to the €8.49/month server cost.

3You’ll know it worked 7 checkable outcomes in this chapter

  • A successful `ssh root@<ip>` lands you at a root shell on Ubuntu 24.04
  • A web page loads at http://<server-ip>:3000 showing the login screen or dashboard if already logged in
  • You are logged in as the newly created admin and see an empty project list
  • The dashboard displays an empty list where projects would appear
  • The application loads in a browser at the provided URL
  • The browser displays a padlock icon and no self-signed warning when loading `https://yourdomain.com`
  • .zip file showing up in the configured S3 bucket

4FAQ, Tips & How-to 25

one problem, one solution, one action
How-to Everyone

Want a cheap Ubuntu VM on Hetzner

You get a VM sized to run Dokploy and multiple small apps plus a database

Lesson → AI-generated
How-to Everyone

Need password‑free access to a new Hetzner server

You can log in immediately after the server boots without a password prompt

Lesson → AI-generated
How-to Everyone

You receive a reachable IP that you can use for SSH and later deployments

Lesson → AI-generated
How-to Everyone

You know the server is ready for Dokploy installation

~5 min · no code Lesson → AI-generated
How-to Everyone

Can't reach my Ubuntu box from home

You can manage your Hetzner box directly from the terminal

**The Dokploy dashboard.** This is what loads at `http://<server-ip>:3000` once the install script finishes — your control plane for every app and database on this server. Credit: dokploy.com ↗
Free — Dokploy itself has no license cost; you are only paying for the Hetzner server from the previous lesson. Lesson → AI-generated
How-to Everyone

Provisioning a fresh Ubuntu box

A single script provisions Docker, Traefik, Postgres and the dashboard on a fresh Ubuntu box

~5 min · no code Lesson → AI-generated
How-to Everyone

The install will fail if any of the required ports are already in use

Lesson → AI-generated
How-to Everyone

You can view and manage your PaaS control plane through a web interface

Lesson → AI-generated
How-to Everyone

First signup through the dashboard

The initial account has full control to deploy and delete any app on the server

Lesson → AI-generated
Tip Everyone

Empty project list — starting point for deployments

Seeing no projects confirms the control plane is ready but nothing has been deployed yet

Lesson → AI-generated
How-to Everyone

Need to add a service for deployment

You can register your service in Dokploy so it knows what to build and run

Free — this is Dokploy's core feature, not a paywalled one. Note the free tier caps you at 2 concurrent builds; a third push queues rather than failing. Lesson → AI-generated
How-to Everyone

Need to point your code repo to Dokploy

Linking your GitHub/GitLab/Gitea/Bitbucket repository tells Dokploy where to fetch source code

Lesson → AI-generated
How-to Everyone

The branch name must match exactly or Dokploy will reject pushes

Lesson → AI-generated
How-to Everyone

You can watch the build process in real time to see code pull, image build, and container start

Lesson → AI-generated
How-to Everyone

Opening the Dokploy-assigned URL proves the app is serving traffic after the build

Lesson → AI-generated
How-to Everyone

Need your domain to point at a server

Your domain will resolve to the Hetzner server so traffic reaches your app

Free — Let's Encrypt certificates cost nothing. The only cost is the domain registration itself, which this lesson does not cover. Lesson → AI-generated
How-to Everyone

Can’t specify which hostname should reach my app

Dokploy knows which hostname should route to your application

Lesson → AI-generated
How-to Everyone

Want automatic HTTPS for my site

Traefik will request and renew a Let's Encrypt cert without manual steps

Lesson → AI-generated
How-to Everyone

The certificate is automatically fetched the first time the domain is accessed

Lesson → AI-generated
How-to Everyone

A trusted certificate means browsers will show a secure connection indicator

Lesson → AI-generated
How-to Everyone

Want a temporary test address without buying a domain

You can test without buying a domain, but it will only serve HTTP

Lesson → AI-generated
How-to Everyone

Need a safe spot for Dokploy backup zip files

You can store Dokploy state backups in any S3-compatible object storage

A few cents per month for object storage — negligible next to the €8.49/month server cost. Lesson → AI-generated
How-to Everyone

No backup destination

Dokploy can push its backup zip to the configured S3 bucket automatically

Lesson → AI-generated
How-to Everyone

Need to test a backup manually

Running a one-off backup lets you confirm the pipeline works before relying on the schedule

Lesson → AI-generated
How-to Everyone

Dokploy backups do not include your apps' databases; each app needs its own backup plan

Lesson → AI-generated

The same set on /recipes, filtered by tool and role.

5Videos 2

6FAQ 5

How can I log into the new Hetzner server without a password?

Upload your SSH public key in the Hetzner server‑creation form instead of setting a password. Paste the key into the "SSH keys" field before you create the server, then you can SSH directly after it boots.

Which ports must be free on the server before I run the Dokploy install script?

Docker containers used by Dokploy need the HTTP port 80, HTTPS port 443, and the dashboard port 3000 to be unoccupied. Make sure no other service is listening on any of these ports, otherwise the installation will fail.

How do I configure a custom domain so traffic reaches my deployed app?

First create an A record at your domain registrar that points the hostname to the Hetzner server’s public IPv4 address. Then add the same domain name in the application’s Dokploy settings so Dokploy knows which host should route to that app.

Will my site get HTTPS automatically, and how does it work?

Dokploy uses Traefik, which can request a Let’s Encrypt certificate for your domain when you enable HTTPS in the UI. The first time the domain is visited, Traefik fetches the cert and browsers will show a padlock once the certificate is installed.

Where should I store Dokploy backup files?

You can back up Dokploy state to any S3‑compatible object storage bucket, such as Hetzner Object Storage. Create an S3‑compatible bucket in your provider’s console and configure Dokploy to write backup zip files there.

7Glossary 12 terms

Show the 12 terms
Dokploy
Hetzner Cloud
A German cloud service that provides virtual machines billed by the hour with data stored in the EU.
project
A logical container in Hetzner Cloud used to group servers, networks and other resources together.
CX33
A Hetzner server type that offers 4 virtual CPUs, 8 GB RAM and an 80 GB disk.
SSH public key
A cryptographic key you paste into the Hetzner creation form so you can log in without a password.
IPv4 address
The publicly reachable numeric address of your server that you use for SSH and web access.
`ssh root@<ip>`
A command that opens a secure shell session as the root user on the server whose IP replaces <ip>.
Docker
Software that runs applications inside isolated containers, used by Dokploy to host your services.
Traefik
A reverse‑proxy router that directs web traffic to your containers and can obtain HTTPS certificates automatically.
Postgres
An open‑source relational database that Dokploy can set up for your applications.
dashboard
A web interface served on port 3000 where you manage Dokploy projects, apps and settings.
A record
A DNS entry that maps a hostname to the server’s IPv4 address so traffic reaches your app.
S3‑compatible bucket
An object storage location that follows the S3 API, used by Dokploy to store backup zip files.

8See also

💬 Discuss this chapter

Ask, share, or report — over on the Heidelberg AI community forum.