Heidelberg AICurriculum
Track 13 · Advanced
13.2

AI coding assistants

AI that writes code with you inside your codebase

65 lessons 2026-08-06 AI-generated

1Overview

AI developer platforms / AI-assisted coding tools. → Unlike the "vibe coding" app builders (Lovable, Base44) that create a whole app from a plain prompt, these are software-engineering utilities that sit inside or alongside your existing codebase: they read files, run terminal commands, and fix bugs, writing code collaboratively with you. Claude Code, Codex, OpenCode, Aider, jcode, Cursor, Devin Desktop (formerly Windsurf), Antigravity, GitHub Copilot — some run in your terminal, some are full IDEs, one is an editor extension. → Next rung: Building complex codebases — the discipline that makes any of these reliable on a big, real project.

1.2After this chapter you can
Pick a coding assistant that fits your editor and workflow
Know which run in the terminal vs inside your IDE
Let an agent edit and run code in your own repo
1.3Where does the AI run?

It runs in one of three environments—directly in your terminal, inside a full‑featured IDE, or as an editor extension—depending on which assistant you choose.

1.4Can it modify my existing code?

Yes; these assistants read files from your current project, execute commands and edit the code collaboratively, fixing bugs and adding features right inside your repository.

1.5Which tool offers deep whole‑repo reasoning?

Claude Code provides the deepest whole‑repository reasoning among the listed AI coding assistants, making it ideal for large, complex codebases.

How a coding agent works — read, edit, run, fix, repeat A loop: read context, propose edit, run it, read output; fail loops back to propose edit, pass goes to done. A chatbot stops after propose edit. How a coding agent works reads code, runs it, fixes its own mistakes — not just a chatbot Read context repo · open files · grep Propose edit write & patch the code Run it tests · build · run command Read output pass or fail? errors · diffs · logs fail → fix & retry pass ✓ Done change verified A chatbot stops after "Propose edit". An agent runs it and checks itself.

2Matrix 7 rows · 9 tools

Where it runs
terminal
terminal
terminal
terminal
terminal
IDE
IDE
IDE
extension
Works in your existing repo
yes
yes
yes
yes
yes
yes
yes
yes
yes
Free / open-source
no
no
yes
yes
yes
partial
partial
partial
partial
Bring your own model
no
no
yes
yes
yes
partial
partial
partial
no
Agentic multi-file edits
yes
yes
yes
yes
yes
yes
yes
yes
partial
Runs commands / tests
yes
yes
yes
yes
yes
yes
yes
yes
partial
Beginner-friendly
partial
partial
partial
partial
partial
yes
yes
partial
yes

3Sub-chapters

4In depth

AI that writes code with you, inside a codebase you already have. Unlike the app builders (Lovable, Base44) that spin up a whole app from a prompt, these work alongside your existing project: they read your files, run commands, and fix bugs with you. The tag shows where each one runs — a terminal, a full IDE, or an editor extension. → Not sure which? Pick by what you want: deepest whole-repo reasoning → Claude Code; inline autocomplete as you type → Copilot; an AI-native IDE → Cursor or Devin Desktop (formerly Windsurf); a git-native terminal tool that commits each step → Aider; fully open-source on your own model → opencode; open-source with local models, memory and agent swarms → jcode.

5Lessons 65

5.1 Generate a Python script using Aider

Aider is a terminal‑based AI assistant that generates code from natural‑language prompts, shows a diff, and creates a Git commit for the change.

Run an Aider session that turns a natural‑language request into a committed Python file

TryWrite a Python script that prints the numbers 1 to 10 with their squares.

In a terminal, run aider --model sonnet squares.py to start a session, then type the sentence above at the prompt. Write it in any language you like.

A real Aider session in the terminal: you run aider demo.py, describe what you want, and Aider edits the file and commits the change to Git. Credit: aider.chat ↗
  1. Open a terminal and execute aider --model sonnet squares.py
  2. Type your request in plain English at the Aider prompt
  3. Inspect the diff printed by Aider to verify the modifications
  • You'll see A new Python file appears in the terminal and a Git commit records the change
  • Takeaway Natural‑language prompts become real, versioned code
  • Check How does Aider turn a plain‑English request into a committed Python file and record it in Git?
  • Cost Aider is free and open-source (Apache 2.0) — there is no subscription. You pay only the third-party LLM's token cost for each request (you bring your own key).

5.2 Give a coding task to an Antigravity agent

Antigravity is a desktop application that runs AI agents which can autonomously plan, code, execute, and self‑correct tasks within a selected project.

Install Antigravity, sign in with a Google account, and give an agent a complete coding task to execute autonomously

TryWrite a Python script that fetches a UniProt entry by accession, prints the protein name, length, and organism, then add a test and run it — fix any errors until the test passes.

Open the new-agent screen, type your task into the prompt box (in any language), and send it. The agent does the work; you just watch.
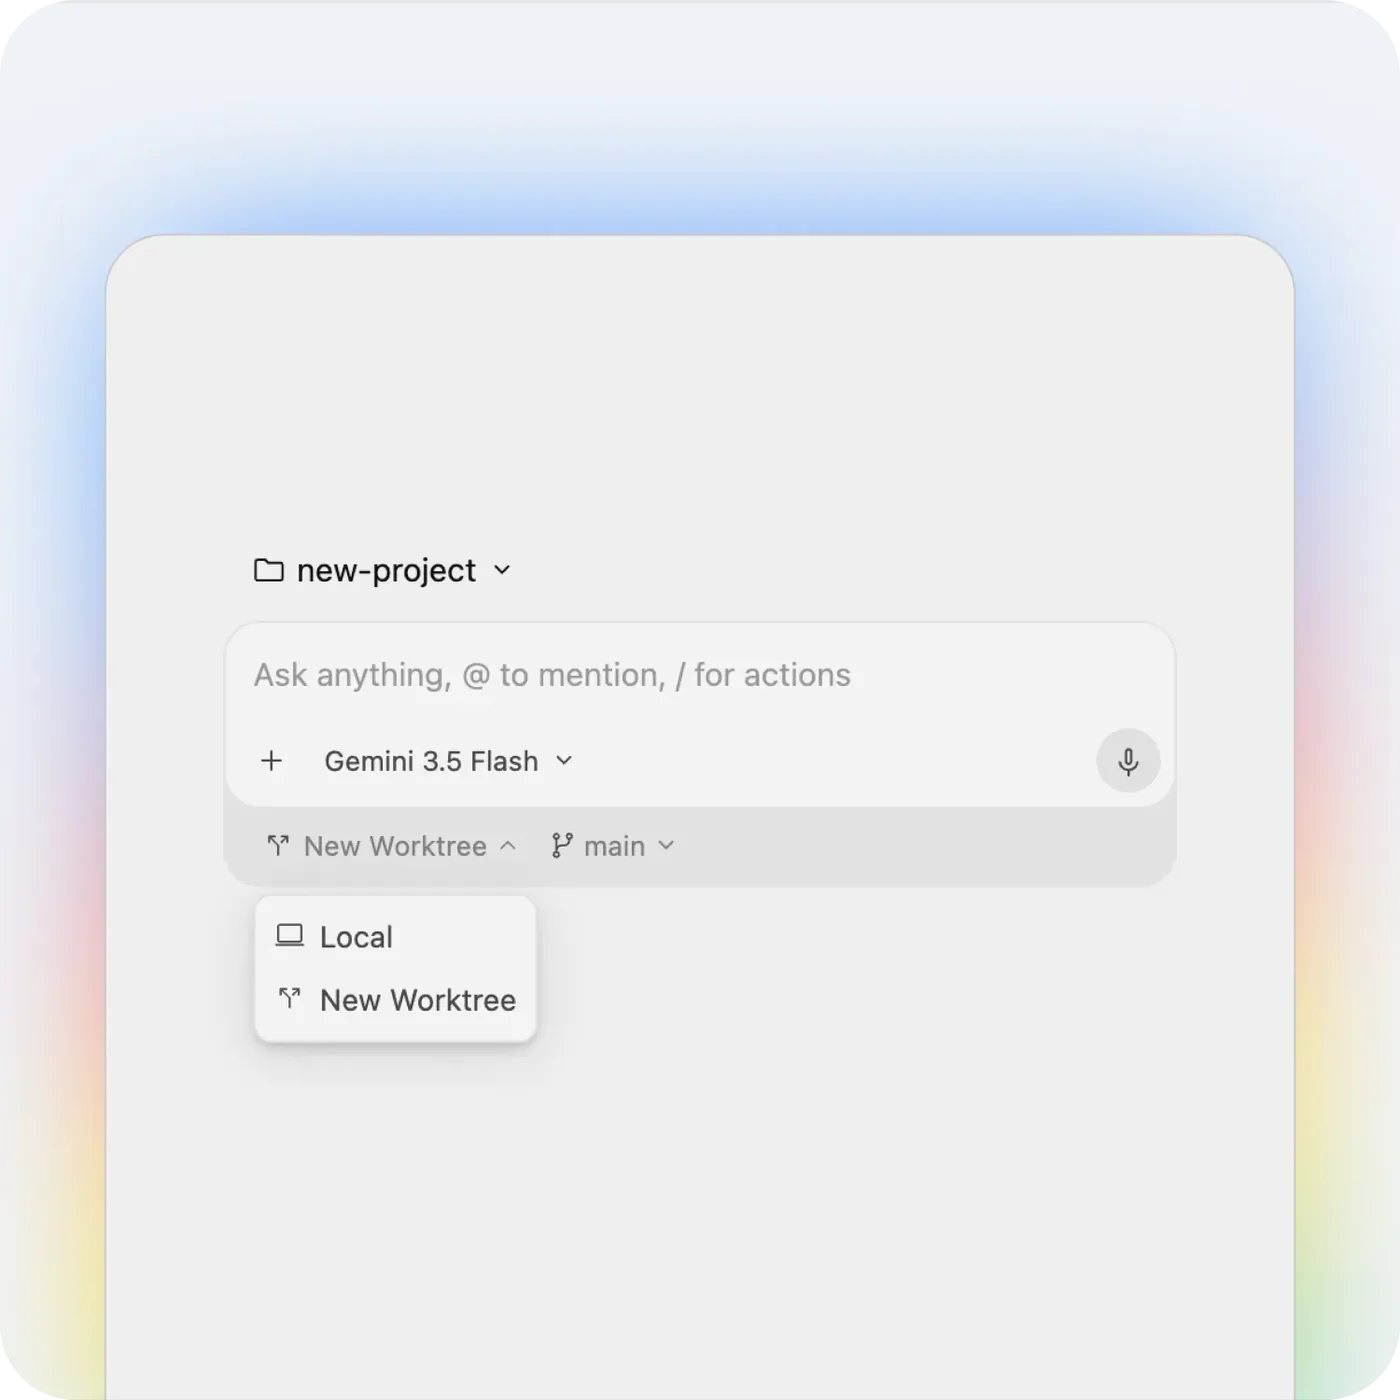
Antigravity's new-agent screen: a project selector, an 'Ask anything, @ to mention, / for actions' prompt box, the Gemini 3.5 Flash model selector with a mic button, and 'New Worktree / main' git controls with a Local vs New Worktree dropdown
  1. 1 Project picker which repo this chat works in
  2. 2 Model selector chooses the LLM for responses Why this exists →
  3. 3 Create worktree opens a separate workspace branch

Best viewed on desktop — tap Enlarge to read the numbered controls.

The new-agent screen: type your task in the prompt box, pick a model (here Gemini 3.5 Flash), and choose where the agent runs — Local on a branch like main, or an isolated New Worktree. Credit: antigravity.google ↗
  1. Download Antigravity as a desktop app for your OS and launch it
  2. Sign in using your Google account when prompted
  3. On the new-agent screen select a project and keep the model set to Gemini 3.5 Flash
  4. Paste your task into the prompt box and click Send
  5. Observe the agent plan, write, run and iterate the script until the test passes
  • You'll see The agent plans, writes, runs and iterates a script and its test until the test passes
  • Takeaway Antigravity lets you delegate whole tasks to an agent that handles planning, coding, execution and self‑correction
  • Check What steps let an Antigravity agent plan, write, run and iterate a script until its test passes?
  • Cost The For Individuals plan is free ($0/month): Gemini 3.5/3.1/3, Claude Sonnet & Opus 4.6 and gpt-oss-120b, unlimited tab-completions and command requests, with basic weekly rate limits. One task like this costs you nothing.

5.3 Run your first Claude Code task

Claude Code is an interactive CLI tool that generates Python scripts from natural‑language prompts, runs them, and displays their output, awaiting user approval before each change.

Install Claude Code, give it a plain‑English request, and watch it generate, execute and display a Python script’s output

macOS
curl -fsSL https://claude.ai/install.sh | bash
Tryclaude "Write a Python script primes.py that prints the first 20 prime numbers, then run it."

You don't write any code yourself — Claude writes the script, shows you what it will create, and runs it once you approve.

Claude Code runs in your terminal — install it, run claude, and type a plain-English task at the prompt. Credit: claude.com/claude-code ↗
  1. Open a terminal in any folder and execute claude
  2. Log in with a Claude Pro or Max account when prompted
  3. Enter the task sentence (for example, “Print the first 20 prime numbers”) at the Claude prompt
  4. Confirm with yes when Claude shows the file it will create before it writes and runs the script
  • You'll see The first 20 prime numbers printed in the terminal by the script Claude created
  • Takeaway Describe the desired outcome and Claude Code will produce real code, run it, and let you approve each change
  • Check What does Claude Code do after you enter a plain‑English request and confirm the file creation?
  • Cost Claude Code needs a paid Claude plan — Pro ($17/mo annual, $20/mo monthly) is the entry point and includes Claude Code. There is no free tier.

5.4 Execute a Codex task from the terminal

Codex is a command‑line AI coding assistant that creates code from prompts, executes it in the same terminal session, and presents the result.

Install the Codex CLI, give it a plain‑English request and let it generate, run and show a script in one terminal session

macOS
curl -fsSL https://chatgpt.com/codex/install.sh | sh
Trycodex "Write a Python script fibonacci.py that prints the first 20 Fibonacci numbers, then run it."

You don't write any code yourself — Codex writes the script, shows you what it will create, and runs it once you approve.

Codex runs in your terminal — install the CLI, run codex, and type a plain-English task at the prompt. Credit: openai.com/codex ↗
  1. Open a terminal in any folder and run codex; on first launch sign in with your ChatGPT account or provide an API key
  2. Type the task sentence at the prompt and press Enter
  3. Confirm the operation by typing yes when Codex displays the file it will create
  • You'll see The first 20 Fibonacci numbers printed in the terminal by a Python script that Codex created and executed
  • Takeaway Codex acts as an interactive coding agent you steer with natural‑language prompts and explicit approvals
  • Check How does Codex generate, run and show a script after you type a task sentence and confirm the file creation?
  • Cost Codex is included with a paid ChatGPT plan (Plus $20/mo, Pro from $100/mo); a Free ($0) and Go ($8/mo) tier exist for lighter use, or pay per token via the OpenAI API.

5.5 Set up GitHub Copilot and accept its first suggestion

GitHub Copilot is an AI pair-programmer that lives inside your code editor (here, VS Code) as an extension — not a separate app and not a terminal tool. As you type, it suggests the next lines as faint ghost text you accept with Tab.

Configure GitHub Copilot in VS Code and watch it complete a line of Python code

Try# Load gene_counts.csv, normalize by library size, and plot a heatmap of the top 50 most variable genes with seaborn

Open a new .py file in VS Code and type this comment. Copilot offers a greyed-out suggestion — press Tab to accept it.

Write a plain-English comment and Copilot generates from it — right inside VS Code. Type the description, and it proposes the next lines as ghost text you accept with Tab. Credit: github.blog ↗
  1. Install VS Code
  2. Add the GitHub Copilot extension from the Extensions view and sign in with a GitHub account
  3. Open a .py file and type a comment describing the code you need
  4. Press Tab to accept the ghost‑text suggestion
  • You'll see Around fifteen lines of pandas and seaborn code appear as ghost text, ready to be accepted with Tab
  • Takeaway A plain‑English comment can be turned into working code directly inside the editor
  • Check What happens when you type a comment describing needed code and press Tab in VS Code with Copilot enabled?
  • Cost Free plan = $0/mo, 2,000 code completions per month plus limited chat and agent usage, with access to multiple models. Code completions don't consume AI Credits. Verified students get unlimited completions free via the GitHub Student Developer Pack.

5.6 Make your first AI‑powered code change

Cursor is an AI‑powered development environment that accepts natural‑language prompts via a chat sidebar, proposes diffs, and applies them to files when approved.

Install Cursor, open a folder, and apply a change described in plain English

TryCreate a Python file called analysis.py with a function that loads a CSV with pandas and prints the first 5 rows. Add a short comment above each line explaining what it does.

Download Cursor from cursor.com, sign in (the Hobby plan is free, no credit card), open or create a project folder, then open the chat sidebar and type your idea — in any language you like.

Cursor is VS Code with AI built in: describe a change in the chat sidebar and it writes the code, then holds it in a reviewable diff — you accept before anything is saved. Credit: cursor.com/docs ↗
  1. Visit cursor.com, download and install Cursor, then sign in
  2. Open a folder using File → Open Folder
  3. Paste your prompt into the chat sidebar
  4. Review the proposed diff and click Accept
  • You'll see A new analysis.py file appears with a complete, commented function and an approved diff
  • Takeaway Describe what you want, review the AI‑generated diff, and accept to apply the change
  • Check After pasting a plain‑English prompt into Cursor’s chat sidebar and accepting the diff, what change appears in your project?
  • Cost The Hobby plan is free with no credit card, including limited Agent requests and limited Tab completions — enough to follow this course's first lessons.

5.7 Run a script with a single command

opencode is a terminal‑based AI coding tool that generates code from English requests, shows a TUI preview of the new file, and runs the script upon approval.

Install opencode, give it a task in the terminal and watch it generate and execute a small script

Tryopencode "Write a Python script multtable.py that prints a 10×10 multiplication table, then run it."

Run this in any folder. opencode shows you the file it will create and applies it once you approve — type your request in any language you like.

The opencode terminal UI mid-session: it greps and reads files to locate the right code, shows a running token count, and runs in Build mode (here on Claude Opus via OpenCode Zen). Credit: github.com/sst/opencode ↗
  1. Install opencode using npm, Homebrew, Scoop, Pacman or Nix
  2. Open a terminal in any folder and run the installed opencode command
  3. Approve the change when the terminal UI (TUI) displays the file to be created
  • You'll see opencode writes a Python script, shows the file to be created and runs it to print a table, all inside your terminal after you approve the change
  • Takeaway plain‑English requests become executable code directly in your development environment
  • Check What does opencode do after you run its command, approve the displayed file creation, and watch it execute?
  • Cost The opencode tool itself is free and open source. You only pay your model provider for the tokens a session uses (set up in the next lesson) — this first small task is a few cents at most.

5.8 Create a Python script from an English description

Windsurf (Cascade) is a desktop AI assistant that reads task descriptions, proposes code edits in a panel, and can execute the resulting script within your project.

Generate, explain and run a Python script that builds sample data and outputs a CSV file

TryCreate a small sample CSV of BLAST-style hits (columns: query, accession, e-value, description), then write a Python script that reads it, keeps the top hit per query, and saves a clean CSV.

Download Devin Desktop from devin.ai/desktop (windsurf.com now redirects there — Cognition renamed Windsurf to Devin Desktop in 2026). Open any folder, then open the Cascade panel and paste your task — in any language you like.

Cascade is Devin Desktop's agent panel: open any folder, type a whole task in plain English, and it reads your project, writes the code, and shows you the edits to accept. Credit: docs.devin.ai ↗
  1. Install Devin Desktop from devin.ai/desktop and sign in
  2. Open any folder, open the Cascade panel, and paste the task description
  3. Review the proposed edits shown in the Cascade panel and accept them
  • You'll see A working Python script that Cascade wrote, explained, and ran — producing a clean CSV from a self‑created sample file
  • Takeaway Cascade turns a description into runnable code across your project
  • Check How does Cascade turn an English description into a runnable Python script that creates a CSV file?
  • Cost The Free plan ($0/month) includes unlimited Tab completions, unlimited inline edits, and a light agent quota — enough to follow this course, though heavy agent use exhausts it in ~2–3 real coding days.

5.9 Iterate script via chat and revert edits

Aider creates a separate Git commit for each conversational edit, allowing safe experimentation and easy rollback with the /undo command.

Do this first Generate a Python script using Aider

Refine your script through conversation and use a single command to revert any edit safely

TryAlso write the results to a summary.csv file, and skip any columns that are completely empty.

Send this as a follow-up in the same Aider session — it keeps editing the existing file instead of starting over.

Every Aider edit lands as a real Git commit (shown here in Aider's browser UI) — which is exactly what makes /undo a clean, safe revert instead of a guess. Credit: aider.chat/docs ↗
  1. Describe your next change in plain English while the session remains open; Aider applies it and creates a new Git commit
  2. Type /undo to revert the last AI‑generated commit
  3. Issue one clear request at a time to keep each commit small and easy to review
  • You'll see The script updates after each request as separate Git commits, and running /undo restores the previous version instantly
  • Takeaway Every conversational edit becomes a Git commit so you can experiment freely knowing /undo will always roll back cleanly
  • Check What command lets you revert the last AI‑generated Git commit during an Aider session?
  • Cost Each request is one metered call to your chosen LLM; grouping related changes into one clear message spends fewer tokens. /undo is free — it is just a Git revert.

5.10 Guide an AI coding assistant to plan, execute and verify code changes

Antigravity agents require explicit outcome definitions and checks so they can autonomously run code, test it, and iterate until the verification passes.

Do this first Give a coding task to an Antigravity agent

Write tasks that name the desired outcome and a verification step so the agent can run and confirm its work without you in the loop

TryRefactor that UniProt script into a small module with type hints, then add a second function that fetches a sequence by accession. Add tests for both and run them — keep fixing until everything passes.

Send this as a follow-up in the same agent so it builds on the work already done instead of starting over. Use the mic in the prompt bar if you'd rather dictate.

Before writing code, the agent produces an Implementation Plan artifact you can review — the outcome, the decisions it needs confirmed, and the files it will change — then runs and self-corrects against it. Credit: antigravity.google ↗
  1. DEFINE the goal plus a way to check it such as “add tests and run them until they pass”
  2. SPECIFY what changes and where, for example “a second function that fetches a sequence by accession”
  3. REVIEW the generated Implementation Plan in the side panel
  4. CLICK Proceed to let the agent apply the plan, write code and tests, run them, and iterate until all checks pass
  • You'll see The agent extends the existing code in place, planning the change, writing code and tests, running them, and iterating on failures until all tests pass
  • Takeaway State an outcome and a check so the agent can run and verify its own work
  • Check Why must you define both a goal and a verification step when guiding an Antigravity agent?
  • Cost Still on the free For Individuals plan; usage draws down against basic weekly rate limits, so batch related changes into one task rather than many tiny ones.

5.11 Craft precise prompts and steer Claude efficiently

Claude Code follows a read‑plan‑act‑verify loop; providing concrete details and stepwise instructions helps it stay focused and produce accurate edits.

Do this first Run your first Claude Code task

Get better, faster results by being specific, breaking work into steps, and letting Claude explore before it edits

Tryclaude-code "1) parse blast_results.txt, 2) keep the top hit per query, 3) write results.csv, 4) generate evalue_histogram.png"

Paste the command into the Claude Code prompt box on the main screen and click Send. Watch that Claude only reads the specified files and stops after each step before proceeding to the next.

Being specific pays off: naming the exact file and lines (@utils.py#2-3) gets a precise, scoped answer instead of a broad scan — shown here in Claude Code's VS Code extension, an alternative to the terminal. Credit: docs.claude.com ↗
  1. Specify the request with concrete details, e.g., “fix the parser bug where rows with a missing e-value are silently dropped”.
  2. Divide complex work into numbered steps, such as 1) parse the BLAST output, 2) keep the top hit per query, 3) write a CSV and plot an e‑value histogram.
  3. Ask Claude to analyse before refactoring, then interrupt with Escape if it heads in the wrong direction.
  • You'll see The same task done two ways — a vague prompt that wanders and reads half the repo, and a specific one that lands the change in a couple of file reads
  • Takeaway Treat Claude like a capable colleague: say exactly what "done" looks like, let it read first, and stop it early if it drifts
  • Check How does breaking a complex task into numbered steps improve Claude Code’s results?
  • Cost Tighter prompts mean fewer tokens — vague asks like "improve this codebase" trigger broad scanning; specific asks keep usage (and your bill) down.

5.12 Run a Claude coding session and approve its edit

You ran your first task in the last lesson. This time, slow down and watch how it works. Claude Code is not a chatbot that prints an answer — it runs a loop: it reads, plans, acts with a tool, checks the result, and repeats until the job is done. Give it a small task and narrate the loop as it turns.

Execute a single agentic loop that reads, plans, acts and verifies code changes

Tryclaude "add a one-line docstring to the top function in utils.py and show me the diff"

In your project terminal, run the command above. When the edit proposal appears, first type /context to view the loaded files and the agent’s plan, then approve the change and watch the verification step.

  1. Open a terminal in any project folder and run claude with a tiny verifiable task
  2. Watch the agent read the file, propose an edit, and then pause for approval
  3. Enter /context to display the files and messages currently loaded by the agent
  4. Approve the suggested change using the approval prompt
  5. Observe the agent run verification steps and report the final result
  • You'll see A request moves from read to plan to act to verify, with a pause at the approval prompt
  • Takeaway Claude Code iterates through reading files, proposing edits, awaiting your consent, then confirming the outcome
  • Check What are the four stages you observe when running a small task with Claude Code in loop mode?

5.13 Craft precise prompts and guide Codex to iterate

Codex can accept additional artefacts such as images via the --image flag, using them as verification targets to steer focused edits.

Do this first Execute a Codex task from the terminal

Obtain focused code changes by defining clear objectives, providing verification targets, and steering the assistant through successive turns

TryFind and fix bugs in utils.py so that the failing tests in test_utils.py all pass, making only minimal, high‑confidence changes.

Paste this into the Codex prompt box on the main chat screen. After sending, watch the diff view – ensure Codex proposes only small edits that resolve the test failures without altering unrelated code.

Codex explores first, then plans, then acts — give it room to look around before asking for changes. Credit: github.com/openai/codex ↗
  1. SPECIFY the task and constraints in the prompt input, e.g., “Find and fix bugs with minimal, high‑confidence changes”.
  2. ATTACH a verification artefact such as a failing test or expected output using the image flag (-i/--image).
  3. ASK for an overview of the project first by typing “Explain this code base to me” into the prompt input.
  4. REQUEST the actual change after the exploration, refining the request in subsequent prompts as needed.
  • You'll see A concise change that meets the defined success criteria without unrelated modifications
  • Takeaway Define success explicitly and give a verifiable target so Codex can iterate toward it
  • Check How does attaching a failing test image to the Codex prompt guide its code changes?
  • Cost Scoped prompts and a clear "done" signal mean fewer model round-trips — less of your plan's usage per task.

5.14 Observe an agentic coding loop

You ran your first task last lesson. This time, slow down and watch how it works. Codex is not a chatbot that prints an answer — it runs a loop: it reads, plans, acts (an edit or a command), checks the result, and repeats until the job is done. The approval mode decides how often it stops to ask you first.

Watch a single Codex request move through read, plan, act and verify

Trycodex "add a one-line docstring to the top function in utils.py and show me the diff"

In your project terminal, start codex with the exact command above. Watch the approval dialog that appears before any edit is applied, and approve it to see the diff and verification step.

  1. Open a terminal in your project folder and run codex with a tiny verifiable task
  2. Watch Codex read the target file and then propose an edit
  3. Approve the suggested change in the approval prompt
  4. Observe Codex run its verification step and report the result
  • You'll see You watched a single request go read → plan → act → verify, and you approved at least one edit or command
  • Takeaway Codex operates as an iterative loop that reads, plans, asks for approval, applies changes and verifies before continuing
  • Check What effect does changing the approval mode have on how often Codex stops for your consent?

5.15 Steer autocomplete with comments and Tab

Copilot is an AI coding assistant you use inside your IDE — it watches your comments and code, then offers inline completions as you type. Not a separate app you launch; it lives within the editor environment.

Do this first Set up GitHub Copilot and accept its first suggestion

Produce the exact code you need by guiding inline suggestions with precise comments and function signatures

Try# Read a FASTA file of protein sequences, count amino-acid frequencies, and return a pandas DataFrame sorted by frequency

Type the comment, then start a def line below it — Copilot fills in the whole function body as ghost text.

Steer inline autocomplete, then accept with Tab (or reject with Escape) — Copilot suggests the next edit, and you keep only what you want. Credit: docs.github.com ↗
  1. Write a detailed comment that names the input, describes the operation, and states the output shape
  2. Enter the function signature (e.g. def count_amino_acids(path):) to trigger suggestions
  3. Press Tab to accept the suggested line or block
  4. Edit any unwanted suggestion by typing over it and adjust the comment if the suggestion drifts
  5. Press Escape to dismiss a suggestion you do not want
  • You'll see A complete function appears, built from your comment and signature, ready for you to accept piece by piece
  • Takeaway Precise comments and signatures let you control what autocomplete generates
  • Check What role does a detailed comment play in shaping Copilot’s inline suggestion after you type a function signature?
  • Cost Inline completions are unlimited on Pro and capped at 2,000/month on Free — and completions never spend AI Credits, so iterating costs nothing on the credit meter.

5.16 Use tab autocomplete and file‑aware chat while coding

Cursor combines tab‑based inline completion with a chat sidebar that can read your project files to answer contextual questions.

Do this first Make your first AI‑powered code change

Accelerate writing code with Tab completion and get context‑aware answers from the chat sidebar

TryStart typing `def average_expression(` in analysis.py and let Tab suggest the rest. Then ask the chat: "What does the function I just wrote do, and how would I call it on a column named TP53?"

Tab completion fires as you type — press Tab to accept a suggestion. The chat sidebar already knows your open files, so you can ask about your code, not generic examples.

Cursor's three panes — sidebar, file-aware chat, and a reviewable diff. Credit: cursor.com ↗
  1. Start typing a function and watch Tab completion suggest whole lines and functions; press Tab to accept or continue typing to ignore it
  2. Open the chat sidebar and ask a question about your project in plain English, letting Cursor read your files to provide a grounded reply
  3. Use chat for understanding and targeted edits, and use Tab for moment‑to‑moment typing
  • You'll see Autocomplete suggestions appear as you type and the chat returns answers that reference your project's actual files
  • Takeaway Tab speeds up line‑by‑line typing while the file‑aware chat lets you ask precise questions about your code
  • Check How does opening the chat sidebar while typing a function let Cursor provide both autocomplete and file‑aware answers?
  • Cost Both Tab completion and chat draw on your plan's included usage. On Hobby these are limited; Pro ($20/mo) adds generous included usage so you rarely think about it.

5.17 Connect any AI coding model to opencode

opencode lets you choose a model from providers like Anthropic, OpenAI, Google, Mistral or Ollama via its Model Picker UI.

Do this first Run a script with a single command

Link a provider key or existing subscription so opencode can run code generation tasks.

Tryopencode "Read all CSV files in ./data/, merge them, remove duplicates by sample_id, fill missing numeric values with column medians, and save the result as cleaned_data.csv"

Once a model is connected, hand opencode a multi-step job like this and let it write and run the script.
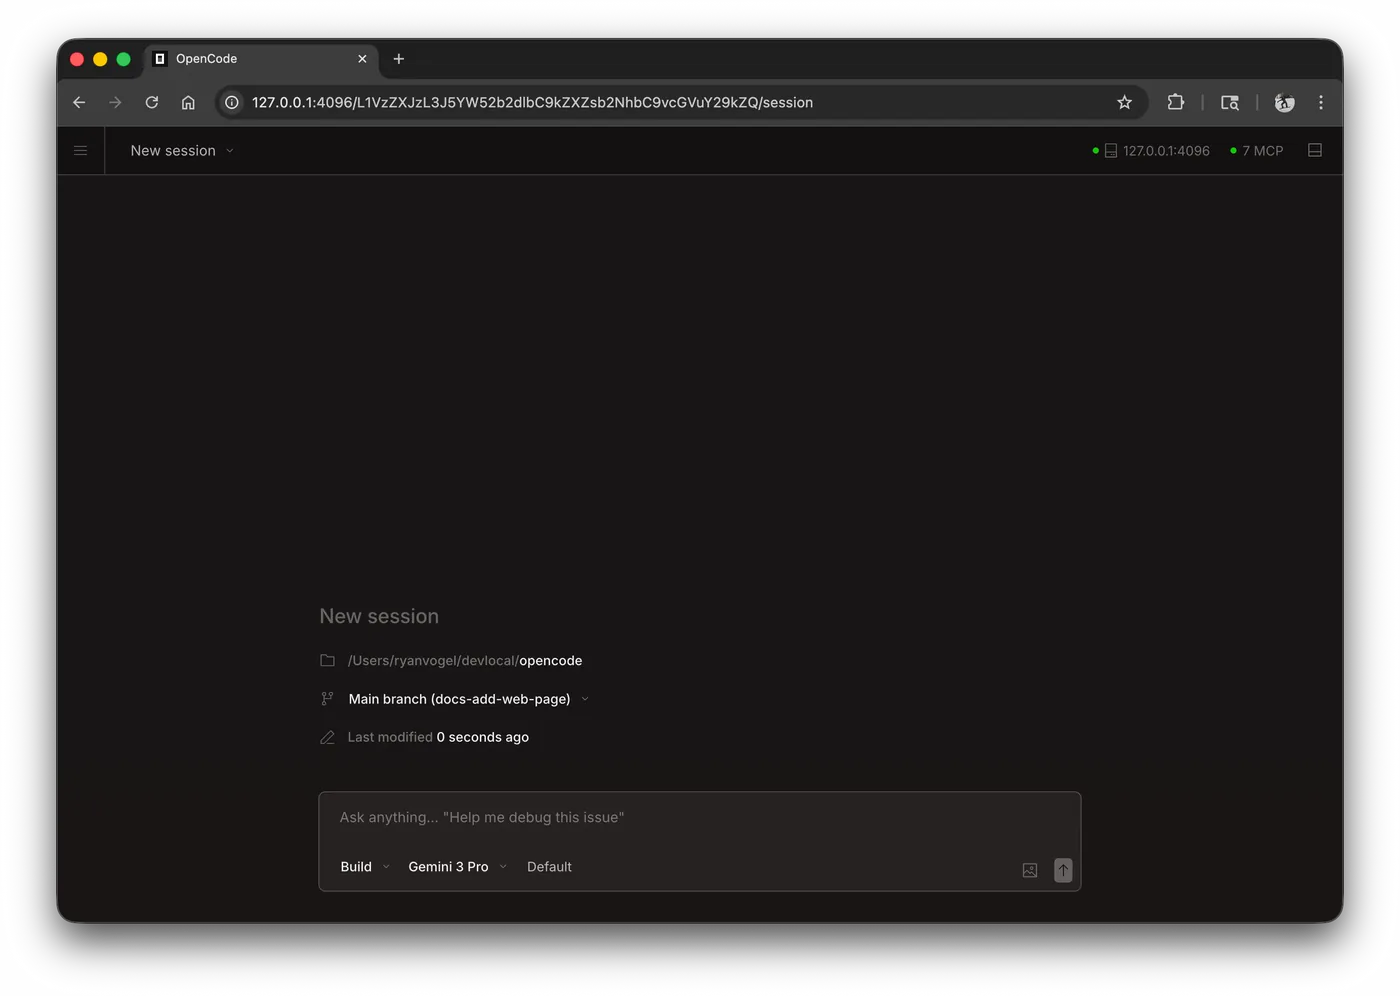
opencode's New Session screen (web interface) showing the project path, git branch, a prompt box, a 'Build' mode selector, and a model picker set to 'Gemini 3 Pro'
  1. 1 provider dropdown select AI provider for code generation
  2. 2 default selection label indicates currently selected model

Best viewed on desktop — tap Enlarge to read the numbered controls.

opencode's model picker — shown here in the web interface, the same picker as the TUI — lets you swap the connected provider per session (Gemini 3 Pro here; Anthropic, OpenAI, or a local Ollama model elsewhere). Credit: opencode.ai/docs/web/ ↗
  1. Open the Model Picker in the New Session screen and choose a provider such as Anthropic, OpenAI, Google, Mistral or Ollama.
  2. Enter your API key in the API Key field that appears for the selected provider.
  3. If you have a GitHub Copilot or ChatGPT Plus/Pro subscription, click Log in with Subscription and authorise the connection.
  4. Select the specific model you want from the dropdown list and confirm the selection.
  • You'll see opencode executing the task using the selected model and producing an output file.
  • Takeaway You control which model powers opencode – any of the supported providers, a local Ollama instance, or a subscription you already own
  • Check What must you select in the Model Picker before opencode can run a task using an external provider’s model?
  • Cost BYOK means token costs land directly on your provider bill — monitor usage or cap spending to avoid surprises. Reusing a Copilot or ChatGPT subscription means no new bill at all.

5.18 Refine a script using Cascade conversations

Cascade (Windsurf) applies edits based on conversational prompts; precise location details ensure targeted modifications without restarting the whole task.

Do this first Create a Python script from an English description

Drive Cascade conversationally to update your code by describing precise, located changes instead of restarting

TryAdd a command-line argument for the input filename so the script isn't hard-coded. Then filter out any hit with an e-value above 1e-5, and print how many queries were kept versus dropped.

Send this as a follow-up in the same Cascade conversation — it keeps iterating on the code it already wrote instead of starting over.

Cascade is a conversation, not a one-shot: it asks clarifying questions and offers options mid-task, so you refine the plan together before it writes code. Credit: docs.devin.ai ↗
  1. Specify the exact change and its location in your request
  2. Group related tweaks into a single message and let Cascade apply them together
  3. Review the suggested edits, accept them, and re‑run the script
  4. If feedback is vague, restate the request more precisely before sending another prompt
  • You'll see Your existing script is updated in place with the requested modifications while preserving earlier work
  • Takeaway You steer Cascade like a teammate by describing outcomes precisely and iterating in small steps
  • Check Why is it important to specify the exact location of a change when refining code with Cascade?
  • Cost Tab completions and inline edits are unlimited and free on every plan; each Cascade task draws on your agent quota, so batch related changes to make them count.

5.19 Run Aider with automatic linting and testing

Aider can run linting and test suites after every generated change, committing only when those checks pass.

Do this first Iterate script via chat and revert edits

Verify each change Aider makes by having it lint and test the code before committing

TryAdd a small test that checks the mean is calculated correctly, then run it.

Ask for tests as part of your request — Aider can automatically lint and test the code after each change and fix problems it finds.

  1. Start Aider with the --lint and --test options so it runs those checks after every edit
  2. Observe the lint and test output; if errors appear, let Aider suggest a fix
  3. Accept Aider’s proposed fix and allow it to commit the corrected code
  • You'll see Aider modifies the file, runs lint and tests, and creates a Git commit only when they pass
  • Takeaway Each commit produced by Aider is validated by linting and testing rather than being an unchecked guess
  • Check What happens when you start Aider with the --lint and --test flags before each edit?
  • Cost Still only LLM token cost; the lint and test steps run locally on your machine and add nothing beyond the model calls Aider already makes.

5.20 Run an AI coding assistant in a separate Git worktree

Antigravity lets you run agents in isolated Git worktrees or directly on the current branch, providing a safety control for experimental edits.

Do this first Guide an AI coding assistant to plan, execute and verify code changes

Choose where an agent runs so experimental work stays isolated from your real branch

TryCreate a new Git worktree named `exp-worktree` from `main`, then ask the agent to add a Python function `def factorial(n): …` that computes n! and write a pytest test for it. Run the tests in this isolated worktree.

In the new-agent screen, open the Local / New Worktree dropdown, choose New Worktree, paste the prompt into the input box and send. Verify the agent creates the exp-worktree folder and runs the tests there before any changes appear on your main branch.
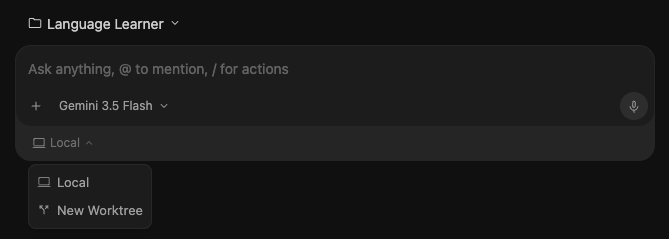
Antigravity's new-conversation setup showing the Local / New Worktree dropdown open, with 'New Worktree' highlighted as the selected option
  1. 1 Model selector which model answers
  2. 2 Create new worktree adds a git worktree for isolated changes

Best viewed on desktop — tap Enlarge to read the numbered controls.

Native Git worktrees can be created easily when starting a new conversation. Credit: antigravity.google/blog ↗
  1. Open the Local / New Worktree dropdown on the new‑agent screen
  2. Select New Worktree to run the agent in an isolated Git worktree
  3. Select Local to run the agent on the current branch for trusted edits
  • You'll see An agent running against an isolated Git worktree, its changes kept separate from your main branch until you choose to keep them
  • Takeaway Treat the worktree‑vs‑local switch as a safety control: isolate experimental agents, run trusted ones locally, and review before merging
  • Check How does selecting “New Worktree” versus “Local” affect where an Antigravity agent applies its changes?
  • Cost Choosing where the agent runs costs nothing extra — it's a setting on the free plan. The saving is in safety: no half-finished agent work landing on main.

5.21 Create a detailed edit plan with Claude

Claude Code’s plan mode lets you generate and review a step‑by‑step edit plan prior to any file modifications.

Do this first Craft precise prompts and steer Claude efficiently

Generate and approve a step‑by‑step plan before any code is modified

Tryclaude --permission-mode plan "Split my single-file RNA-seq script into modules and add tests"

In the claude-code interface, enter the line above in the prompt box; verify the status bar shows plan mode before sending. Claude will return a step‑by‑step plan—ensure no files are edited until you explicitly approve.

  1. Press Shift+Tab to cycle permission modes until the status bar shows plan mode
  2. Describe the desired change to Claude, for example “Split my single‑file RNA‑seq script into modules and add tests”
  3. Review the step‑by‑step plan that Claude produces
  4. Choose how to continue by pressing Shift+Tab again to exit plan mode or approve edits
  • You'll see A written plan outlining each change you can review and adjust before edits occur
  • Takeaway Plan first by entering plan mode, then let Claude implement the approved approach
  • Check What does entering plan mode with Shift+Tab enable you to do before Claude makes any code changes?
  • Cost Plan mode prevents expensive re-work: Claude proposes the approach up front, so you catch a wrong direction before it writes (and re-writes) files.

5.22 Set Codex approval mode

Codex’s permission settings (Read‑only, Auto, Full Access) control how much autonomy it has before requiring user approval for edits or actions.

Do this first Craft precise prompts and guide Codex to iterate

Choose how much Codex can do on its own before it edits files or runs commands

Try/permissions read-only Create a new module called `utils.py` that defines a function `load_csv(path: str) -> pd.DataFrame`. The function should read the CSV at *path* using pandas, infer column types, and raise a clear error if the file does not exist.

In the Codex CLI, paste the whole block exactly as shown. After submitting, watch for Codex’s approval prompts for each file creation or edit; you must confirm before it writes utils.py.
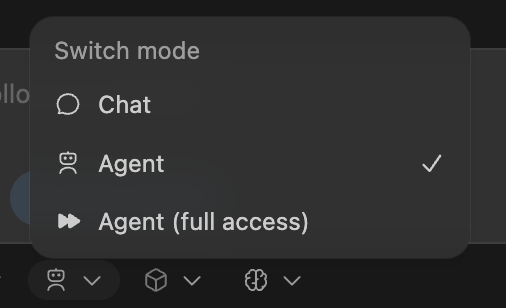
Codex IDE extension "Switch mode" dropdown showing three options: Chat, Agent (checked), and Agent (full access)
  1. 1 Mode toggle changes IDE operation context
  2. 2 Full‑access agent enables unrestricted tool actions

Best viewed on desktop — tap Enlarge to read the numbered controls.

The IDE offers the same approval-mode range as the CLI — Chat, Agent, or Agent (full access). Credit: developers.openai.com/codex/sandboxing ↗
  1. Open the terminal and run /permissions to select Read-only, Auto, or Full Access
  2. Observe the current policy displayed as untrusted, on‑request, or never, with the sandbox label workspace-write indicating edit scope
  3. In the IDE, click the Switch mode dropdown and choose Chat, Agent, or Agent (full access) to align the UI with your CLI selection
  • You'll see The same task run two ways — approving each step in a read‑only / on‑request mode, then hands‑off in a fuller mode once you trust it
  • Takeaway Match the approval mode to your trust in the task — tight when it's risky, loose when you just want it done
  • Check How does the /permissions command influence Codex’s ability to read, write, or execute commands during a session?
  • Cost Approval mode doesn't change token cost — it changes how often you're in the loop; looser modes finish with fewer interruptions.

5.23 Explain errors and refactor code with Copilot Chat

Copilot is an AI assistant you use inside your code editor — it lives in the sidebar chat panel and interacts with the files you’re already working on. Not a separate IDE or standalone app you launch.

Do this first Steer autocomplete with comments and Tab

Use the chat panel to diagnose problems and improve code without leaving the editor

TryWhy does this code throw a KeyError, and how do I fix it? Then refactor this loop into a single pandas operation.

Open the Copilot Chat panel, paste or select the relevant code, and ask in plain language — in any language you like.

The Copilot Chat panel is your in-editor tutor: attach a file or selection, type /explain (or ask in plain language) to understand an error or get a refactor — without leaving VS Code. Credit: github.blog ↗
  1. Open the Chat panel from the Copilot icon
  2. Select a block of code so the chat has context
  3. Ask the assistant to explain an error or suggest a refactor
  4. Review the plain‑language response and copy the provided code changes into your file
  5. Continue the conversation with follow‑up questions, simpler versions or added comments
  • You'll see A plain‑language explanation of the error together with a cleaned‑up rewrite you can insert directly into your file
  • Takeaway Chat acts as an in‑editor tutor that explains, debugs and refactors code
  • Check What advantage does using Copilot Chat to explain an error provide over reading the traceback yourself?
  • Cost Chat, agents, code review, and CLI features DO consume AI Credits (unlike completions). The Free plan includes limited chat usage; Pro ($10/mo) adds $15/mo in GitHub AI Credits.

5.24 Create a multi‑file feature using Agent mode

Cursor’s Agent mode lets a single English prompt produce coordinated changes spanning several project files.

Do this first Use tab autocomplete and file‑aware chat while coding

Generate a complete, runnable feature across several files by prompting the Agent

TryI have a CSV called expression_data.csv with gene names in column A and values for 6 samples in B–G. Write a Python script that loads it with pandas, drops any gene with >20% missing values, and plots a clustered heatmap with seaborn.

Switch the chat to Agent mode and send this. The agent reads your project, writes the files, and plans the steps itself — you review the proposed changes before they apply.

Agent mode in the chat sidebar reads your project and writes changes across multiple files, then stops at a reviewable diff — accept or reject before anything touches your folder. Credit: cursor.com/docs ↗
  1. Enable Agent mode in the chat sidebar
  2. Enter your feature description as a prompt and submit it
  3. Inspect the generated diff and click Review to accept the changes
  • You'll see A finished script with imports, data cleaning and a clustered heatmap spread over the required files
  • Takeaway Agent mode converts a concise English request into coordinated code changes across multiple files
  • Check What does enabling Agent mode in Cursor’s chat sidebar allow you to generate across multiple files?
  • Cost Agent runs consume included usage by request; Hobby has limited Agent requests, so spend them on real features. Pro includes generous usage for Agent and Composer.

5.25 Switch between plan and build modes to control code changes

opencode offers a plan mode for read‑only analysis and a build mode that applies the approved edits, switched with Tab.

Do this first Connect any AI coding model to opencode

Use 'plan' mode to have the agent analyse and propose an approach before it touches a single file — then switch to 'build' to execute

TryExplain how authentication flows through this codebase and outline the safest way to add password reset — don't change any files yet.

Start in plan mode for this. Press Tab to toggle to build mode once you're happy with the plan.

  1. Press Tab to toggle to plan mode
  2. Observe the status bar at the bottom of the TUI showing plan mode and read‑only analysis
  3. Provide feedback in plain language to refine the plan
  4. Press Tab again to switch to build mode
  5. Confirm that code changes are applied after switching to build
  • You'll see A read‑only walkthrough of the codebase and a proposed approach in plan mode, then real edits once you toggle to build
  • Takeaway Think before you act: plan mode reads and proposes safely, build mode executes — one Tab apart
  • Check How does toggling between plan and build modes affect when opencode actually writes code to your files?
  • Cost Both modes use your model's tokens like any other turn — but planning first usually saves money by avoiding wrong edits you'd have to undo.

5.26 Apply tab completions and inline edits

Windsurf’s tab completion and inline edit features let you make quick local changes without consuming AI quota or launching a full agent session.

Do this first Refine a script using Cascade conversations

Make quick code changes using Tab autocomplete and inline edits without consuming your agent quota

TryAdd a docstring to this function: def compute_area(radius): return 3.14159 * radius ** 2

In the windsurf editor, highlight the function definition and type the prompt above; an inline edit will appear. Accept the suggestion with Tab and verify the docstring is inserted without opening a Cascade task.
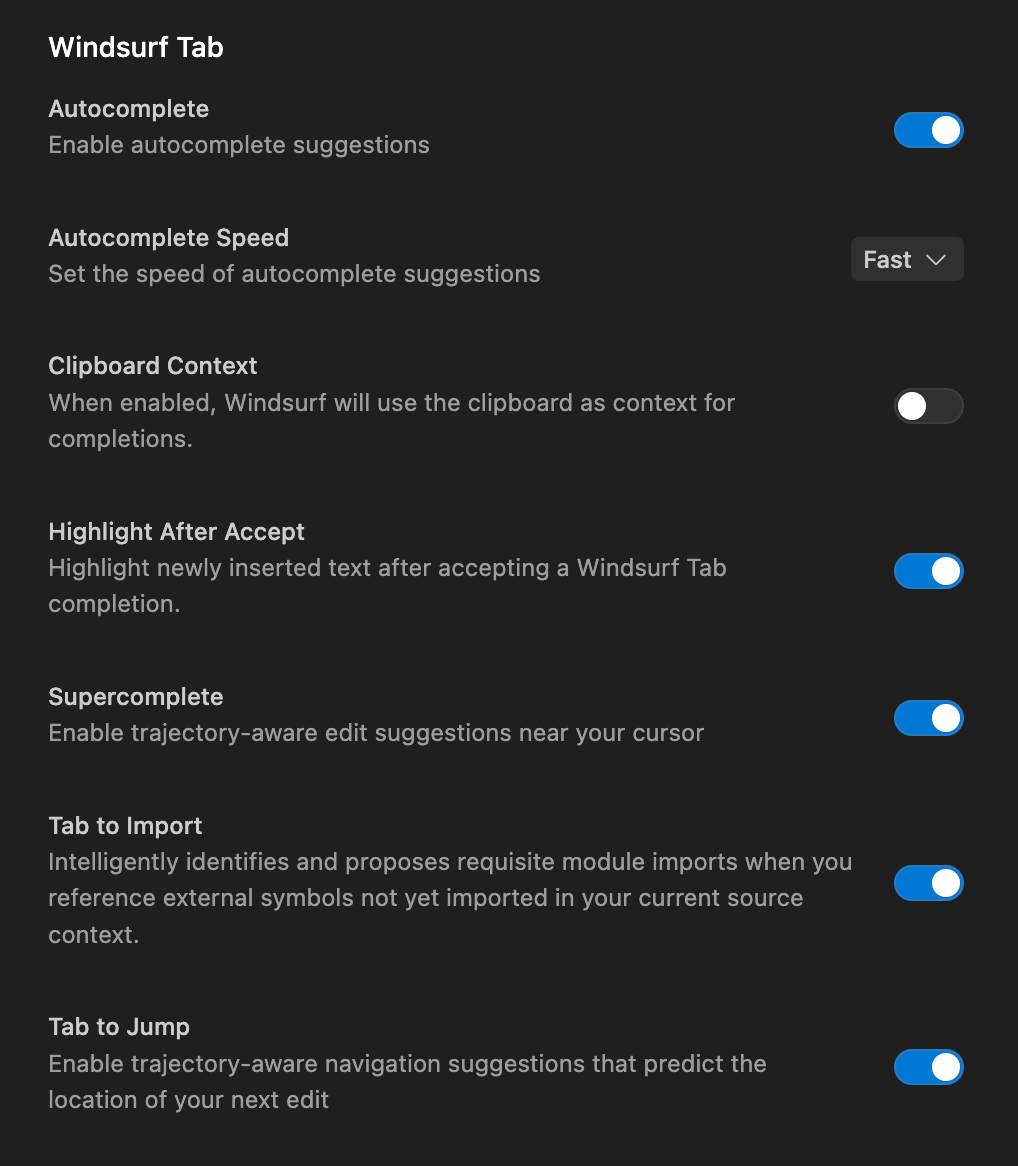
Devin Desktop's 'Windsurf Tab' settings panel with toggles for Autocomplete, Autocomplete Speed, Clipboard Context, Highlight After Accept, Supercomplete, Tab to Import, and Tab to Jump
  1. 1 Autocomplete speed how eagerly it suggests
  2. 2 Clipboard as context it can read what you copied
  3. 3 Supercomplete edits near the cursor, not just the line
  4. 4 Tab to Import adds the missing import for you
  5. 5 Tab to Jump jumps to the next likely edit

Best viewed on desktop — tap Enlarge to read the numbered controls.

Windsurf Tab is the free, unlimited autocomplete: as you type it suggests the next lines (press Tab to accept), with extras like Supercomplete and Tab-to-Jump — none of it touching your agent quota (screenshot shows pre-rename Windsurf branding). Credit: docs.devin.ai ↗
  1. Type until a suggestion appears and press Tab to insert the completion
  2. Select the code you want to modify and choose Inline edit, then describe the change
  3. Confirm the edit by pressing Enter to apply it in place
  • You'll see The code updates instantly after pressing Tab or confirming an inline edit, with no quota usage shown
  • Takeaway Small, local modifications can be done for free using tab completions and inline edits rather than invoking the agent
  • Check What benefit do tab completions and inline edits give you compared to invoking the Cascade agent directly?
  • Cost Both Tab completions and inline edits are unlimited and free on every plan, so this is the cheapest way to make small changes.

5.27 Choose the best LLM for your task and budget

Aider supports selecting different LLM providers via the --model flag, allowing side‑by‑side comparison of accuracy, speed and cost against a public leaderboard.

Do this first Run Aider with automatic linting and testing

Run Aider with the most suitable model for accuracy, speed and cost

Tryaider --model ollama-mistral merge.py "Write a Python script that reads data.csv, groups rows by the 'category' column, and outputs each group's total of the numeric 'value' field."

In your terminal, paste the command exactly as shown. After the assistant finishes, note the token usage displayed; then rerun the same prompt with --model gpt-4.1 to compare cost versus accuracy.

Aider's own polyglot benchmark — 225 Exercism exercises across 6 languages — ranks each model's success rate, so you can pick a cheaper model that still clears the bar for your task. Credit: aider.chat ↗
  1. Run Aider with a specific provider by adding the --model flag, e.g. aider --model sonnet for Claude Sonnet
  2. Execute Aider against free local models via Ollama when you want zero token cost
  3. Open the public model leaderboard and compare each model’s success rate and price to decide which one meets your needs
  • You'll see Aider completes the same edit using different models while you compare their success rates on the leaderboard
  • Takeaway Match the model to the job and let the benchmark guide cost‑effective choices
  • Check How can you compare model performance using Aider’s --model flag and the public leaderboard?
  • Cost Aider itself is free and open-source (Apache 2.0) — you pay only your model provider's per-token costs. Aider reports the token count and dollar cost of each interaction in the terminal (use /tokens to see the running total for the current context), so you can watch spend live regardless of which model you choose.

5.28 Run Antigravity agents from the terminal

The Antigravity CLI includes a colour‑scheme selector to adjust the terminal UI appearance before entering a task description.

Do this first Give a coding task to an Antigravity agent

Run Antigravity agents from the terminal using the CLI

Tryadd a greeting function

Launch the Antigravity CLI, pick a colour scheme when prompted, then type a task. The agent replies with the change as a code diff right in the terminal.
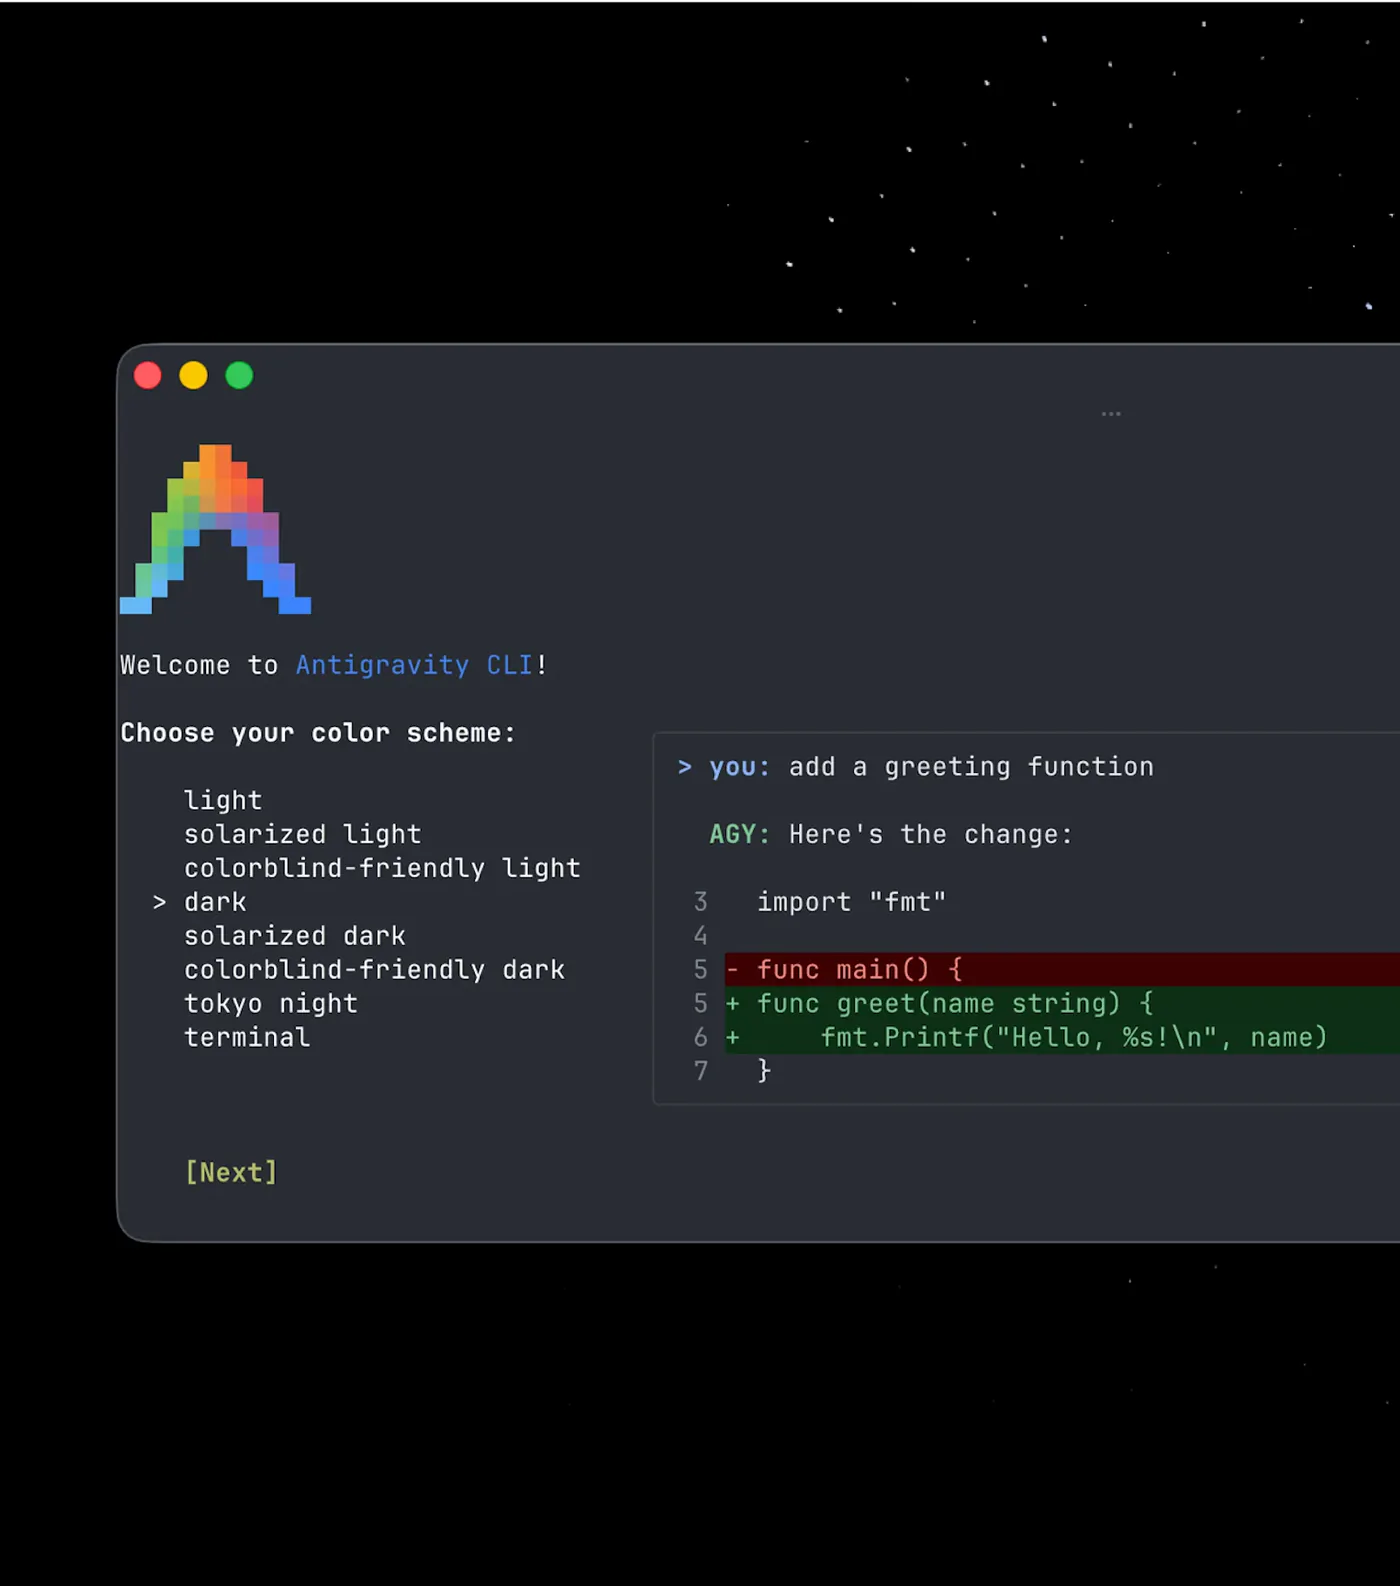
The Antigravity CLI terminal: a 'Welcome to Antigravity CLI!' banner with a colour-scheme picker (light, dark, tokyo night and others) and a live exchange — 'you: add a greeting function' / 'AGY: Here's the change' — showing a code diff
  1. 1 color scheme option select light theme
  2. 2 continue button proceed after entering task

Best viewed on desktop — tap Enlarge to read the numbered controls.

The Antigravity CLI: choose a colour scheme, type a task ('add a greeting function'), and the agent (AGY) returns the edit as a reviewable diff. Credit: antigravity.google ↗
  1. Launch Antigravity CLI
  2. Select a colour scheme with the colour‑scheme picker
  3. Enter a task description and press Enter
  • You'll see A terminal session where you type a plain‑English task and the agent replies with a reviewable code diff
  • Takeaway The same agents can be accessed via a CLI, SDK or managed service beyond the desktop app
  • Check What does the colour‑scheme picker let you customise when running Antigravity agents from the CLI?
  • Cost The CLI runs on the same free For Individuals plan and the same weekly rate limits — no separate cost for using the terminal instead of the app.

5.29 Create persistent project memory for Claude

CLAUDE.md is a project‑level configuration file that stores coding standards and commands, automatically loaded by Claude at the start of each session.

Do this first Create a detailed edit plan with Claude

Provide Claude with lasting instructions so it follows your standards automatically each session

TryCreate or edit the file **CLAUDE.md** at the root of your project with these persistent instructions: - Use pandas for data manipulation and seaborn for visualisation. - Run tests with `pytest -q` before committing. - Follow PEP8 naming conventions and include type hints. - Keep this file under 200 lines. Save the file, then start a new **claude-code** session to see the settings take effect.

Open the project’s file explorer, create/edit CLAUDE.md, paste the text above, save, and then launch a fresh claude-code session. Verify that Claude now uses pandas, seaborn, and runs pytest -q automatically.

  1. Create a CLAUDE.md file in the project root and add coding standards, favourite libraries and test‑run instructions
  2. Edit the file so it contains only essential facts and keep its length under ~200 lines
  3. Save the file; Claude will load its contents at the start of every session
  • You'll see Claude uses your test command and preferred libraries without additional prompts
  • Takeaway Write the rules once in CLAUDE.md and every future session starts already knowing your project
  • Check How does creating a CLAUDE.md file affect Claude’s behaviour in subsequent sessions?
  • Cost CLAUDE.md is loaded every session, so trimming it to essentials keeps your base context (and per-message cost) small.

5.30 Define project-wide instructions for Codex using AGENTS.md

Codex reads AGENTS.md files placed at repository root, subfolders, or in a user home directory to apply standing instructions with overriding scopes.

Do this first Set Codex approval mode

Codex follows your project's standing instructions automatically

TryCreate an `AGENTS.md` file in the project root containing these standing instructions: - Always run `npm test` after changing any JavaScript file. - Run the linter before opening a pull request. - Use single‑quote strings for all JavaScript code. Save the file and commit it.

In the file explorer, open or create AGENTS.md at the repository root, paste the text above, then click Save. Verify that Codex shows a confirmation that it has read the new AGENTS.md before your next command.

  1. Create an AGENTS.md file in your repository root and add standing instructions such as “Always run npm test after changing JavaScript”
  2. Add additional AGENTS.md files in sub‑folders when you need rules that override the broader ones
  3. Place a personal ~/.codex/AGENTS.md file for organisation‑wide defaults that apply to all projects
  • You'll see Codex runs the test and lint commands and respects your conventions without being reminded each session
  • Takeaway Write the project's rules once in AGENTS.md and Codex applies them on every task, in every session
  • Check What hierarchy of AGENTS.md files lets you define both global and folder‑specific instructions for Codex?
  • Cost One-time setup — the rules ride along every session at negligible cost and save you repeating yourself.

5.31 Use Copilot Agent Mode for multi‑file tasks

Copilot is an AI coding assistant you use in your IDE — it helps you write, refactor, and test code directly within the editor. Not a separate terminal program; it lives inside the development environment as a chat-based extension.

Do this first Explain errors and refactor code with Copilot Chat

Hand Copilot a longer, multi‑step task and let it plan, write, and iterate across several files

TrySplit my analysis script into a reusable data-loading module and a plotting module, add type hints throughout, and write a quick test for the loader.

Switch the chat picker to Agent mode, then send the task. Copilot proposes changes across multiple files for you to review.
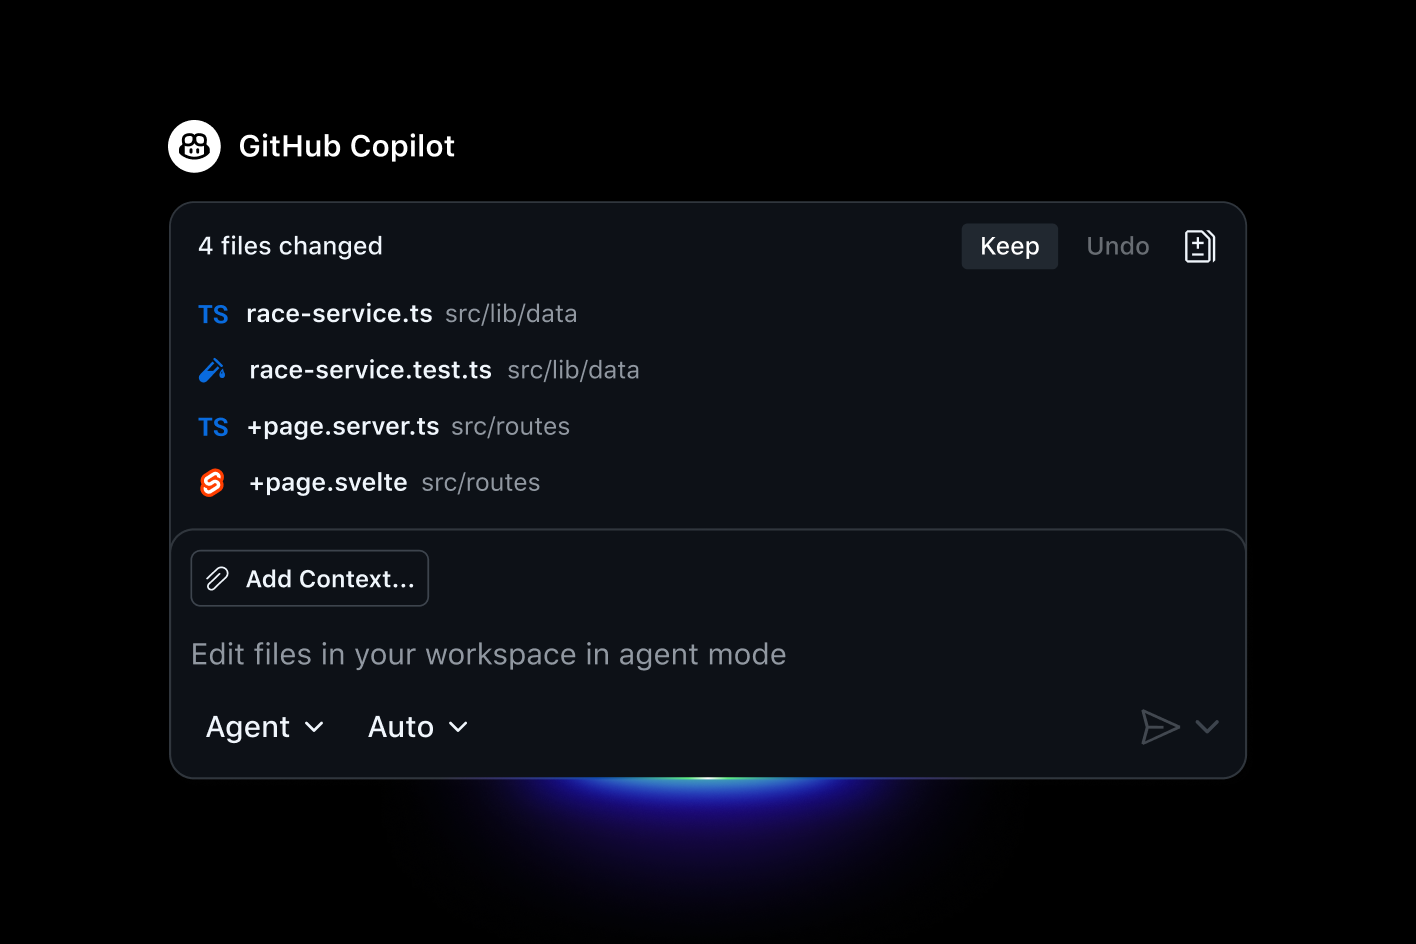
GitHub Copilot Agent Mode showing a '4 files changed' summary with Keep and Undo buttons and an Agent / Auto mode picker
  1. 1 button accept changes for a file
  2. 2 dropdown switches from Agent to automatic mode

Best viewed on desktop — tap Enlarge to read the numbered controls.

Agent Mode edits across multiple files at once — here it changed 4 files and offers Keep or Undo so you review every edit before accepting. Credit: github.com/features/copilot ↗
  1. Select the mode dropdown in the Copilot Chat panel and choose Agent
  2. Submit a task that spans several files
  3. Review the listed files it changed, then click Keep to accept or Undo to discard each file
  • You'll see Copilot reorganising your code across several files at once, with a ‘files changed’ summary and Keep / Undo controls to review its work
  • Takeaway Agent Mode tackles work too big for autocomplete — but you stay the reviewer, keeping or undoing each change
  • Check What does selecting Agent mode in Copilot Chat enable you to do that autocomplete cannot?
  • Cost Agent Mode consumes AI Credits. Free includes limited agent usage; Pro ($10/mo) comes with $15/mo in AI Credits, Pro+ ($39/mo) adds premium models plus $70/mo in Credits. A deep multi-file run costs more than a single chat.

5.32 Run code and let the AI fix errors

Cursor can ingest an exception traceback from the chat, run the code in Agent mode, and propose fixes that you review and accept.

Do this first Create a multi‑file feature using Agent mode

Execute a script, paste any traceback into Cursor’s chat and have the agent automatically diagnose and repair the problem

TryI ran the script and got this error: `ModuleNotFoundError: No module named 'seaborn'`. Fix it and make the script run end to end.

Paste an error message straight into the chat. In Agent mode Cursor can run the code itself and iterate until it works — installing what's missing and re-running.

The agent reads a real error you paste in and explains precisely what to fix — the paste-error, agent-diagnoses loop this lesson teaches. Credit: youtube.com/@cursor_ai ↗
  1. Run your script in the terminal or IDE
  2. If an exception occurs, copy the full traceback
  3. Open the Cursor chat window and paste the traceback
  4. Switch to Agent mode if not already active
  5. Ask the agent to run the code, see the failure, and iterate
  6. Review each change the agent proposes and accept the ones that resolve the issue
  • You'll see The script runs without errors and displays its intended output after the agent applies the suggested fixes
  • Takeaway Paste the error and let the agent run, diagnose, and fix – the iterate‑to‑green loop replaces manual debugging
  • Check How does pasting a traceback into Cursor’s chat let the AI fix the error automatically?
  • Cost Each fix-and-rerun is an Agent request against your included usage — batching the error and the goal into one message (as above) spends fewer of them.

5.33 Run several agents at once

opencode’s Multi‑session parallelism option enables multiple agents to work concurrently on separate tasks within the same project.

Do this first Switch between plan and build modes to control code changes

Split a big job across multiple agents working the same project in parallel so independent subtasks finish at the same time

TrySession A: write unit tests for the parsing module. Session B: update the README and fix the broken links.

Start two separate opencode sessions on the same project and give each its own focused subtask.

  1. Activate Multi‑session parallelism in the project settings
  2. Create a new session and assign it a narrow, independent task such as testing
  3. Create another session and assign it a different narrow, independent task such as documentation
  • You'll see Two agents progressing on separate parts of the same project simultaneously, each with full code understanding
  • Takeaway opencode scales sideways: fan independent subtasks out to parallel agents instead of waiting on one
  • Check What setting lets opencode run several independent agents on different subtasks at the same time?
  • Cost Each running session consumes your model's tokens independently — two agents cost roughly twice one, so parallelise jobs that are genuinely independent.

5.34 Fix errors fast with Cascade

Windsurf is an AI coding assistant you run on your desktop — it watches your editor, reads the Problems panel and lets you push issues to Cascade or invoke Explain-and-Fix without leaving the code view. Not a terminal tool you type commands into.

Do this first Apply tab completions and inline edits

Turn an error into a fix without leaving the editor

TryIn the editor, open the **Problems** panel and click **Send to Cascade** to push all listed errors into the Cascade conversation.

Open the Problems side panel, then press the Send to Cascade button; verify that the error list appears in the Cascade chat window before proceeding.

Explain and Fix: select an error in the editor and Cascade explains what went wrong and proposes a fix right there — no need to copy the message out. Credit: docs.devin.ai/desktop/cascade/cascade ↗
  1. Open the editor's Problems panel
  2. Click Send to Cascade to push all listed issues into the agent conversation
  3. Hover or select an error and press Explain and Fix (⇧⌘.) to get an inline explanation and fix suggestion
  4. Review the proposed change and accept it
  • You'll see Errors from the Problems panel appear in Cascade and single errors are explained and fixed inline before you accept them
  • Takeaway You never have to copy an error message out of the editor – send the whole panel or use Explain‑and‑Fix on a single issue
  • Check How does the “Explain and Fix” shortcut let you address a single error without leaving your editor?
  • Cost Reading and explaining errors happens inside a normal Cascade task, so it draws on your agent quota like any other task; the Free plan covers light use.

5.35 Refactor multiple files together using Aider

Aider builds a code map of callers and definitions across the project, enabling coordinated edits with each change committed individually via Git.

Do this first Choose the best LLM for your task and budget

Apply coordinated changes across a whole project while keeping each edit versioned in Git

TryMove the column-parsing logic into a helpers.py module and update analysis.py to import it.

Start Aider with more than one file — e.g. aider --model sonnet analysis.py helpers.py — and ask for a change that spans both.

  1. Run aider from the terminal, passing all target files or directories as arguments
  2. Observe the code map that Aider builds to understand relationships between callers and definitions
  3. Instruct Aider to perform the desired refactor; it will edit each affected file and stage the changes
  4. Commit each coherent set of edits automatically using the built‑in Git integration
  • You'll see Consistent modifications appear in several source files and each change is recorded as an individual Git commit
  • Takeaway Aider can map your codebase and edit many related files in one session while preserving a full Git history
  • Check What does Aider’s code map show before you request a multi‑file refactor?
  • Cost Larger context (more files, the codebase map) means more tokens per request — another reason to pick an economical model from the leaderboard for routine work.

5.36 Spawn and monitor several agents together

Antigravity’s Manager Surface provides a UI to launch and monitor several agents in parallel, assigning each an independent task.

Do this first Guide an AI coding assistant to plan, execute and verify code changes

Run multiple agents in parallel from the Manager Surface

TryAgent 1: refactor this analysis script into modules with type hints. Agent 2: write pytest tests for the normalisation step. Run both now.

Open the Manager Surface, spawn two agents on these two independent tasks, and watch them work side by side.

The Manager Surface: spawn and watch multiple agents working in parallel, each in its own workspace. Credit: antigravity.google/blog (Introducing Google Antigravity, embedded video)
  1. Open the Manager Surface
  2. Assign each agent an independent task
  3. Split a large job into subagents when the work naturally divides
  • You'll see Two or more agents running concurrently in the Manager Surface, each progressing on its own task
  • Takeaway The Manager Surface lets you orchestrate many agents at once instead of handling them one by one
  • Check How does the Manager Surface help you orchestrate multiple Antigravity agents simultaneously?
  • Cost Parallel agents draw from the same weekly rate-limit pool on the free plan, so they finish a multi-part job faster but don't make it cheaper — for heavy parallel use, Google AI Pro raises the limits (see antigravity.google/pricing for current plan pricing).

5.37 Control Claude sessions with slash commands

Claude Code supports slash commands like /clear, /rewind, /compact and others to manage session context, usage, and permissions.

Do this first Create persistent project memory for Claude

Drive a session with slash commands and keep the context window small so Claude stays fast and cheap.

Try/clear Create a new file utils.py with a recursive function factorial(n) that returns n!. Then run a test checking that factorial(5) equals 120.

Enter the text in the claude-code chat input and hit Enter. After sending, use /usage to verify the token count stays low and the context window only contains this task.

What actually fills the context window and when — CLAUDE.md loads in full every request, Skills and MCP servers load lazily, subagents and hooks stay outside it entirely. Credit: docs.claude.com ↗
  1. Open the command palette by typing / to view available commands such as /help, /clear, /resume, and /rewind.
  2. Check the current context with /context and token usage with /usage.
  3. Clear stale context between unrelated tasks using /clear.
  4. Summarise relevant information while preserving important details with /compact.
  5. Navigate command history with , autocomplete commands with Tab, and cycle permission modes with Shift+Tab.
  • You'll see A session you steer deliberately — clearing between tasks, rewinding a bad change, and keeping the context lean.
  • Takeaway A few slash commands — /clear, /rewind, /compact, /usage — keep long sessions fast, recoverable, and affordable
  • Check Which slash command would you use to clear stale context between unrelated Claude sessions?
  • Cost /clear and /compact directly cut token use; /usage shows where your tokens go (skills, subagents, MCP servers).

5.38 Choose the right Codex model for your task

Codex allows changing models on the fly via the /model command or -m flag, selecting between options such as gpt‑5.5 and gpt‑5.4‑mini.

Do this first Define project-wide instructions for Codex using AGENTS.md

Pick the Codex model that matches speed, cost and capability needs

Trycodex -m gpt-5.4-mini refactor.py Rename all functions in this file to snake_case and ensure imports still work.

In a terminal, run the codex -m gpt-5.4-mini refactor.py command to start a session with the faster mini model, then paste the rename request. Watch how quickly it applies the changes compared to the default model.

  1. Select gpt-5.5 as the initial model for complex coding and research workflows
  2. Switch to gpt-5.4-mini for faster, lower‑cost edits on lighter tasks
  3. Change the model with the /model command during a session or by using the -m flag when launching Codex
  • You'll see A heavy refactor on gpt-5.5 versus a quick edit on gpt-5.4-mini – capability where you need it, speed where you don’t
  • Takeaway Default to gpt‑5.5, drop to gpt‑5.4‑mini for light or fast work, and switch any time with /model or -m
  • Check How do you switch from the default gpt‑5.5 model to a faster, cheaper model for a light edit in Codex?
  • Cost Model choice is the main cost lever — the mini model is markedly cheaper for routine edits; save the frontier model for hard problems.

5.39 Select a coding assistant model and validate its suggestions

Copilot is an AI coding assistant you use inside your IDE — it suggests code snippets, completions, and whole functions as you type. Not a separate app or terminal tool; it lives as an editor extension you enable within your development environment.

Do this first Use Copilot Agent Mode for multi‑file tasks

Pick a model and confirm each piece of code it generates before accepting it

TryUse a stronger model to refactor this function, then explain each change so I can confirm it's correct.

Use the model picker in the Chat panel to switch models, then ask Copilot to justify its work.

Copilot lets you choose which model answers — even the free plan gives access to several, including Anthropic (Claude) and OpenAI (GPT). Pick the model, then verify what it writes. Credit: docs.github.com ↗
  1. Open the Chat panel’s model picker and select the desired model
  2. Run the code Copilot generates and compare its behaviour against expectations
  3. Ask Copilot to explain its changes and add a small test, then verify the results
  • You'll see The task answered by the chosen model, with an explanation you can check line by line and at least one suggestion you correct
  • Takeaway You control the model choice and own the verification – Copilot drafts fast but correctness remains yours to confirm
  • Check What two actions let you verify a Copilot suggestion before accepting it?
  • Cost Premium models live on Pro+ ($39/mo, $70/mo in Credits) and Max ($100/mo, $200/mo in Credits, priority access to new models). Premium-model chat draws on your AI Credits.

5.40 Pick the right model for the task

Cursor’s model picker lets you choose a specific Frontier model or let the system automatically select the best one for the task.

Do this first Run code and let the AI fix errors

Select a Frontier model in Cursor to control answer quality and usage cost

TryRefactor the `src/utils/helpers.py` file for better performance and add comprehensive type hints, then run the project's test suite to confirm all tests still pass. Use the **Claude** model for this operation.

Open the model picker in the chat/Agent bar, select Claude, paste the prompt into the chat input, and click Send. Watch that Cursor applies the changes and that the test run finishes without errors.

The model picker: switch between frontier models per task, with cost and context-window details shown inline. Credit: youtube.com/@cursor_ai ↗
  1. Open the model picker in the chat/Agent bar
  2. Choose a model such as Claude‑4.5‑sonnet, GPT‑5‑high‑fast, or Gemini from the dropdown
  3. Select Auto if you want Cursor to decide automatically
  4. Observe the cost and context‑window details displayed inline
  • You'll see The same request handled by different models, with cost and context‑window details shown inline
  • Takeaway Cursor isn’t tied to one model — pick the model that fits the task, knowing it also acts as a cost lever
  • Check How does selecting Auto in Cursor’s model picker affect which model handles your request?
  • Cost Model selection directly affects spend: a pricier model eats included usage faster. On Pro ($20/mo) you get generous included usage for Auto and Composer to absorb everyday switching.

5.41 Run opencode agent in a desktop app or IDE

opencode can generate a shareable session link, allowing others to join the same AI coding session across desktop or IDE environments.

Do this first Run several agents at once

Start the same opencode assistant from a desktop window or editor and share its session with others

TryRefactor the file utils.py in my current project to replace all uses of os.path with equivalent pathlib operations, and show me a diff before applying changes.

In the opencode desktop window (or IDE panel), type the sentence above into the prompt box and hit Send. After the agent finishes, click Copy link to get the shareable session URL—ensure the diff preview looks correct before confirming the refactor.

  1. Choose the desktop app or IDE extension from the opencode download page
  2. Enable Privacy mode in the settings to keep your code local
  3. Click Generate shareable session link to copy a URL for collaboration
  • You'll see The opencode agent appears in a desktop window or inside your IDE, and a link is shown that reproduces the session for anyone you share it with
  • Takeaway One agent works across terminal, desktop and IDE while keeping code private and making sessions easy to share
  • Check What feature enables you to share an opencode session with collaborators via a URL?
  • Cost The desktop app and IDE extension are part of the free open-source tool — you still only pay your model provider for tokens.

5.42 Make Cascade auto‑fix its lint errors

Windsurf is an AI coding assistant you run in your desktop — it sits beside your existing codebase, reads files, runs commands and iteratively writes fixes with you. Not a terminal-only tool; it’s an app you open, not a CLI utility.

Do this first Fix errors fast with Cascade

Run a task and have Cascade correct any lint issues it creates without manual intervention

Tryadd an analytics summary to the panel

In the windsurf interface, type the sentence above into the task prompt box and press Enter. Make sure the Auto‑fix switch is turned on; then watch the status bar for a “5 new lint errors” message that disappears as Cascade fixes them.

Cascade edits a file, notices it introduced 5 new lint errors, and with Auto-fix on clears them itself before finishing the task. Credit: docs.devin.ai/desktop/cascade/cascade ↗
  1. Enter a multi‑file request such as “add an analytics summary to the panel”
  2. Watch for the Auto‑fix indicator to appear when lint errors are detected and let Cascade apply the fixes
  3. Click Open diff on any edit to view the exact changes before proceeding
  • You'll see Cascade reports the lint errors caused by its edits and clears them automatically before completing the task
  • Takeaway Cascade catches and removes the lint errors it introduces so the final code is clean
  • Check How does Cascade automatically fix lint errors it introduces during a multi‑file request?
  • Cost Auto-fix happens inside the same Cascade task, so it uses your agent quota rather than adding a separate charge.

5.43 Provide richer inputs to Aider

Aider accepts images, web page URLs, and voice‑to‑code commands as additional context for generating committed code edits.

Do this first Refactor multiple files together using Aider

Give Aider context using images, web pages, or spoken instructions instead of typing alone

TryPlease add a function `summarize_sales()` that reads the sales data shown in the attached screenshot chart.png and returns total revenue and average order value.

In your terminal, start a session with aider, then paste the above sentence at the Aider prompt and drag‑and‑drop chart.png into the same terminal window to provide the image context. Watch for any clarification questions from the model before it makes changes.

  1. Add an image file to aider as context and ask it to implement the shown design
  2. Paste a web page URL into aider and request code that matches the page content
  3. Activate voice-to-code in aider, dictate your request, and let the model generate the changes
  • You'll see Aider processes the supplied image, web page, or voice command and produces committed code changes
  • Takeaway Images, web pages, voice and any of the supported languages feed the same Git‑based workflow
  • Check What types of non‑textual inputs can you give Aider to generate code changes?
  • Cost Still just LLM token cost; image and web-page context add to the tokens per request, so keep references focused.

5.44 Run an agent as a background or scheduled task

Antigravity provides a /schedule command palette where you can define recurring or one‑off background tasks for agents.

Do this first Spawn and monitor several agents together

Let an agent work while you're away — including on a schedule — and check the result later.

TryEvery night, pull the latest commits, run the full test suite, and write me a summary of any failures to read in the morning.

Set this up as a scheduled task in the Manager Surface so the agent runs it on a cron without you starting it each time.
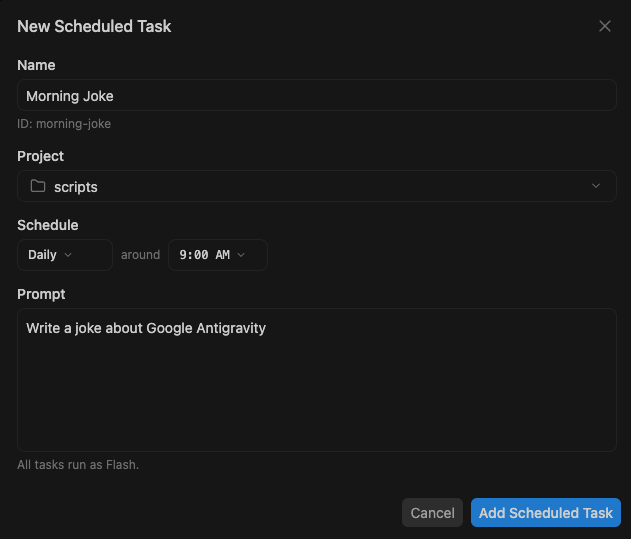
Antigravity's 'New Scheduled Task' dialog: Name field ('Morning Joke'), Project ('scripts'), Schedule (Daily around 9:00 AM), and a Prompt field, with an Add Scheduled Task button
  1. 1 Project selector assigns task to a project
  2. 2 Recurrence option runs the job every day
  3. 3 Create button saves and activates the task

Best viewed on desktop — tap Enlarge to read the numbered controls.

Set recurring schedules or one-off timers using the /schedule command or Scheduled Tasks. Credit: antigravity.google/blog ↗
  1. Open the /schedule command palette.
  2. Enter a name, project and schedule in the New Scheduled Task dialog.
  3. Click Add Scheduled Task to create the recurring job.
  4. For a one‑off run, select the task and click Run in background.
  • You'll see A task runs on its own and a summary appears when it finishes.
  • Takeaway Agents can operate unattended, so you hand off background or cron‑scheduled jobs and review results at your convenience
  • Check How do you schedule an Antigravity agent to run automatically at a later time?
  • Cost Background and scheduled runs consume the same weekly quota as interactive ones; on the free plan, keep schedules light, or move to Google AI Pro for more headroom (see antigravity.google/pricing for current plan pricing).

5.45 Manage Git operations with Claude from the terminal

Claude Code can perform Git operations such as staging, committing, branching and opening pull requests directly from natural‑language commands.

Do this first Control Claude sessions with slash commands

Run staging, committing, branching and pull‑request creation by describing them in plain English

Tryclaude-code "commit my changes with a descriptive message and open a pull request"

In the terminal where claude-code is active, type the line above and hit Enter. Then press Shift+Tab to enter acceptEdits mode and review the staged diff with git diff before confirming.

  1. Ask Claude in plain English which files have changed, e.g. “what files have I changed?”
  2. Tell Claude to commit your changes with a descriptive message, e.g. “commit my changes with a descriptive message”
  3. Instruct Claude to create a new branch, e.g. “create a branch called feature/normalize-counts”
  4. Request Claude to open a pull request for the new branch when you are ready
  • You'll see A clean commit (and optionally a PR) that Claude staged and described for you from a one‑line request
  • Takeaway You never have to context‑switch to git — describe the version‑control step and Claude runs it
  • Check Which plain‑English request would make Claude stage, commit, and push a new branch with your changes?
  • Cost Git operations are ordinary turns — they draw on your plan like any other task.

5.46 Fix failing tests and commit changes with Git

Codex can trace failing tests, propose minimal fixes in controlled checkpoints, and create a pull request containing the reviewed diff.

Do this first Choose the right Codex model for your task

Turn a failing repository into a green build by applying a targeted fix and creating a pull request

TryError: tests/test_math.py::test_addition failed with AssertionError: expected 5 but got 3. Please trace the cause, apply a minimal fix, and run the test suite to confirm it passes.

In the Codex interface, paste the error line into the prompt box on the main chat screen and press Enter. Watch for Codex’s proposed minimal change and its automated test run confirming the failure is resolved.

A real Codex run: bug reported, minimal fix applied, tests run to confirm, changed files listed for review. Credit: openai.com/index/introducing-upgrades-to-codex ↗
  1. Describe the symptom or paste the error so Codex can trace it and propose a minimal fix
  2. Apply changes using controlled checkpoints to remove dead code, modernise patterns, or run migrations step by step
  3. Review the diff and use open pull requests to commit the changes to Git
  • You'll see The previously failing test now passes and the change appears as a reviewed pull request ready to merge
  • Takeaway Target the failure, apply a minimal fix in checkpoints, and let Codex open a PR for review
  • Check What sequence of steps lets Codex fix a failing test and open a pull request for the change?
  • Cost Minimal, high-confidence changes mean fewer iterations and less usage than open-ended "fix it all" requests.

5.47 Use Copilot from the command line

Copilot is an AI coding assistant you run in your terminal — describe tasks in plain English and it writes, tests, and debugs code right from the command line. Not a graphical app or IDE extension you click.

Do this first Select a coding assistant model and validate its suggestions

Get code suggestions, testing and debugging directly in your terminal with the Copilot CLI

TryWrite a shell command that finds every .fasta file under this folder and counts the sequences in each.

Run Copilot CLI in your terminal and describe the task — it suggests the command and can run, test, and debug from there.

The GitHub Copilot CLI running in a terminal — it can 'write, test and debug code right from your terminal', with @ to mention files and / for commands. Credit: github.com/features/copilot ↗
  1. Launch the Copilot CLI in your terminal
  2. Enter a plain‑English description of the command or job you need
  3. Read the suggested command that Copilot returns before running it
  4. Press Enter to execute the accepted suggestion
  • You'll see The Copilot CLI welcome screen showing you are logged in and waiting for a task description
  • Takeaway Copilot can assist you wherever you work, not just inside an editor
  • Check What steps does the Copilot CLI follow to turn a plain‑English task description into a suggested command that you can review and execute?
  • Cost CLI features consume AI Credits (like chat and agents), so they draw on your plan's monthly Credit allowance — completions remain the only free-of-credits feature.

5.48 Provide the AI assistant with project files and extensions

The project files, MCPs (Model Context Protocol servers), skills, and hooks configured for Cursor supply real‑code context and external tool integration to its AI assistant.

Do this first Pick the right model for the task

Supply the agent with your codebase, MCPs and skills so its replies are grounded in real project data

TryAdd a function `factorial(n:int)->int` to **src/utils/math.py** that uses the existing helper `multiply_numbers(a,b)` from **src/helpers.py**. Then update **tests/test_math.py** to include a test case checking that `factorial(5)` returns 120.

In Cursor’s Agent panel, paste the prompt into the chat input box and press Enter. Verify that the agent opens both referenced files before making changes.

Beyond your own files, MCPs connect the agent to external tools and data — here it calls a connected Postgres server's list_schemas and works from the real result, not a guess. Credit: cursor.com/docs ↗
  1. Reference the relevant files or folders in the Chat so the agent works from your real code
  2. Enable the desired MCPs, skills, and hooks in the agent settings to connect external tools
  3. Leverage your existing VS Code extension ecosystem while interacting with the agent
  • You'll see The chat shows answers that reference actual files and, when configured, invoke external tools via MCPs
  • Takeaway Accurate context turns a generic assistant into one that truly knows your project
  • Check How does providing file references, enabling MCPs, and linking VS Code extensions affect the relevance of Cursor’s chat responses?
  • Cost Context features themselves are about quality, not extra fees; the usual usage metering applies to the model requests they drive. Teams plans add Bugbot agentic code reviews and shared-context cloud agents.

5.49 Use OpenCode Zen’s free tier and cap your spending

OpenCode Zen’s hosted model selection combined with auto‑reload, a top‑up amount, and a per‑workspace monthly usage cap controls cost while providing free‑tier AI coding.

Do this first Run opencode agent in a desktop app or IDE

Run hosted models on OpenCode Zen for free while automatically limiting spend

TryUse OpenCode Zen free tier, turn off auto‑reload, and set a per‑workspace monthly usage limit of $5.

In the terminal, start an OpenCode session (e.g., opencode) and paste the sentence exactly; the assistant will apply the free‑tier model, disable auto‑reload, and enforce the $5 limit. Watch the confirmation messages to ensure the settings are applied.

OpenCode Zen's pricing table — the five free-tier models all at $0, with paid models billed per 1M tokens below; a way to use hosted models without managing your own provider key.
  1. Free tier — five models at $0 to start.
  2. Pay-as-you-go — paid models billed per 1M tokens.
  3. Hosted — no provider key of your own to manage.
Credit: opencode.ai ↗
  1. Select OpenCode Zen as the model provider
  2. Enable auto-reload and set the top‑up amount to $20
  3. Set a per‑workspace monthly usage limit of $5
  • You'll see OpenCode Zen runs a free‑tier model with auto‑reload and monthly limits applied
  • Takeaway Zero‑setup hosted models let you start free and control costs with built‑in limits
  • Check What configuration lets OpenCode Zen run a free‑tier model while automatically limiting monthly spend per workspace?
  • Cost Zen is pay-as-you-go per 1M tokens with a free five-model tier; paid models span $0.14/$0.28 to $10/$50 per 1M tokens. Auto-reload and per-member limits keep costs in check.

5.50 Revert a change with one click

The revert arrow icon in the Cascade chat panel rolls back a selected step, restoring the codebase to its prior version with one click.

Do this first Make Cascade auto‑fix its lint errors

Experiment fearlessly by rolling back any agent modification instantly.

TryAdd a new helper function `def factorial(n): return 1 if n==0 else n*factorial(n-1)` to the file **utils.py** using windsurf.

In the agent output pane, approve the change so it creates a checkpoint. Then click the Rollback button next to the latest checkpoint in the Checkpoints panel to revert the file back to its original state.

Hover any earlier step and click the revert arrow to roll the whole conversation’s changes back to that point. Credit: docs.devin.ai (Devin Desktop/Cascade documentation)
  1. Open the Cascade chat panel and locate the step you want to undo.
  2. Click the revert arrow icon next to that step.
  3. Confirm the rollback when prompted.
  • You'll see Your project returns to its previous state after clicking the revert control.
  • Takeaway Every agent edit can be undone in a single action
  • Check Which UI control lets you instantly undo any Cascade edit and return the project to its previous state?
  • Cost Reverting to a checkpoint costs nothing — it's a local snapshot, not a new agent task.

5.51 Choose a model and review an agent’s artifacts

The model selector chooses the AI backend (e.g., Gemini 3.5 Flash or Claude Sonnet) while the Artifacts panel displays generated task lists, screenshots and walkthroughs for review.

Do this first Guide an AI coding assistant to plan, execute and verify code changes

Select the appropriate model and verify the agent’s actions by reading its artifacts

TrySwitch the model to **gpt-oss-120b** in the model selector, then ask the agent to refactor the file `src/helpers.py` to use async functions and add type hints. After it finishes, open the Artifacts panel and comment on any missing screenshots.

In the model selector dropdown choose gpt‑oss‑120b, send the request, then click the Artifacts tab that appears after the run; watch for a complete task list and at least one screenshot before commenting.

Antigravity is model-agnostic: one selector switches between Gemini, Anthropic Claude, and gpt-oss models mid-session — a stronger model for a hard task, a faster one for routine edits. Credit: antigravity.google ↗
  1. Open the model selector and pick the desired model such as Gemini 3.5 Flash or Claude Sonnet
  2. Run the task with the selected model
  3. Open the Artifacts panel to view the generated task list, screenshots and browser walkthrough
  4. Add a comment on any artifact that needs correction
  5. Submit the feedback so the agent updates its work
  • You'll see The task runs using the chosen model and displays Artifacts – a task list, screenshots and a browser walkthrough – ready for comment
  • Takeaway Match the model to the task and use Artifacts as your review surface to stay in control of agents that act on your code
  • Check How does selecting a model and then opening the Artifacts panel help you verify an Antigravity agent’s work?
  • Cost All listed models are available on the free For Individuals plan ($0/month). For higher rate limits and a flexible AI credit pool, there are Google AI Pro and Google AI Ultra paid tiers — see antigravity.google/pricing for current pricing.

5.52 Choose the right model and monitor cost

The /model command switches Claude’s model (e.g., Sonnet or Opus), /config sets a default model, and /usage reports a token breakdown by skill, subagent and time window.

Do this first Manage Git operations with Claude from the terminal

Pick the appropriate Claude model for each task while keeping spending visible.

Try/model opus Write a Rust program that reads a CSV file named `sales.csv`, computes total sales per product, and prints the results as a table.

Paste the whole block into the Claude Code chat input and press Enter. Verify the model switch by checking the banner now shows Opus, then watch for any token‑usage warnings after execution.

/usage breaks down exactly what's driving your limits — parallel sessions, subagent-heavy runs, long context, cache misses — with a tip for each. Credit: docs.claude.com (What's new, week 16)
  1. Run /model to change the model mid‑session; select Sonnet for most work or Opus for demanding tasks.
  2. Open /config and set your preferred default model so future sessions start with the right choice.
  3. Execute /usage to view a token breakdown by skill, subagent, and server, toggling between 24‑hour and 7‑day windows.
  • You'll see The terminal shows which model is active and a usage breakdown indicating where tokens are consumed.
  • Takeaway Prefer Sonnet for routine coding, switch to Opus for complex reasoning, and check /usage regularly to avoid surprise costs
  • Check What commands let you change Claude’s active model mid‑session and monitor token usage to keep costs visible?
  • Cost Model choice is the biggest lever — Sonnet for most work, Opus only when needed; /usage keeps spend visible.

5.53 Run Codex inside your IDE

Installing the Codex extension adds a sidebar where open files, selections and @file references supply context, while a cloud off‑loading option sends heavyweight tasks to remote execution.

Do this first Fix failing tests and commit changes with Git

Execute Codex in the editor, using full file context and optionally sending long jobs to the cloud

TryAdd a new function to the currently opened file `analysis.py` that loads `data.csv`, computes the mean of the numeric column `score`, and returns it. Use an `@file data.csv` reference so Codex can see the CSV contents.

In the Codex sidebar, type the task into the prompt box and press Enter. Ensure the @file data.csv reference appears exactly as shown so Codex includes the file context; watch for the generated function to be inserted at the cursor location.
The VS Code activity bar with the Codex icon docked among Explorer, Search, Extensions, Source Control, and Run and Debug
  1. 1 Codex sidebar opens Codex panel
  2. 2 extensions tab install Codex extension

Best viewed on desktop — tap Enlarge to read the numbered controls.

Install the Codex extension and it docks right in your editor's sidebar — full file context, model switching, and a one-click path to offload long jobs to the cloud. Credit: developers.openai.com ↗
  1. Install the Codex extension from the VS Code Marketplace
  2. Open the Codex sidebar and add context with open files, selections, and @file references
  3. Offload longer jobs to a cloud environment from the sidebar
  • You'll see Codex working in your editor sidebar against the files you have open, with a long task handed off to the cloud
  • Takeaway IDE extensions can feed the assistant full editor context and let you shift heavy work to the cloud
  • Check What steps enable you to run Codex inside VS Code, add file context, and offload longer jobs to the cloud?
  • Cost The IDE extension uses the same plan and usage as the CLI — no separate charge for running it in your editor.

5.54 Assign an issue to Copilot

Copilot is an AI assistant you engage through GitHub’s web interface — you assign it to issues just like a teammate and review its pull-request suggestions before merging. Not a local IDE plugin you run from your terminal.

Do this first Use Copilot from the command line

Assign a GitHub issue to Copilot and let it work the task like a teammate

TryAllow users to pin side panels — add the setting, persist it, and update the layout.

On a GitHub issue, open Select assignees and pick Copilot the same way you'd assign a person.

GitHub's Select assignees menu — assign Copilot to an issue like a teammate, alongside third-party agents Claude (Anthropic) and Codex (OpenAI). Credit: github.com/features/copilot ↗
  1. Open an issue on GitHub and click Select assignees
  2. Pick Copilot (or another listed AI) from the assignee list
  3. Review the changes proposed by the assigned agent and merge when satisfied
  • You'll see Copilot appears as an assignable AI agent in the GitHub “Select assignees” menu alongside human teammates and other agents
  • Takeaway You can treat Copilot as a teammate you assign work to while retaining review responsibility
  • Check What process lets you assign a GitHub issue to Copilot and then review its pull‑request suggestions before merging?
  • Cost The coding agent consumes AI Credits. Org plans price per seat: Business = $19/seat/mo, Enterprise = $39/seat/mo; individual paid tiers include a monthly Credit allowance.

5.55 Pick the right Cursor plan and claim a free student year

Choosing a plan on the Pricing page and confirming a .edu email in Account Settings activates the complimentary Student Plan, providing a full year of Pro features at no cost.

Do this first Provide the AI assistant with project files and extensions

Select a suitable Cursor subscription and activate the complimentary Pro year for eligible students

TryShow me my current subscription plan, remaining free usage, and whether I'm eligible for the free student year of Cursor Pro.

Open the new-agent screen in Cursor, paste the sentence above into the prompt box, and click Send. Verify that the response lists your plan tier, usage limits, and instructions to claim the student offer if applicable.

Cursor's pricing page (Monthly billing) — Hobby is free, Individual/Pro is $20/mo (Pro+/Ultra step up from there), Teams is $40/user/mo, Enterprise is custom.
  1. Hobby — free tier to start.
  2. Pro — $20/mo (Pro+ $60, Ultra $200).
  3. Teams — $40/user/mo; Enterprise — custom.
Credit: cursor.com ↗
  1. Open Pricing in the main navigation to view all subscription tiers
  2. Compare the features listed under each tier and note the included usage amounts
  3. If you are a student, navigate to Account Settings, click Verify Status, and follow the prompts to confirm your .edu email
  4. Confirm the free year activation on the Student Plan banner that appears after verification
  • You'll see A clear map of which plan fits your usage, and — if you're a student — a free year of Pro applied to your account
  • Takeaway Start free, upgrade to Pro when the limits bite — and if you're a student, get a full year of Pro at no cost
  • Check How does selecting a subscription tier and verifying student status grant you a free year of Cursor Pro?
  • Cost Free to start on Hobby; $20/mo for Pro; free for one year for eligible students. Because different models have different API costs, model choice is what governs how fast included usage is spent.

5.56 Choose the right plan and model

The Agent Command Center’s Pricing link shows tier details, while the Base Model dropdown in Cascade selects the underlying AI model that powers the assistant.

Do this first Revert a change with one click

Select a pricing tier and AI model that match your coding workload

TryShow me the current quota limits and available models for each WindSurf plan (Free, Pro, Max) and compare them.

Enter this text in the Agent Command Center prompt box and click Send; watch the response table to see quotas and model lists for each tier.

Cascade lets you pick the model from its Base Model dropdown — Devin Desktop's own model, Anthropic Claude, or OpenAI GPT — with the frontier models unlocked on the paid plans. Credit: docs.devin.ai ↗
  1. Open the Agent Command Center Kanban board
  2. Click the Pricing link to view detailed tier information at devin.ai/pricing
  3. In Cascade, open the Base Model dropdown and pick the model you need
  • You'll see The Agent Command Center shows the current plan, quota usage and available models
  • Takeaway Start on Free and upgrade only when agent quota becomes the bottleneck
  • Check Which steps let you pick a pricing tier and then choose a base model for Cascade within the Agent Command Center?
  • Cost Free $0 · Pro $20/month · Max $200/month · Teams $80/month + $40/seat · Enterprise custom. Pro+ adds extra usage at API pricing; check devin.ai/pricing for the latest.

5.57 Pull external data into a coding session

The /mcp command enables or disables Model Context Protocol servers, and /context lists the active tool names, allowing Claude to read specifications from services like Google Drive.

Do this first Choose the right model and monitor cost

Bring outside services like design docs or tickets into Claude Code using the Model Context Protocol

Try/mcp enable jira claude "Fetch Jira ticket PROJ-123 and summarize its acceptance criteria."

Paste the two lines sequentially into the Claude Code chat input (press Enter after each line). First ensure the Jira server is enabled, then ask Claude to retrieve the ticket—watch for the confirmation that the Jira tool was loaded in context before the summary appears.

MCP is the standardized wire protocol behind /mcp — the same connector shape whether the server exposes Google Drive, Jira, Slack, or a database. Credit: modelcontextprotocol.io ↗
  1. Run /mcp to display all configured MCP servers and toggle each one on or off
  2. Use /context to view which tool names have been loaded into the current session
  3. Disable any unused servers in /mcp to keep the context focused on the tools you need
  • You'll see Claude reads a spec from Drive (or another service) inside the same chat where it writes code
  • Takeaway MCP connects your real tools and data to every Claude session once you register a server
  • Check How does toggling MCP servers with /mcp and viewing loaded tools via /context bring external data into a Claude Code session?
  • Cost MCP tool definitions are deferred, so an idle server costs almost nothing; disable unused ones with /mcp to keep context lean.

5.58 Delegate tasks to Codex cloud

Opening codex.com, tagging @codex on an issue or PR, and setting up the cloud environment (repo, setup steps, tool permissions, internet access) delegates execution to Codex cloud.

Do this first Run Codex inside your IDE

Hand long or parallel tasks to Codex cloud and review the results as pull requests

Try@codex Please add a GitHub Actions workflow to the repository that runs unit tests on every push to the main branch and reports coverage.

In the GitHub web UI, open an existing issue or create a new one, paste the line above into the comment box, and click Comment. Watch for Codex to open a pull request with the new workflow file.

Delegate from chatgpt.com/codex, your IDE, or by tagging @codex on a GitHub issue — Codex works in its own cloud environment and comes back with a pull request. Credit: openai.com/codex ↗
  1. Open chatgpt.com/codex in your browser
  2. Tag @codex on an issue or pull request in GitHub
  3. Configure the environment in Codex cloud, specifying the repository, setup steps, tools and whether Codex may reach the public internet
  • You'll see A finished pull request appears that you can review and merge
  • Takeaway For work that doesn't need you watching, delegate to the cloud — Codex runs it in the background and comes back with a PR
  • Check What workflow lets you delegate a long task to Codex cloud by tagging @codex on GitHub and configuring repository access?
  • Cost Cloud tasks draw on your ChatGPT plan's usage; running several in parallel uses proportionally more.

5.59 Delegate side tasks to a subagent

A subagent is defined by a markdown description placed in the .claude/agents folder; selecting it in the Subagent dropdown routes the side task to that agent, returning only a concise summary.

Do this first Pull external data into a coding session

Move noisy searches, log reads or test runs into a separate agent so the main conversation stays focused

Tryclaude-code "Run the full test suite for the repository and return a concise summary of any failures or errors."

Paste this into the main chat input of the claude-code interface and press Enter. Watch that only a brief summary appears in the main thread while the detailed test output is handled by the subagent.

Custom subagents live as files under .claude/agents/ — each with its own description so Claude knows when to delegate (here a QA and a visual-testing agent). Shown in the VS Code extension; the same subagents work from the terminal. Credit: docs.claude.com ↗
  1. OPEN the Explorer pane and navigate to the .claude/agents/ folder
  2. CREATE a new markdown file for the subagent and type its description at the top of the file
  3. IN the Claude Code panel, SELECT the newly created subagent from the Subagent dropdown and SEND your side‑task
  • You'll see The subagent completes the heavy work and returns only a brief summary in your main thread
  • Takeaway Hand bulky operations to a subagent and receive just the answer you need
  • Check How does creating a markdown file in .claude/agents and selecting it from the Subagent dropdown move side tasks away from the main conversation?
  • Cost Subagents control cost by keeping verbose output in their own window and by routing simple work to faster, cheaper models like Haiku.

5.60 Connect your tools to Codex using MCP

Adding a STDIO or streamingHTTP server definition to ~/.codex/config.toml and registering it with the codex mcp command enables Codex to invoke that external tool mid‑task.

Do this first Delegate tasks to Codex cloud

Extend Codex with external tools and data through the Model Context Protocol

TryFetch the current temperature for San Francisco using the MCP‑connected weather service and display it in a one‑line Python script.

In the Codex chat window, paste the sentence above into the prompt box after starting a session (e.g., via codex start). Watch that Codex invokes the external MCP tool and returns the temperature output.

  1. Edit ~/.codex/config.toml to add a STDIO or streaming-HTTP MCP server definition
  2. Run the codex mcp CLI command to register or manage the new server
  3. Start a Codex session; the configured MCP servers launch automatically
  • You'll see Codex calls a connected MCP tool mid‑task, using data or actions that live outside your codebase
  • Takeaway MCP plugs your own tools into Codex — configure a server once in config.toml and every session can use it
  • Check What configuration changes let Codex call an external MCP tool during a session after editing its config.toml and running codex mcp?
  • Cost MCP adds capability, not a separate fee — you still pay only for model usage on your plan.

5.61 Create reusable workflow skills

A SKILL.md containing step‑by‑step instructions is stored under .claude/skills//; the resulting slash command (e.g., /clean-fastq) runs that procedure on demand.

Do this first Delegate side tasks to a subagent

Convert a repeated set of instructions into a reusable Skill your whole team can invoke

Tryclaude-code "Create a Skill at .claude/skills/review-pr/SKILL.md that runs a checklist: ensure PR title contains a JIRA ticket ID, verify description length > 50 chars, and add a comment if any check fails"

In the Claude Code interface, paste the command into the main prompt box and press Enter. Watch for Claude confirming the new /review-pr skill and showing the generated SKILL.md content.

Progressive disclosure: a Skill's YAML metadata is always in context, but the body — your actual procedure — only loads once the Skill triggers, exactly as the steps above describe. Credit: anthropic.com/engineering ↗
  1. Create a SKILL.md file in the .claude/skills// folder containing your instructions
  2. Save the file to add the new skill to Claude’s toolkit
  3. Invoke the skill by typing its slash command, such as /clean-fastq, in any chat
  • You'll see A custom slash command – for example /clean-fastq – that runs your exact procedure on demand
  • Takeaway Write the steps once as SKILL.md and call them forever with a slash command
  • Check How does placing a SKILL.md file in .claude/skills and invoking its slash command provide reusable workflow automation?
  • Cost Skills load on-demand, so moving long procedures out of CLAUDE.md and into Skills keeps your base context (and cost) smaller.

5.62 Run Codex from a script or CI pipeline

The codex exec command executes a prompt headlessly, with --json for machine‑readable streams or -o to write results directly to a file, suitable for automation.

Do this first Connect your tools to Codex using MCP

Execute Codex headlessly and capture its output for automation

Trycodex exec "generate release notes for the last 10 commits" -o release-notes.md

In a terminal, paste the command and press Enter. After it finishes, verify that release-notes.md appears in the current directory with the generated notes.

  1. Execute codex exec "…" with your prompt to run Codex non‑interactively, e.g. codex exec "summarise the repository structure"
  2. Add the --json flag to receive a machine‑readable stream or use -o to write the final output straight to a file
  3. In CI, invoke the official Codex Action in your workflow instead of handling API keys manually
  • You'll see Codex runs without the interactive UI and writes the result directly to stdout, which you can redirect to a file
  • Takeaway codex exec makes Codex usable in automated workflows and piping chains
  • Check What command line options allow you to run Codex non‑interactively and capture its output for CI pipelines?
  • Cost Each codex exec is its own run and bills like any task; keep the prompt focused for CI.

5.63 Run custom commands automatically with Hooks

A hook entry such as "PreToolUse" with a Bash matcher is added to the project’s settings.json; saving triggers the defined command (e.g., a formatter) each time an edit occurs.

Do this first Create reusable workflow skills

Execute your own shell commands before or after Claude's actions such as formatting, linting, or filtering output

TryAdd a PreToolUse hook in settings.json that runs "grep -E 'FAIL|ERROR' test_output.log" using a Bash matcher.

Open the settings.json screen in Claude Code, paste the line above into the file, save it, then trigger any Claude action and watch the filtered log appear in the output pane.

Every point in the loop a Hook can attach toPreToolUse (used in the example above) is one of a dozen deterministic hook points around Claude Code's session and tool-call lifecycle. Credit: docs.claude.com ↗
  1. Open settings.json in your project
  2. Insert a hook definition, for example a "PreToolUse" entry with a Bash matcher that filters test output
  3. Save settings.json and make a code edit to trigger the hook
  • You'll see Your formatter or linter fires automatically on every edit without any reminder
  • Takeaway Hooks turn a manual step into a guaranteed command that runs at the right moment
  • Check How do you define a PreToolUse hook in settings.json so that a formatter runs automatically on every code edit?
  • Cost A pre-processing hook (e.g. grepping a log for ERROR) can slash the context Claude reads, directly lowering token cost.

5.64 Select a Codex subscription plan

Visiting the ChatGPT pricing page, selecting the Plus plan for regular work, and upgrading to Pro if limits are exceeded aligns the subscription with coding demand.

Do this first Run Codex from a script or CI pipeline

Pick the plan that matches how hard you'll use Codex

TryCompare the features, monthly cost, and rate limits of the Free, Plus, Go, Pro, Business, Enterprise, and Edu tiers for Codex in a markdown table.

Paste this into the Codex chat input on the main conversation screen and hit Enter. Verify that the response includes a clear table with each tier’s cost and rate‑limit details.

  1. Open the ChatGPT pricing page in your browser
  2. Choose the Plus ($20/mo) plan for regular coding sessions and click Select Plan
  3. If you exceed Plus limits, upgrade by clicking Upgrade to Pro and confirm the Pro (from $100/mo) selection
  • You'll see A clear match between your usage and a tier — Plus for regular study work, Pro only if you hit its limits
  • Takeaway Start on Plus (or Free/Go to try it); move up only when rate limits, not the tool, are what slows you down
  • Check What steps let you choose a Codex subscription plan that matches your expected usage and upgrade only when limits are reached?
  • Cost Plus $20/mo · Pro from $100/mo · Go $8/mo · Free $0 · Business pay-as-you-go · Enterprise/Edu custom — plus API pay-per-token as an alternative.

5.65 Run Claude Code as a headless command‑line tool

Running claude -p "query" processes a single prompt; piping input (e.g., git diff output) into this command lets Claude read, analyze and emit results, functioning as a Unix‑style utility.

Do this first Run custom commands automatically with Hooks

Execute Claude Code non‑interactively and pipe data through it for scripts or CI

Trygit diff main --name-only | claude -p "review these changed files for security issues"

In a terminal, run the command exactly as shown; observe Claude's output for any security warnings and redirect it to a file if needed.

  1. EXECUTE claude -p "query" to run a single prompt and exit
  2. PIPE input into Claude Code, for example tail -200 app.log | claude -p "flag any anomalies"
  3. CHAIN Claude Code with other commands in scripts or CI, such as git diff main --name-only | claude -p "review these changed files for security issues"
  • You'll see Claude Code acting as a filter that reads piped input, performs the requested task, and writes the result to standard output
  • Takeaway Using -p turns Claude Code into a Unix‑style utility you can embed in any automation pipeline
  • Check How does using the -p flag with Claude enable it to act as a filter in pipelines, such as reviewing changed files from git diff?
  • Cost Headless runs bill like any session; keep prompts focused since each -p call is its own task.

6You’ll know it worked 57 checkable outcomes in this chapter

  • Endpoint returns aggregated row counts grouped by status and appears in OpenAPI docs
  • The code snippets in README.md compile against the current API without deprecation errors
  • All CRUD routes for a resource are present and consistent without manual copy-paste
  • A validation_report.csv lists all changes and flags, and no study_id appears more than once
  • The displayed code and chat revert to the selected earlier version
  • Running `/context` after enabling a server shows only the tool name, not its full definition, until the tool is invoked
  • The Explorer pane lists the contents of the chosen folder
  • Billing view shows "Pro+" as the plan and displays $70 of remaining credit

57 outcomes in all — one per recipe below.

7FAQ, Tips & How-to 163

one problem, one solution, one action

Internal tools & ops7

How-to Claude Code Founder +1

Need a FastAPI summary endpoint for report statuses

The endpoint is live and tested within 20 minutes: five files change consistently, and the generated OpenAPI spec is correct on the first try because the agent already caught its own mistakes.

~8 min · low code AI-generated
How-to Aider Operations +1

Controller code is tangled with duplicate logic

The refactor is done in a single aider session with a clean git history — reviewable commit by commit — and no test regressions.

~10 min · low code AI-generated
How-to Cursor Founder +1

Huge monolithic React page blocks reuse

The page becomes composable and testable; two new features are added the same afternoon by reusing the extracted components.

~8 min · low code AI-generated
How-to Windsurf Operations +1

Want to filter orders and mark many as shipped

Operations staff can filter and bulk-update orders directly in Django admin without a custom internal tool build.

~12 min · low code AI-generated
How-to Copilot Operations +1

Typing all CRUD routes by hand

A full set of CRUD routes that would take 2–3 hours to type is done in 20 minutes with consistent style and no copy-paste errors.

~10 min · low code AI-generated
How-to Claude Code Robotics

PID code mixed with hardware

The PID module gains 100 % branch coverage in a host-side Unity test suite; a tuning bug in the derivative term is caught before it reaches a patient fitting.

~8 min · low code AI-generated
How-to Claude Code Robotics

Port a C grip‑pattern state machine to Rust

The Rust crate compiles for the Cortex-M4 target; the property-based tests catch an unreachable transition that had been silently dead in the C version for two firmware generations.

~8 min · low code AI-generated

Knowledge & docs2

How-to Claude Code Operations +1

JavaScript utility with no types

A 30-file library is fully typed in one session; downstream teams immediately benefit from autocomplete and compile-time safety.

~8 min · low code AI-generated
How-to Aider Operations +1

README code samples are broken after an API change

Documentation drift is fixed in minutes; the next person to follow the README gets working code, not a confusing deprecation error.

~10 min · low code AI-generated

Research & data tools11

How-to Codex Scientist +1

My cleaning script is a tangled monolith

The script becomes maintainable and reusable; a colleague adapts the ingest module for a new instrument within an hour.

~8 min · low code AI-generated
How-to Codex Founder +2

Tests fail after a dependency upgrade

The upgrade unblocks in under an hour with a clear audit trail of why each fix was made.

~8 min · low code AI-generated
How-to opencode Scientist +1

Need complete type hints for a bioinformatics codebase

A 6 000-line bioinformatics package gains full type coverage using only infrastructure the lab already controls; mypy catches a silent integer-vs-float bug on the first run.

~8 min · low code AI-generated
How-to opencode Scientist

Messy instrument CSV exports

Manual pre-processing of instrument exports is eliminated; the parser handles every file variant from the past three years without modification.

~8 min · low code AI-generated
How-to Antigravity Scientist

One huge R script that’s hard to edit

Each stage can be developed and re-run independently; the figures module is reused in a second paper within the same week.

~12 min · low code AI-generated
How-to Copilot Scientist +1

A regex bug that stalled the ingestion pipeline for two days is identified and fixed in 30 minutes with a clear explanation the whole team can follow.

~10 min · low code AI-generated
How-to Copilot Robotics

Need nonstop EMG readings at 2 kHz

Both EMG channels stream continuously into the ring buffer with no missed samples at 2 kHz; the buffer hand-off to the signal-processing task is interrupt-safe without a RTOS mutex.

~10 min · low code AI-generated
How-to Cursor Finance +1

Manual spreadsheet formulas for billing reconciliation

A reconciliation step that previously required a 200-line manual spreadsheet formula is replaced by a reproducible, version-controlled script; discrepancies are caught the same day they arise.

~8 min · low code AI-generated
How-to Claude Code Physician

Messy patient registry with duplicate IDs and bad dates

A 3,000-row registry export that would take an afternoon to clean by hand in a spreadsheet is validated in minutes, with a full change log the physician reviews before using the data for any analysis.

~8 min · low code AI-generated
How-to Codex Physician

Need to compute a clinical risk score from a paper

The calculator reproduces the paper's worked examples exactly and is ready to embed in the practice's internal tools, with the underlying formula and citation kept alongside the code so it stays auditable.

~8 min · low code AI-generated
How-to Aider Physician

Raw FHIR bundles need hand review

A stack of raw FHIR bundles that previously required manual review is turned into one analysis-ready table in a single session, with full field-level traceability back to the source export.

~10 min · low code AI-generated

Dashboards & analytics3

How-to Cursor Finance +1

Slow dashboard caused by ORM N + 1 queries

Dashboard load time drops from 4.2 s to 0.6 s; the migration is production-ready with rollback included.

~8 min · low code AI-generated
How-to Antigravity Founder

Want a complete funnel view without hand‑coding tracking

The founder has a complete funnel view within one day of setup: no manual instrumentation pass, and no manual click-through either, because the agent verified its own work in a live browser.

~12 min · low code AI-generated
How-to Claude Code Finance +1

Manual month‑end data pull takes half a day

The analyst's monthly close reporting cycle drops from a half-day manual pull to a 90-second script run; the output matches CFO expectations on the first pass.

~8 min · low code AI-generated

CRM & sales1

How-to Windsurf Founder +1

Never know a contact acted until you refresh

Sales reps see contact activity in real time without manually refreshing the page, catching follow-up moments they previously missed.

~12 min · low code AI-generated
How-to Aider Everyone

Need to launch AI pair‑programming from the command line

You can launch Aider directly from the terminal to begin editing files with AI

**A real Aider session** in the terminal: you run `aider demo.py`, describe what you want, and Aider edits the file and commits the change to Git. Credit: aider.chat ↗
Aider is **free and open-source (Apache 2.0)** — there is no subscription. You pay only the third-party LLM's token cost for each request (you bring your own key). Lesson → AI-generated
How-to Aider Everyone

Only have an English sentence describing what you want

Aider translates a single English sentence into working Python code

Lesson → AI-generated
How-to Aider Everyone

Want to tweak code through conversation and never lose changes

You can refine code conversationally while each change is safely versioned

Every Aider edit lands as a real Git commit (shown here in Aider's browser UI) — which is exactly what makes `/undo` a clean, safe revert instead of a guess. Credit: aider.chat/docs ↗
Each request is one metered call to your chosen LLM; grouping related changes into one clear message spends fewer tokens. `/undo` is free — it is just a Git revert. Lesson → AI-generated
How-to Aider Everyone

Need to roll back the latest AI edit

You can instantly roll back any unwanted change without losing prior work

Lesson → AI-generated
How-to Aider Everyone

Lint or test failures appear

When a lint or test error appears, Aider reads the output and suggests a corrective change automatically

Still only LLM token cost; the lint and test steps run locally on your machine and add nothing beyond the model calls Aider already makes. Lesson → AI-generated
How-to Aider Everyone

Manually checking the diff and test outcome confirms that each change is safe to continue with

Lesson → AI-generated
How-to Aider Everyone

Not sure the mean calculation is correct

Introducing a focused unit test forces Aider to run the full check cycle, catching errors early

~10 min · low code Lesson → AI-generated
How-to Aider Everyone

The public leaderboard lets you pick a model that balances accuracy and expense for your workload

Aider's own **polyglot benchmark** — 225 Exercism exercises across 6 languages — ranks each model's success rate, so you can pick a cheaper model that still clears the bar for your task. Credit: aider.chat ↗
Aider itself is free and open-source (Apache 2.0) — you pay only your model provider's per-token costs. Aider reports the token count and dollar cost of each interaction in the terminal (use **`/tokens`** to see the running total for the current context), so you can watch spend live regardless of which model you choose. Lesson → AI-generated
How-to Aider Everyone

Aider automatically shows how many tokens and dollars each request consumes, helping you stay within budget

Lesson → AI-generated
How-to Aider Everyone

Edit several source files at once

You can start Aider with multiple source files so it can modify them all in one interactive session

Larger context (more files, the codebase map) means more tokens per request — another reason to pick an economical model from the leaderboard for routine work. Lesson → AI-generated
How-to Aider Everyone

One huge script you can’t reuse

You can ask Aider to move functions or logic from a monolithic script into new module files while updating imports

Lesson → AI-generated
How-to Aider Everyone

Can’t convey what’s on screen

You can give Aider a screenshot so it sees the exact visual reference instead of you describing it

Still just LLM token cost; image and web-page context add to the tokens per request, so keep references focused. Lesson → AI-generated
How-to Aider Everyone

Want to feed a webpage into an AI code helper

Aider can read a web page you supply, letting the model work from the actual page content

Lesson → AI-generated
How-to Antigravity Everyone

Want to choose a project and keep the default Gemini model

Choosing a project and leaving the model on Gemini 3.5 Flash prepares the agent with a capable default LLM

The **new-agent** screen: type your task in the prompt box, pick a model (here **Gemini 3.5 Flash**), and choose where the agent runs — **Local** on a branch like `main`, or an isolated **New Worktree**. Credit: antigravity.google ↗
The **For Individuals** plan is **free ($0/month)**: Gemini 3.5/3.1/3, Claude Sonnet & Opus 4.6 and gpt-oss-120b, unlimited tab-completions and command requests, with **basic weekly rate limits**. One task like this costs you nothing. Lesson → AI-generated
How-to Antigravity Everyone

Unsure which part of the code to tweak

Stating exactly which code to modify and its location helps the agent produce targeted edits instead of vague improvements

Before writing code, the agent produces an **Implementation Plan** artifact you can review — the outcome, the decisions it needs confirmed, and the files it will change — then runs and self-corrects against it. Credit: antigravity.google ↗
Still on the free **For Individuals** plan; usage draws down against **basic weekly rate limits**, so batch related changes into one task rather than many tiny ones. Lesson → AI-generated
How-to Antigravity Everyone

The Editor View shows the agent's planned steps, code execution, and automatic fixes, giving you visibility into its self-correction process

Lesson → AI-generated
How-to Antigravity Everyone

Too many small edits exceed free limits

Grouping related changes into a single task reduces the number of API calls, keeping you under the basic weekly rate limits of the free Individual plan

Lesson → AI-generated
How-to Antigravity Everyone

Need to modify just one branch directly

Running an agent locally lets it modify the selected branch directly, suitable for small trusted changes

Native Git worktrees can be created easily when starting a new conversation. Credit: antigravity.google/blog ↗
Choosing where the agent runs costs nothing extra — it's a setting on the free plan. The saving is in safety: no half-finished agent work landing on `main`. Lesson → AI-generated
How-to Antigravity Everyone

Can't decide on terminal colours

You can launch the Antigravity command-line interface and immediately choose a colour scheme for your terminal

The **Antigravity CLI**: choose a colour scheme, type a task ('add a greeting function'), and the agent (**AGY**) returns the edit as a reviewable **diff**. Credit: antigravity.google ↗
The CLI runs on the same free **For Individuals** plan and the same weekly rate limits — no separate cost for using the terminal instead of the app. Lesson → AI-generated
How-to Antigravity Everyone

Need to request a code change in plain English

The CLI forwards your natural-language request to an agent that replies with a ready-to-review code diff

~12 min · low code Lesson → AI-generated
How-to Antigravity Everyone

Running many agents in parallel consumes the same weekly rate-limit, so total throughput increases but cost does not decrease

The Manager Surface: spawn and watch multiple agents working in parallel, each in its own workspace. Credit: antigravity.google/blog (Introducing Google Antigravity, embedded video)
Parallel agents draw from the same weekly rate-limit pool on the free plan, so they finish a multi-part job faster but don't make it cheaper — for heavy parallel use, **Google AI Pro** raises the limits (see antigravity.google/pricing for current plan pricing). Lesson → AI-generated
How-to Antigravity Everyone

Too many AI agents get blocked by rate limits

Upgrading to the Google AI Pro plan increases the rate-limit pool, allowing more concurrent agents without hitting the free-plan ceiling

Lesson → AI-generated
How-to Antigravity Everyone

Want a task to keep running after you log off

You can start work for an agent and let it finish on its own, freeing you to do other things

Set recurring schedules or one-off timers using the /schedule command or Scheduled Tasks. Credit: antigravity.google/blog ↗
Background and scheduled runs consume the same weekly quota as interactive ones; on the free plan, keep schedules light, or move to **Google AI Pro** for more headroom (see antigravity.google/pricing for current plan pricing). Lesson → AI-generated
How-to Antigravity Everyone

Need nightly test runs with failure list

You can ask an agent to pull commits, run tests nightly, and summarize failures for morning review

~12 min · low code Lesson → AI-generated
How-to Antigravity Everyone

When you want to give feedback on generated docs

Leaving comments on the generated artifacts lets you guide the agent to fix issues

Lesson → AI-generated
Tip Claude Code Everyone

First 20 primes printed — observable result of Claude Code task

When the task succeeds you see the first 20 prime numbers displayed in your terminal

**Claude Code runs in your terminal** — install it, run `claude`, and type a plain-English task at the prompt. Credit: claude.com/claude-code ↗
Claude Code needs a paid Claude plan — **Pro ($17/mo annual, $20/mo monthly)** is the entry point and includes Claude Code. There is no free tier. Lesson → AI-generated
How-to Claude Code Everyone

Complex task needs step‑by‑step guidance

Listing sub-tasks as a numbered sequence makes Claude execute them in order

**Being specific pays off**: naming the exact file and lines (`@utils.py#2-3`) gets a precise, scoped answer instead of a broad scan — shown here in Claude Code's VS Code extension, an alternative to the terminal. Credit: docs.claude.com ↗
Tighter prompts mean fewer tokens — vague asks like "improve this codebase" trigger broad scanning; specific asks keep usage (and your bill) down. Lesson → AI-generated
How-to Claude Code Everyone

Letting Claude explore first gives context, and stopping with Escape prevents wasted work

Lesson → AI-generated
How-to Claude Code Everyone

Describe change

Providing a clear description of the desired refactor prompts Claude to output a step-by-step implementation plan

Lesson → AI-generated
How-to Claude Code Everyone

You can leave plan mode at any time if you decide not to proceed with the proposed changes

Lesson → AI-generated
How-to Claude Code Everyone

Changed something you didn’t mean to

Rewinding lets you recover from a bad change without re-typing everything

**What actually fills the context window** and when — CLAUDE.md loads in full every request, Skills and MCP servers load lazily, subagents and hooks stay outside it entirely. Credit: docs.claude.com ↗
~8 min · low code `/clear` and `/compact` directly cut token use; `/usage` shows where your tokens go (skills, subagents, MCP servers). Lesson → AI-generated
How-to Claude Code Everyone

Checking the context lets you monitor how much information Claude retains at any moment

~8 min · low code Lesson → AI-generated
How-to Claude Code Everyone

Using Tab speeds up command entry and reduces typing errors

Lesson → AI-generated
How-to Claude Code Everyone

Arrow-up lets you quickly reuse recent slash commands without retyping

Lesson → AI-generated
How-to Claude Code Everyone

You can quickly see which files have uncommitted changes without running git yourself

Git operations are ordinary turns — they draw on your plan like any other task. Lesson → AI-generated
How-to Claude Code Everyone

Need to stage files and make a commit

You can let Claude handle staging and committing with a descriptive message in one turn

Lesson → AI-generated
How-to Claude Code Everyone

Need a correctly named feature branch without typing git commands

You can create a correctly-named branch without typing git commands yourself

Lesson → AI-generated
How-to Claude Code Everyone

Want to batch‑review AI edits without prompts

Shift+Tab puts Claude into a mode where it edits without prompting, letting you batch-review changes with `git diff`

Lesson → AI-generated
How-to Claude Code Everyone

Need to open a pull request from the terminal

Claude can open a pull request on your remote repository directly after committing

Lesson → AI-generated
How-to Claude Code Everyone

Choosing a model each new session

Setting a default model avoids having to switch each time you start a new session

**`/usage`** breaks down exactly what's driving your limits — parallel sessions, subagent-heavy runs, long context, cache misses — with a tip for each. Credit: docs.claude.com (What's new, week 16)
~8 min · low code Model choice is the biggest lever — Sonnet for most work, Opus only when needed; `/usage` keeps spend visible. Lesson → AI-generated
How-to Claude Code Everyone

Reduces token usage by keeping full tool specs out of context until Claude actually calls the tool

~8 min · low code Lesson → AI-generated
How-to Claude Code Everyone

Can’t access design docs stored in Google Drive while coding

Enables Claude to read files stored in Google Drive directly during coding, without manual copy-paste

Lesson → AI-generated
How-to Claude Code Everyone

Big test runs flood the chat

Using subagents for big test suites or log processing prevents large outputs from cluttering the main chat

Custom **subagents** live as files under `.claude/agents/` — each with its own description so Claude knows when to delegate (here a QA and a visual-testing agent). Shown in the VS Code extension; the same subagents work from the terminal. Credit: docs.claude.com ↗
Subagents control cost by keeping verbose output in their own window and by routing simple work to faster, cheaper models like Haiku. Lesson → AI-generated
How-to Claude Code Everyone

Want to run a procedure instantly

Team members can run the full procedure with a single `/skill-name` call, eliminating copy-pasting

**Progressive disclosure**: a Skill's YAML metadata is always in context, but the body — your actual procedure — only loads once the Skill triggers, exactly as the steps above describe. Credit: anthropic.com/engineering ↗
Skills load on-demand, so moving long procedures out of CLAUDE.md and into Skills keeps your base context (and cost) smaller. Lesson → AI-generated
How-to Claude Code Everyone

Manual steps get missed

Hooks turn optional manual steps into reliable, automatically-run commands, removing reliance on Claude's memory

**Every point in the loop a Hook can attach to** — `PreToolUse` (used in the example above) is one of a dozen deterministic hook points around Claude Code's session and tool-call lifecycle. Credit: docs.claude.com ↗
A pre-processing hook (e.g. grepping a log for ERROR) can slash the context Claude reads, directly lowering token cost. Lesson → AI-generated
How-to Claude Code Everyone

Need a single, non‑interactive Claude reply

Run Claude Code non-interactively to get a single response and then exit

~8 min · low code Headless runs bill like any session; keep prompts focused since each `-p` call is its own task. Lesson → AI-generated
How-to Claude Code Everyone

Seeing what files and messages Claude has loaded helps you understand its decisions before approving changes

~8 min · low code Lesson → AI-generated
How-to Codex Everyone

Want a Python script from an English description

Codex parses the natural-language request, shows the file it will create, and waits for your approval before acting

**Codex runs in your terminal** — install the CLI, run `codex`, and type a plain-English task at the prompt. Credit: openai.com/codex ↗
~8 min · low code Codex is included with a paid **ChatGPT plan (Plus $20/mo, Pro from $100/mo)**; a **Free ($0)** and **Go ($8/mo)** tier exist for lighter use, or pay per token via the OpenAI API. Lesson → AI-generated
Tip Codex Everyone

Observing Codex's output — Fibonacci script execution

When you approve, Codex writes the script, runs it, and shows the computed sequence in your terminal

Lesson → AI-generated
How-to Codex Everyone

I don’t know what the code does

Starting with an open-ended request (e.g., "Tell me about this project") lets Codex gather context, improving later targeted edits

Codex explores first, then plans, then acts — give it room to look around before asking for changes. Credit: github.com/openai/codex ↗
Scoped prompts and a clear "done" signal mean fewer model round-trips — less of your plan's usage per task. Lesson → AI-generated
How-to Codex Everyone

Need to keep AI from touching other files

A sandbox isolates Codex's file operations, protecting critical paths like .git

The IDE offers the same approval-mode range as the CLI — Chat, Agent, or Agent (full access). Credit: developers.openai.com/codex/sandboxing ↗
Approval mode doesn't change token cost — it changes how often you're in the loop; looser modes finish with fewer interruptions. Lesson → AI-generated
How-to Codex Everyone

Rules defined in AGENTS.md files closer to your current folder take precedence over broader definitions

One-time setup — the rules ride along every session at negligible cost and save you repeating yourself. Lesson → AI-generated
How-to Codex Everyone

Having to repeat conventions for every task

Writing your conventions once in AGENTS.md lets Codex enforce them on every task without extra effort

Lesson → AI-generated
How-to Codex Everyone

Need quick, cheap edits for routine work

Use the mini model for light or time-sensitive edits to reduce cost and increase speed

Model choice is the main cost lever — the mini model is markedly cheaper for routine edits; save the frontier model for hard problems. Lesson → AI-generated
How-to Codex Everyone

Need to lock in a model before starting the CLI

Specify the desired Codex model when starting the CLI to avoid later switches

~8 min · low code Lesson → AI-generated
How-to Codex Everyone

Providing the exact symptom or error message lets Codex locate the failure in the codebase

A real Codex run: bug reported, minimal fix applied, tests run to confirm, changed files listed for review. Credit: openai.com/index/introducing-upgrades-to-codex ↗
Minimal, high-confidence changes mean fewer iterations and less usage than open-ended "fix it all" requests. Lesson → AI-generated
How-to Codex Everyone

Want the assistant to know my open files and selections

Providing open files, selections, and @file references lets Codex work with full project context

Install the **Codex extension** and it docks right in your editor's sidebar — full file context, model switching, and a one-click path to offload long jobs to the cloud. Credit: developers.openai.com ↗
The IDE extension uses the same plan and usage as the CLI — no separate charge for running it in your editor. Lesson → AI-generated
How-to Codex Everyone

My prompts take forever locally

Long-running prompts can be sent to a cloud environment, freeing your local IDE

Lesson → AI-generated
How-to Codex Everyone

AI thinks too shallow or too deep

Adjusting reasoning settings tailors how much thought Codex applies to a request

Lesson → AI-generated
How-to Codex Everyone

Need to run long or parallel jobs without watching them

You can off-load long or parallel jobs to Codex's cloud so they run without your supervision

Delegate from **chatgpt.com/codex**, your IDE, or by tagging `@codex` on a GitHub issue — Codex works in its own cloud environment and comes back with a pull request. Credit: openai.com/codex ↗
Cloud tasks draw on your ChatGPT plan's usage; running several in parallel uses proportionally more. Lesson → AI-generated
How-to Codex Everyone

Want cloud jobs to run from a GitHub issue

Tagging `@codex` on an issue or pull request automatically hands the job to Codex's cloud

Lesson → AI-generated
How-to Codex Everyone

Need to hook up an external tool

You can extend Codex with external tools by defining an MCP server in the configuration file

MCP adds capability, not a separate fee — you still pay only for model usage on your plan. Lesson → AI-generated
How-to Codex Everyone

When you need only the final answer from a command

You can pipe the final message directly into other tools or files

Each `codex exec` is its own run and bills like any task; keep the prompt focused for CI. Lesson → AI-generated
How-to Codex Everyone

Use `--json` to get a structured JSON stream suitable for automated processing

Lesson → AI-generated
How-to Codex Everyone

Want the answer saved without extra redirection

Specify an output path so Codex writes its final answer without needing extra redirection

Lesson → AI-generated
How-to Codex Everyone

Let AI change my files while blocking all other actions

Grant Codex write access to the current workspace while keeping other permissions restricted

Lesson → AI-generated
How-to Codex Everyone

Start with the Plus plan to cover regular study work without overpaying

Plus $20/mo · Pro from $100/mo · Go $8/mo · Free $0 · Business pay-as-you-go · Enterprise/Edu custom — plus API pay-per-token as an alternative. Lesson → AI-generated
How-to Codex Everyone

Move to the Pro plan only after you hit Plus's rate-limit ceiling

Lesson → AI-generated
How-to Codex Everyone

Use the Business plan for on-demand scaling without a fixed monthly fee

Lesson → AI-generated
How-to Codex Everyone

Verbally labeling each loop stage reinforces the mental model and improves debugging of agent behavior

Lesson → AI-generated
How-to Copilot Everyone

When you type, Copilot shows faint gray text (ghost text) that can be accepted or ignored

**Write a plain-English comment and Copilot generates from it** — right inside VS Code. Type the description, and it proposes the next lines as ghost text you accept with Tab. Credit: github.blog ↗
**Free** plan = **$0/mo**, 2,000 code completions per month plus limited chat and agent usage, with access to multiple models. **Code completions don't consume AI Credits.** Verified students get unlimited completions free via the GitHub Student Developer Pack. Lesson → AI-generated
How-to Copilot Everyone

Need to turn AI suggestions into actual code quickly

Pressing Tab inserts the suggested ghost text as real code, letting you build programs line-by-line

Lesson → AI-generated
How-to Everyone

Placeholder file names in script

You must replace Copilot-generated placeholder file names with actual CSV files before running the script

Lesson → AI-generated
How-to Copilot Everyone

Write a detailed comment before a function

Starting the function definition after a detailed comment lets Copilot suggest the body, next lines, or whole blocks

Steer inline autocomplete, then **accept with Tab** (or reject with Escape) — Copilot suggests the next edit, and you keep only what you want. Credit: docs.github.com ↗
Inline completions are **unlimited on Pro** and capped at 2,000/month on Free — and **completions never spend AI Credits**, so iterating costs nothing on the credit meter. Lesson → AI-generated
How-to Copilot Everyone

Want a quick way to accept suggested code

Pressing Tab accepts the suggested line or block, allowing you to build the function piece by piece

Lesson → AI-generated
How-to Copilot Everyone

You can launch the in-editor Chat without leaving your IDE

The **Copilot Chat** panel is your in-editor tutor: attach a file or selection, type `/explain` (or ask in plain language) to understand an error or get a refactor — without leaving VS Code. Credit: github.blog ↗
**Chat, agents, code review, and CLI features DO consume AI Credits** (unlike completions). The Free plan includes limited chat usage; **Pro** ($10/mo) adds **$15/mo in GitHub AI Credits**. Lesson → AI-generated
How-to Copilot Everyone

You can keep the dialogue open to ask for clarifications, simpler code, or added comments

Lesson → AI-generated
How-to Copilot Everyone

Need to work on several source files in one go

Lets Copilot plan, write, run, and iterate over several project files in one request

**Agent Mode** edits across multiple files at once — here it changed 4 files and offers **Keep** or **Undo** so you review every edit before accepting. Credit: github.com/features/copilot ↗
**Agent Mode consumes AI Credits.** Free includes limited agent usage; **Pro** ($10/mo) comes with **$15/mo in AI Credits**, **Pro+** ($39/mo) adds premium models plus **$70/mo in Credits**. A deep multi-file run costs more than a single chat. Lesson → AI-generated
How-to Copilot Everyone

Want to approve or reject every AI edit

Gives you final authority to accept or reject every modification Copilot made

Lesson → AI-generated
How-to Copilot Everyone

A quick test validates that Copilot's numerical output matches known results, catching errors early

Copilot lets you **choose which model answers** — even the free plan gives access to several, including Anthropic (Claude) and OpenAI (GPT). Pick the model, then verify what it writes. Credit: docs.github.com ↗
Premium models live on **Pro+** ($39/mo, $70/mo in Credits) and **Max** ($100/mo, $200/mo in Credits, priority access to new models). Premium-model chat draws on your **AI Credits**. Lesson → AI-generated
How-to Copilot Everyone

You can open the Copilot CLI directly in your terminal and it will confirm you are logged in before accepting tasks

The **GitHub Copilot CLI** running in a terminal — it can 'write, test and debug code right from your terminal', with `@` to mention files and `/` for commands. Credit: github.com/features/copilot ↗
**CLI features consume AI Credits** (like chat and agents), so they draw on your plan's monthly Credit allowance — completions remain the only free-of-credits feature. Lesson → AI-generated
How-to Copilot Everyone

Typing `?` shows the built-in help menu so you can discover available shortcuts and usage tips without leaving the terminal

Lesson → AI-generated
How-to Copilot Everyone

Can’t tell AI which file to use

Using `@` before a filename tells Copilot which existing file the command should act on

Lesson → AI-generated
How-to Copilot Everyone

Want to execute a suggested command instantly

Prefixing a suggestion with `/` lets you execute the generated command immediately from the CLI

Lesson → AI-generated
How-to Copilot Everyone

Always review each generated command before executing it to avoid unintended side effects

Lesson → AI-generated
How-to Copilot Everyone

Need to locate all FASTA files and see how many sequences each contains

You can ask Copilot to produce a concrete shell pipeline for a specific file-processing task

~10 min · low code Lesson → AI-generated
How-to Copilot Everyone

GitHub groups AI agents with human teammates, making them selectable for any issue

GitHub's **Select assignees** menu — assign **Copilot** to an issue like a teammate, alongside third-party agents **Claude (Anthropic)** and **Codex (OpenAI)**. Credit: github.com/features/copilot ↗
The **coding agent consumes AI Credits**. Org plans price per seat: **Business = $19/seat/mo**, **Enterprise = $39/seat/mo**; individual paid tiers include a monthly Credit allowance. Lesson → AI-generated
How-to Copilot Everyone

Review AI‑generated code changes

After assignment, the coding agent proposes code changes that you review and merge just like a human teammate

Lesson → AI-generated
How-to Cursor Everyone

My code is scattered and I need the AI to see it

Opening a folder lets the AI see your codebase and generate files in the right place

**Cursor is VS Code with AI built in**: describe a change in the chat sidebar and it writes the code, then holds it in a reviewable diff — you accept before anything is saved. Credit: cursor.com/docs ↗
The **Hobby** plan is **free with no credit card**, including **limited Agent requests and limited Tab completions** — enough to follow this course's first lessons. Lesson → AI-generated
How-to Cursor Everyone

You retain control by inspecting the suggested modifications before they become part of your project

Lesson → AI-generated
How-to Cursor Everyone

You can type faster by letting Cursor suggest whole lines or functions as you write code

Cursor's three panes — sidebar, file-aware chat, and a reviewable diff. Credit: cursor.com ↗
~8 min · low code Both Tab completion and chat draw on your plan's included usage. On **Hobby** these are **limited**; **Pro** ($20/mo) adds generous included usage so you rarely think about it. Lesson → AI-generated
How-to Cursor Everyone

Press Tab to accept an autocomplete suggestion

Pressing Tab confirms the autocomplete suggestion, inserting it instantly

Lesson → AI-generated
How-to Cursor Everyone

Use the chat to understand code snippets and request concise modifications rather than large rewrites

Lesson → AI-generated
How-to Cursor Everyone

Need to edit many files at once

Activating Agent mode lets the AI read your project and write changes across many files automatically

**Agent mode** in the chat sidebar reads your project and writes changes across multiple files, then stops at a reviewable diff — accept or reject before anything touches your folder. Credit: cursor.com/docs ↗
Agent runs consume included usage by request; **Hobby** has **limited Agent requests**, so spend them on real features. **Pro** includes generous usage for Agent and Composer. Lesson → AI-generated
How-to Cursor Everyone

Need a script to clean a gene CSV and plot a clustered heatmap

Providing a clear English description to the agent yields a ready-to-run script spread over the necessary files

~8 min · low code Lesson → AI-generated
How-to Cursor Everyone

Knowing your plan's request quota helps you allocate Agent runs to high-value features

Lesson → AI-generated
How-to Cursor Everyone

Not sure which AI model fits your task

Enabling Auto lets Cursor automatically pick the most suitable model for each task

The model picker: switch between frontier models per task, with cost and context-window details shown inline. Credit: youtube.com/@cursor_ai ↗
Model selection directly affects spend: a pricier model eats included usage faster. On **Pro** ($20/mo) you get generous included usage for Auto and Composer to absorb everyday switching. Lesson → AI-generated
How-to Cursor Everyone

Choosing a more capable (heavier) model improves answer quality on difficult tasks

Lesson → AI-generated
How-to Cursor Everyone

Different models have different API costs, so picking a model directly influences how fast you consume included usage

Lesson → AI-generated
How-to Cursor Everyone

The agent can answer using actual project files instead of guessing

Beyond your own files, **MCPs** connect the agent to external tools and data — here it calls a connected Postgres server's `list_schemas` and works from the real result, not a guess. Credit: cursor.com/docs ↗
Context features themselves are about quality, not extra fees; the usual usage metering applies to the model requests they drive. **Teams** plans add Bugbot agentic code reviews and shared-context cloud agents. Lesson → AI-generated
How-to Cursor Everyone

Project knowledge disappears after each chat

Shared-context cloud agents let multiple users work with the same project knowledge

Lesson → AI-generated
How-to Cursor Everyone

Need a free AI assistant with limited requests

You can start using Cursor without paying by selecting the Hobby tier

**Cursor's pricing page** (Monthly billing) — Hobby is free, Individual/Pro is $20/mo (Pro+/Ultra step up from there), Teams is $40/user/mo, Enterprise is custom.
  1. **Hobby** — free tier to start.
  2. **Pro** — $20/mo (Pro+ $60, Ultra $200).
  3. **Teams** — $40/user/mo; **Enterprise** — custom.
Credit: cursor.com ↗
Free to start on **Hobby**; **$20/mo** for **Pro**; **free for one year** for eligible students. Because different models have different API costs, model choice is what governs how fast included usage is spent. Lesson → AI-generated
How-to Cursor Everyone

Cursor Pro plan

Upgrading to Pro gives you $20 of monthly API usage and higher limits for Auto and Composer

Lesson → AI-generated
How-to Cursor Everyone

Pro+ offers more generous monthly credits for heavier users at a higher price

Lesson → AI-generated
How-to Cursor Everyone

Cursor Ultra tier

Ultra delivers the highest monthly credit for power users or teams needing large API budgets

Lesson → AI-generated
How-to Cursor Everyone

Want a single bill for all users

Teams lets multiple users share billing, a marketplace, and shared-context agents

Lesson → AI-generated
How-to Cursor Everyone

Want a full year of premium features for free

Eligible students receive a full year of Pro features at no cost

Lesson → AI-generated
How-to opencode Everyone

Want a full-screen terminal view of your current folder

Launching opencode from any directory opens a full-screen terminal UI that loads the current project

The opencode **terminal UI** mid-session: it greps and reads files to locate the right code, shows a running **token count**, and runs in **Build** mode (here on Claude Opus via OpenCode Zen). Credit: github.com/sst/opencode ↗
The opencode tool itself is **free and open source**. You only pay your model provider for the tokens a session uses (set up in the next lesson) — this first small task is a few cents at most. Lesson → AI-generated
How-to opencode Everyone

Turn a sentence into a working script

You can turn a plain English sentence into working code without leaving the terminal

~8 min · low code Lesson → AI-generated
How-to opencode Everyone

Need to verify a generated script instantly

After approval, opencode runs the generated script and displays its output right in the terminal

Lesson → AI-generated
How-to opencode Everyone

Need code‑assistant AI without extra cost

You can log in with a GitHub Copilot or ChatGPT Plus/Pro account and let opencode use that subscription

opencode's model picker — shown here in the web interface, the same picker as the TUI — lets you swap the connected provider per session (Gemini 3 Pro here; Anthropic, OpenAI, or a local Ollama model elsewhere). Credit: opencode.ai/docs/web/ ↗
BYOK means token costs land **directly on your provider bill** — monitor usage or cap spending to avoid surprises. Reusing a Copilot or ChatGPT subscription means no new bill at all. Lesson → AI-generated
How-to opencode Everyone

Want the AI to make real file changes

Switching to build mode enables the agent to apply code edits based on the approved plan

Both modes use your model's tokens like any other turn — but planning first usually **saves** money by avoiding wrong edits you'd have to undo. Lesson → AI-generated
How-to opencode Everyone

Seeing the current mode in the bottom status bar prevents accidental edits

Lesson → AI-generated
How-to opencode Everyone

Agents stepping on each other's files

Assign each agent a distinct, non-overlapping subtask so they don't interfere with each other's files

Each running session consumes your model's tokens independently — two agents cost roughly twice one, so parallelise jobs that are genuinely independent. Lesson → AI-generated
How-to opencode Everyone

Need to add unit tests

Demonstrates a concrete independent job for one agent

Lesson → AI-generated
How-to opencode Everyone

Want a parallel subtask for another agent

Shows a separate independent job for another agent

Lesson → AI-generated
How-to opencode Everyone

Terminal‑only agent feels limiting

You can launch the same opencode agent inside a native desktop application instead of the terminal

The desktop app and IDE extension are part of the free open-source tool — you still only pay your model provider for tokens. Lesson → AI-generated
How-to opencode Everyone

Need AI help while coding

You can invoke opencode directly from your code editor, keeping the workflow inside the IDE

Lesson → AI-generated
How-to opencode Everyone

No API key management

You can run models without managing your own API keys by using OpenCode Zen's hosted service

**OpenCode Zen's pricing table** — eight models are free, and the paid ones are billed per 1M tokens with input, output and cached-read priced separately.
  1. **Free tier** — five models at $0 to start.
  2. **Pay-as-you-go** — paid models billed per 1M tokens.
  3. **Hosted** — no provider key of your own to manage.
Credit: opencode.ai ↗
Zen is **pay-as-you-go per 1M tokens** with a **free five-model tier**; paid models span **$0.14/$0.28 to $10/$50 per 1M tokens**. Auto-reload and per-member limits keep costs in check. Lesson → AI-generated
How-to opencode Everyone

Looking for free AI models to experiment with

You can experiment with opencode at zero cost using the free tier's five pre-selected models

Lesson → AI-generated
How-to opencode Everyone

Auto-reload guardrail

Your balance automatically replenishes when it falls low, preventing interruptions

Lesson → AI-generated
How-to opencode Everyone

Unsure about extra charge on credit‑card top‑ups

Every credit-card payment incurs a small additional charge, so factor it into budgeting

Lesson → AI-generated
How-to Windsurf Everyone

Need to assign an entire project in plain English

The Cascade panel lets you give the agent a natural-language description of an entire task, not just a single file

**Cascade** is Devin Desktop's agent panel: open any folder, type a whole task in plain English, and it reads your project, writes the code, and shows you the edits to accept. Credit: docs.devin.ai ↗
The **Free** plan ($0/month) includes unlimited Tab completions, unlimited inline edits, and a light agent quota — enough to follow this course, though heavy agent use exhausts it in ~2–3 real coding days. Lesson → AI-generated
How-to Windsurf Everyone

Task description is vague

Providing a clear English task lets Cascade generate, explain, and run code automatically

Lesson → AI-generated
How-to Windsurf Everyone

Need to check auto‑generated script before using it

You retain control by reviewing the generated script and its explanations before applying them

Lesson → AI-generated
How-to Windsurf Everyone

Want the generated script to run on its own

If Python is installed, Cascade can run the script and show its output without manual steps

Lesson → AI-generated
How-to Windsurf Everyone

Need to specify exact script edit

Guides Cascade to edit the exact part you want without ambiguity

Cascade is a conversation, not a one-shot: it asks clarifying questions and offers options mid-task, so you **refine the plan together** before it writes code. Credit: docs.devin.ai ↗
Tab completions and inline edits are unlimited and free on every plan; each Cascade task draws on your agent quota, so batch related changes to make them count. Lesson → AI-generated
How-to Windsurf Everyone

Need to change a few things at once

Allows Cascade to apply multiple small changes together, saving quota and keeping context

Lesson → AI-generated
How-to Windsurf Everyone

You can pause and resume work without losing prior state, treating Cascade like a teammate

Lesson → AI-generated
How-to Windsurf Everyone

Need to make lots of edits but keep quota low

Reduces agent quota consumption by grouping related modifications

Lesson → AI-generated
How-to Windsurf Everyone

Need code suggestions that don’t eat your usage

You can insert suggested code instantly with Tab, and it never counts against your agent quota

**Windsurf Tab** is the free, unlimited autocomplete: as you type it suggests the next lines (press Tab to accept), with extras like Supercomplete and Tab-to-Jump — none of it touching your agent quota (screenshot shows pre-rename Windsurf branding). Credit: docs.devin.ai ↗
Both Tab completions and inline edits are **unlimited and free on every plan**, so this is the cheapest way to make small changes. Lesson → AI-generated
How-to Windsurf Everyone

Want to change a piece of code right where it is

You can modify a specific piece of code directly in place, and the edit is unlimited and free

Lesson → AI-generated
How-to Windsurf Everyone

All the errors listed in the editor

You can hand all listed problems from the editor directly to Cascade, letting it propose fixes across relevant files without manual copying

**Explain and Fix**: select an error in the editor and Cascade explains what went wrong and proposes a fix right there — no need to copy the message out. Credit: docs.devin.ai/desktop/cascade/cascade ↗
Reading and explaining errors happens inside a normal Cascade task, so it draws on your agent quota like any other task; the Free plan covers light use. Lesson → AI-generated
How-to Windsurf Everyone

Can’t tell why a line throws an error

A single error can be explained and automatically fixed right in the editor, saving you from describing it yourself

Lesson → AI-generated
How-to Windsurf Everyone

Review each suggestion before accepting

You retain control by reviewing each suggestion before accepting, ensuring only correct fixes are applied

Lesson → AI-generated
How-to Windsurf Everyone

Want to change several related files in one go

Providing a multi-file request lets Cascade edit several related files in one coordinated run

Cascade edits a file, notices it introduced **5 new lint errors**, and with **Auto-fix on** clears them itself before finishing the task. Credit: docs.devin.ai/desktop/cascade/cascade ↗
Auto-fix happens inside the same Cascade task, so it uses your agent quota rather than adding a separate charge. Lesson → AI-generated
How-to Windsurf Everyone

Need to undo a change

You can undo any change made by the agent with a single click

Hover any earlier step and click the revert arrow to roll the whole conversation’s changes back to that point. Credit: docs.devin.ai (Devin Desktop/Cascade documentation)
Reverting to a checkpoint costs nothing — it's a local snapshot, not a new agent task. Lesson → AI-generated
How-to Windsurf Everyone

Trying risky agent tasks

You can try aggressive agent tasks, then roll back if the result isn't satisfactory

Lesson → AI-generated
How-to Windsurf Everyone

You can always confirm current tier costs and quota limits on the official pricing page

Lesson → AI-generated

The same set on /recipes, filtered by tool and role.

8Videos 26

+ 14 more in the video library.

9FAQ 77

What is Aider and what is it for?

Aider is an open-source AI pair programmer that runs in your terminal. Instead of a chat box in a browser, you start a session inside your project folder and describe the change you want in plain English; Aider edits the actual files for you and commits each change to Git. It is built for working on real code you own: writing scripts, refactoring across files, adding tests, and fixing bugs. It is not a point-and-click app builder and is less suited to pure writing tasks like reports. The big idea is that you stay in your normal local workflow and keep full control of the code through Git.

Can I give Aider images, web pages, or use my voice?

Yes. Aider accepts images and web pages as context, so you can hand it a screenshot of a chart or a documentation page and ask it to implement or match what is shown, rather than describing it in words. It also supports voice-to-code, letting you dictate a request instead of typing, which is handy for longer instructions. For documentation you can use the '/read' command to import reference files, or '/paste' to insert clipboard contents including images. Aider supports more than 100 programming languages, including Python, JavaScript, Rust, Go, C++, PHP, HTML and CSS, so the same workflow carries across whatever stack your project uses.

Is my code private, or does Aider run in the cloud?

Aider runs locally on your own machine and edits files in your local Git repository, so the tool itself is not a cloud service. However, your code is not fully private by default, because Aider sends the relevant parts of your files to whichever LLM provider you choose, such as Anthropic or OpenAI, in order to generate edits. If you need everything to stay on your own hardware, run Aider against a local model through Ollama so no source code leaves your machine. Aider collects anonymous usage analytics to improve the tool, but it is opt-in: a random subset of users are asked to confirm first, and it never includes your code, chat messages, or keys. You can disable it with the --no-analytics flag.

What are the main limitations or gotchas?

Aider is terminal-only with no graphical interface, so you need basic command-line confidence to get started, and Windows users often want WSL2 for the smoothest experience. Because you pay LLM API costs directly, a heavy session on a frontier model can add up, so it pays to pick an economical model for routine work. Results also depend heavily on model quality: Aider may not work well with weaker models, which can struggle to format code edits correctly. It is a code editor, so it is less useful for pure writing tasks like lab reports or literature reviews. Finally, its safety net relies on Git, so you should work inside a repository to get clean, reversible commits.

How does Aider compare to Claude Code?

Both are terminal-based AI coding tools that edit files in your project and lean on your Git history, so the workflow feels similar. The key difference is openness and model choice: Aider is fully open-source under Apache 2.0 and is model-agnostic, letting you bring your own key for Claude, GPT, Gemini, DeepSeek, or a free local model via Ollama, with no vendor lock-in. Claude Code is Anthropic's own tool, tightly tuned to Claude models and billed through Anthropic. Choose Aider when you want maximum control, the freedom to switch models for cost or capability, and a transparent open-source tool; choose Claude Code if you specifically want Anthropic's integrated, Claude-optimised experience.

How much does Aider cost?

Aider itself is completely free and open-source under the Apache 2.0 license, so there is no subscription. What you pay for is the large language model it talks to, because you bring your own API key and are billed per token by that provider at the model's standard per-token rates. You can also run Aider against local models via Ollama for zero token cost. Aider shows the running token count and dollar cost of each change in the terminal so you can watch spend live.

How do I install Aider?

If you already have Python 3.8 to 3.13 installed, the recommended path is to run 'python -m pip install aider-install' and then 'aider-install', which sets Aider up in its own isolated environment for you. There are also one-line installers: on Mac and Linux, 'curl -LsSf https://aider.chat/install.sh | sh', and on Windows, 'powershell -ExecutionPolicy ByPass -c "irm https://aider.chat/install.ps1 | iex"'. uv and pipx are supported alternatives. After installing, you run the 'aider' command from inside your project directory. On Windows many users find WSL2 gives the smoothest experience.

Do I need an API key to start, and which LLMs work with Aider?

Yes. Aider is free software but it needs an LLM to do the actual coding, so you supply an API key from a model provider (or run a local model). It works with most major LLMs, including Anthropic Claude, OpenAI, Google Gemini, DeepSeek, xAI, Azure, Cohere, and OpenAI-compatible endpoints. The docs highlight strong performers like Gemini 2.5 Pro, DeepSeek R1/V3, Claude 3.7 Sonnet, and OpenAI o3, o4-mini and GPT-4.1. You can switch models at launch with the --model flag (for example 'aider --model sonnet'), and Aider can also run against free local models through Ollama when you want no token cost.

How do I start my first session and get Aider to write code?

Open a terminal in your project folder and run 'aider', optionally naming files you want it to edit, for example 'aider --model sonnet analysis.py'. Aider drops you into a chat prompt. Type your request in plain English, such as 'Read data.csv and print the mean and standard deviation for every numeric column.' Aider writes or edits the file, shows you the diff, and commits the change to Git with a sensible message. You keep the session open and refine conversationally with follow-up requests. If Aider is not already in a Git repository, it offers to create one, since its safety features depend on Git.

How does Aider use Git, and can I undo a change I do not like?

Every time Aider edits a file, it automatically commits those changes to Git with a descriptive, Conventional Commits style message marked to show the AI was involved. That means every AI edit is its own clean, reversible commit and you always have an audit trail of exactly what changed. If a change is wrong, type '/undo' to cleanly revert that last AI commit, and '/diff' to see all file changes since your last message. Aider works best inside a Git repo and will offer to create one. You can change this behaviour with flags like --no-auto-commits or even --no-git, though disabling Git is not recommended because you lose the easy rollback.

How do I work across multiple files in a real project?

Launch Aider with several files at once, for example 'aider --model sonnet analysis.py helpers.py', and ask for a change that spans them; Aider edits all of them in one session and commits each coherent step to Git. You do not have to load every file by hand: Aider builds a map of your codebase so the model can reason about how files relate, including callers and definitions it is not directly editing. During a session you can add or remove files with the '/add' and '/drop' commands. A good practice is to keep only the files that actually need editing in the chat, so the model is not overwhelmed by irrelevant code.

Can Aider lint and test its own code?

Yes. Aider can automatically lint and test code after each change rather than leaving you to discover breakage later. When a lint or test surfaces an error, Aider reads the output and proposes a fix, then commits the corrected version, so both the failing and fixed states are captured in your Git history. You can also drive this manually in-chat: '/test' runs your test command and shares the result, and '/run' executes an arbitrary command and feeds its output back to the model. The lint and test steps run locally on your machine, so they add nothing beyond the model calls Aider already makes. This edit, lint, test, commit loop keeps each change verified rather than just plausible-looking.

Which model should I pick, and how do I keep costs down?

Aider publishes a public model leaderboard based on its polyglot benchmark, which tests LLMs on 225 challenging Exercism exercises across C++, Go, Java, JavaScript, Python and Rust. The leaderboard reports each model's success rate alongside its cost, so you can deliberately trade accuracy against price. Use a frontier model for hard, multi-file work and a cheaper model for routine edits. To keep spend down, add only the files that need editing, group related requests into one clear message, and watch the live token and dollar counts Aider prints (use '/tokens' for the running total). For zero token cost on routine edits, run a free local model via Ollama.

What is Google Antigravity?

Google Antigravity is an agent-first development platform launched in November 2025. Instead of just suggesting code like a chatbot, it autonomously plans, executes, and verifies complex tasks using AI agents that can operate your editor, terminal, and browser simultaneously. Think of it less like smart autocomplete and more like delegating a whole project to an AI assistant that works through steps on its own.

What is the Browser Subagent and what does it do?

The Browser Subagent opens a real Chrome instance the AI controls directly — it can navigate to your web app, click buttons, fill forms, and report what it finds or what breaks. This lets an agent test a website end-to-end without you doing it manually, a capability several competitors lack at this price point.

What are the free-tier quota limits, and have they changed?

The free tier launched with a generous daily agent-request allotment in November 2025 and was cut sharply within weeks, followed by several further quota reductions through early 2026 that caused some Pro subscribers to hit multi-day lockouts. Basic editor features like tab completion remain effectively unlimited, but autonomous agent usage is tightly capped — verify the current quota before relying on it.

How is it different from a chatbot like Gemini or ChatGPT?

A chatbot answers questions in a conversation window and leaves the actual work to you. Antigravity's agents take actions directly — writing files, running code in the terminal, opening a browser, clicking buttons — and keep going through multi-step tasks without you copy-pasting each response. The key difference is autonomy: the agent does, not just says.

Is it free? What are the pricing plans?

There is a free tier ($0/month) during public preview with core agent access and a Gemini model included, but it comes with weekly usage quotas. Paid plans go through Google AI subscriptions (Pro around $20/month, with higher Ultra tiers). Free limits have been cut several times since launch, so heavy use will likely require a paid plan.

Which AI models does it use? Am I locked into Gemini?

No, it is model-agnostic. Antigravity supports Google's Gemini models (the default), Anthropic's Claude, and OpenAI's open-weight GPT-OSS models, and you can pick different models for different tasks. Using a non-Google model may require your own API key from that provider, which adds cost.

Do I need a Google account to use it?

Yes, you sign in with a Google account. Personal Google accounts work for the free and Pro tiers; Google Workspace accounts are used for enterprise/team plans, subject to admin settings and geographic availability. There is no anonymous or guest access.

+ 57 more in the library.

10Glossary 150 terms

Show the 150 terms
Claude Code
claude
The command you type in your terminal to start a Claude Code session; running it opens an interactive AI coding assistant in your project folder.
claude -p "query"
Runs Claude Code in print mode — Claude answers the query and exits immediately, making it useful in scripts and automated pipelines.
-p
Short form of --print; tells Claude Code to respond to a single query and exit without opening an interactive session.
claude --permission-mode plan
Starts Claude Code in plan mode so it describes what it intends to do before making any file or code changes, letting you review and approve first.
default
The standard permission mode where only read operations run without prompting; file edits and shell commands always ask for your approval.
acceptEdits
A permission mode that auto-approves file edits and common filesystem commands (mkdir, touch, rm, mv, cp, sed) without prompting, while still asking before other shell commands.
plan
A permission mode where Claude reads files and runs shell commands to explore your codebase, but cannot edit source files until you approve its proposed plan.
/
Typing a forward slash at the start of your message opens the command menu so you can see and filter all available Claude Code commands.
/help
Shows a list of available commands and a brief description of each.
/clear
Starts a fresh conversation with empty context; the previous conversation stays available via /resume.
/resume
Opens a picker to return to a previous conversation by name or ID, restoring the full message history.
/rewind
Rolls the conversation and code changes back to an earlier point, or summarizes from a selected message, letting you undo a direction that went wrong.
/usage
Shows session cost, plan usage limits, and activity statistics, including a breakdown by skill, subagent, and MCP server on paid plans.
/compact
Summarises the conversation so far to free up context space; you can optionally tell it what to focus on (e.g. /compact Focus on test output).
/context
Displays a visual breakdown of what is filling your context window and shows optimization suggestions and capacity warnings.
/model
Opens a picker to switch the AI model Claude Code uses; the choice is saved as your default for new sessions.
/config
Opens the Settings panel where you can change your theme, model, output style, and other preferences.
/mcp
Manages MCP server connections and OAuth authentication; run with no argument to open the interactive list.
/schedule
Creates or manages routines that run on Anthropic-managed cloud infrastructure on a schedule, even when your computer is off.
/loop
Runs a prompt repeatedly while the session stays open; omit the interval and Claude self-paces between iterations.
/skill-name
The pattern for invoking any custom skill you have created; replace skill-name with the actual name of your SKILL.md file (e.g. /review-pr).
.claude/skills/review-pr/SKILL.md
An example skill file path; a SKILL.md placed in .claude/skills/<name>/ defines a reusable workflow Claude loads when you run /<name>.
.claude/commands/*.md
The legacy location for custom command files; any .md file placed here also creates a slash command and continues to work alongside the newer .claude/skills/ layout.
model: haiku
A settings key that pins the AI model to Haiku (a faster, lower-cost Claude model) for a project or session.
PreToolUse
A hook event that fires just before Claude runs any tool, letting you inspect or block the action with a shell script before it takes effect.
Bash
Claude Code's built-in shell tool that executes terminal commands on your machine; it is the tool name used in permission rules and hooks.
pandas
A popular Python library for working with tabular data such as spreadsheets and CSV files; used in many data-analysis scripts.
seaborn.histplot
A Python function from the Seaborn visualisation library that draws a histogram (a bar chart showing how values are distributed).
pytest tests/ -q
Runs the automated test suite in the tests/ folder using pytest, with -q (quiet) flag to show only failures rather than every test name.
git diff
A git command that shows exactly which lines have been added or removed in your files since the last saved version.
gh
The official GitHub command-line tool; Claude Code uses it to create pull requests, read comments, and interact with GitHub repositories.
aws
The Amazon Web Services command-line tool; lets you control cloud services such as S3 storage and Lambda functions from the terminal.
None
Python's built-in value meaning 'nothing' or 'no result'; a function returns None when it has no explicit return value.
ValueError
A standard Python error raised when a function receives an argument of the right type but an unacceptable value, such as a negative number where a positive one is required.
Codex
codex
The OpenAI Codex CLI tool — a lightweight AI coding agent you run in your terminal that can read files, write code, and execute commands on your behalf.
codex exec
Runs Codex non-interactively from the command line, streams results to your terminal or a file, and exits when the task is done — useful for scripting or automation.
codex mcp
A Codex subcommand that manages connections to Model Context Protocol servers, which let Codex reach external tools and data sources beyond your local files.
-i
Short for --image; attaches one or more image files to your prompt so Codex can see screenshots, diagrams, or other visuals when answering.
--image
Attaches one or more image files to your prompt so Codex can see screenshots, diagrams, or other visuals when answering.
-m
Short for --model; lets you choose which AI model Codex uses for a session (e.g., codex -m gpt-5.5).
--json
Makes Codex print its output as newline-delimited JSON events instead of formatted text — useful when another program needs to read the results.
--output-schema
Points Codex to a JSON Schema file; Codex validates its final response against that schema before finishing, ensuring the output has the exact shape your code expects.
-o <path>
Short for --output-last-message; writes the assistant's final reply to a file at the given path, making it easy to pipe results into other scripts.
/model
An interactive slash command that lets you switch the AI model Codex is using mid-session without restarting.
/permissions
An interactive slash command that sets what Codex is allowed to do without asking first — adjusting the approval threshold for the current session.
~/.codex/config.toml
The main user-level configuration file for Codex, stored in your home directory, where you set durable defaults like model, MCP servers, and feature flags.
~/.codex/AGENTS.md
A personal instructions file Codex reads before every session — write it in plain English to tell Codex about your preferences, coding style, or recurring context.
.git
A hidden folder Git creates inside every repository to store the project's full version history and configuration — its presence tells tools (including Codex) that the folder is a Git repo.
workspace-write
A sandbox mode that lets Codex read and edit files inside your current project folder, but blocks it from writing elsewhere on your computer or accessing the network.
untrusted
An approval policy that lets Codex run commands it recognises as safe automatically but stops and asks you before running anything outside its trusted set.
on-request
An approval policy that lets Codex work freely within its sandbox but pauses to ask for your permission whenever it needs to go beyond those boundaries.
never
An approval policy that lets Codex act fully autonomously without asking for permission — it still respects the sandbox limits, but never pauses for human approval.
npm test
A standard command that runs the automated tests defined for a JavaScript or TypeScript project — if all tests pass, the code behaves as expected.
gpt-5.5
OpenAI's most capable Codex model (as of mid-2026), best for complex coding, research, and multi-step tasks — the recommended default when quality matters most.
gpt-5.4-mini
A faster, lower-cost Codex model suited for simpler or repetitive tasks where speed matters more than maximum reasoning power.
gpt-5.3-codex-spark
A text-only research-preview Codex model built for near-instant response (over 1,000 tokens per second), optimized for real-time coding iteration — available to ChatGPT Pro subscribers.
opencode
opencode
An open-source AI coding agent that runs in your terminal (or as a desktop app or IDE extension) and helps you read, write, and change code by chatting with a large language model.
TUI
Terminal User Interface — the interactive chat screen you see when you launch opencode in your terminal, where you type messages and watch the AI respond.
Plan mode
A built-in primary agent (switched to with the Tab key) where opencode is restricted from making file changes, so it analyses and describes how it would approach a task without touching your code.
Build mode
The default primary agent where opencode has full permission to read, write, and edit files in your project.
AGENTS.md
A plain-text file you place in your project folder (or home config folder) that gives the AI standing instructions about your project's structure, coding conventions, and quirks.
opencode.json
The main configuration file for opencode where you set your preferred model, provider API keys, tool permissions, and other project-level settings.
provider
A company that supplies the AI model opencode talks to (for example Anthropic, OpenAI, or Google); you configure your API key for each provider you want to use.
model
The specific AI brain opencode uses to answer your questions and write code (for example claude-sonnet-4-5 or gpt-4o); you can switch models mid-session.
OpenCode Zen
A paid AI model gateway maintained by the opencode team that offers a curated set of tested and verified models on a pay-as-you-go basis, so you can access quality-checked models without setting up separate provider accounts.
agent
A named AI assistant profile in opencode with its own set of instructions, permitted tools, and optionally a specific model — for example a 'Plan' agent that cannot edit files.
subagent
A specialist agent that a primary agent can invoke automatically to handle a subtask (like researching external docs); you can also invoke one manually by typing @agentname in your message.
skill
A reusable instruction set stored in a SKILL.md file that agents can load on demand, like a reference manual the AI can consult for a specific topic or workflow.
MCP server
An external tool server that connects to opencode via the Model Context Protocol, giving the AI access to additional capabilities such as searching documentation or querying a database.
snapshot
A save-point opencode automatically tracks as the AI makes file changes, used by the undo system to restore your code if you want to reverse the AI's edits.
session
One continuous conversation with opencode, including all your messages, the AI's replies, and any file changes made during that exchange.
permission
A setting that controls whether opencode can use a particular tool automatically (allow), must ask you first (ask), or is blocked from using it entirely (deny).
/init
A slash command that scans your project and automatically generates an AGENTS.md file with a summary of the codebase structure and build instructions.
/undo
A slash command that removes your last message, the AI's response, and any file changes made during that exchange, letting you rephrase and try again.
/redo
A slash command that re-applies a change you previously undid.
/share
A slash command that generates a shareable public web link to your current conversation so teammates can review the chat without needing opencode installed.
/compact
A slash command that summarises the current conversation to reduce context size, useful when a long session is making responses slower or less focused.
/new
A slash command that starts a fresh session, clearing the conversation history so you can begin a new task with a clean slate.
/models
A slash command that lists all AI models available to you through your configured providers.
/sessions
A slash command that shows your previous conversations so you can switch back to an earlier session and continue where you left off.
/thinking
A slash command that toggles the display of the model's reasoning blocks, letting you see the thinking the AI showed before answering — it controls visibility only, not whether the model reasons.
LSP
Language Server Protocol — a standard opencode uses to connect to language servers and receive diagnostics (errors, warnings) as feedback that helps the AI detect and fix code issues.
compaction
The process of automatically summarising older parts of a conversation to keep the context window from filling up, helping the AI remain accurate on long tasks.
Aider
--model
An Aider command-line flag that specifies which AI model to use for the main chat session, for example --model claude-3-opus-20240229 to select a specific Claude model.
/undo
An Aider slash command that undoes the last git commit if it was made by Aider, restoring your files to how they were before that change.
/tokens
An Aider slash command that reports how many tokens the current chat context is using, so you can see how much of the model's context window is occupied.
auto-commit
Aider's default behaviour of committing every AI-made change to Git with an auto-written message, so each edit has an audit trail you can undo.
codebase map
An index Aider builds of your project so the model can reason across files (callers, definitions, imports) without you pasting every file in.
--model
The launch flag that sets which LLM Aider uses for the session (e.g. 'aider --model sonnet' or '--model o4-mini'), so you can match model to task.
jcode
rustup
The installer and manager for the Rust programming language toolchain.
cargo build --release
A command that compiles the Rust project into an optimized binary placed in the target/release folder.
PATH
An environment variable that tells the operating system where to look for executable files.
vector embedding
A high‑dimensional numeric representation of text used to compare similarity between pieces of conversation.
cosine similarity
A mathematical measure that scores how close two vectors are, with higher values meaning more similar content.
webhook
An automatic HTTP request sent by jcode to a specified address when an event like a file edit occurs.
diff
A display of line‑by‑line changes between two versions of a file, often shown by the git diff command.
dry-run
An option that runs a command without making permanent changes, used here to test startup time only.
EXE
A Windows executable file that can be run directly from the terminal or double‑clicked.
API key
A secret token you paste into JCode after /login so it can call an external AI service on your behalf.
curl
A command‑line tool that downloads data from a URL, used here to fetch and install J Code in one step.
ambient mode
A background process that periodically re‑indexes stored vectors and removes low‑relevance entries to keep memory fresh.
Cursor
sns.clustermap
A function from the seaborn visualisation library that draws a heatmap with rows and columns automatically reordered so that similar values cluster together.
utils.py
A Python file named by convention to hold small helper functions shared across multiple scripts in the same project, keeping the main files shorter and easier to read.
Agent mode
A mode where Cursor autonomously reads your project and writes changes across multiple files in one session, rather than answering a single question.
Tab
Cursor's line-by-line code suggestion that appears as you type; press Tab to accept it or keep typing to ignore it.
model picker
The dropdown that lets you switch which model handles a request (Claude, GPT, Gemini, or Auto) on a per-task basis.
diff
The view Cursor shows of what the AI changed in a file; you review it and choose to accept or reject before it is saved.
ModuleNotFoundError
A Python error meaning a required package is not installed; in Agent mode Cursor can detect this and install the missing package automatically.
Auto
The model-picker option that lets Cursor choose the best model for each request automatically, useful for routine edits.
Devin Desktop
argparse
A built-in Python module that lets your script accept named options (like --input or --threshold) typed on the command line, so you don't have to hard-code values inside the file.
--input
A command-line flag passed to a Python script (via argparse) that tells the script which file to read; you type it after the script name, e.g. python filter.py --input data.csv.
evalue
Short for "expect value" — a BLAST statistic that measures how likely a sequence match is to be a coincidence; lower values (e.g. 1e-10) mean a more trustworthy biological match.
import csv
A Python statement that loads the built-in csv module so your script can read and write spreadsheet-style files with rows and columns.
NameError
A Python error that fires when your code refers to a variable or function that hasn't been defined yet — usually a typo or a missing assignment.
TypeError
A Python error that fires when an operation is applied to the wrong kind of value — for example, trying to do arithmetic on a piece of text instead of a number.
Cascade
Devin Desktop's (formerly Windsurf's) agent panel that reads your whole project and applies multi-file changes from a plain-English task description.
checkpoint
A snapshot of your project saved before each Cascade step, letting you roll an agent change back in one click.
Send to Cascade
An action that pushes the editor's Problems-panel errors into the Cascade conversation so the agent can fix them in context.
Auto-fix
A Cascade setting that detects lint errors introduced mid-task and corrects them automatically before the task finishes.
Antigravity
Antigravity
Google's standalone desktop application for AI-assisted software development, where one or more AI agents autonomously plan, write, and test code on your behalf.
Antigravity CLI
A command-line version of Antigravity that lets you run agents directly from your terminal without opening the desktop app.
Antigravity SDK
A set of developer tools that lets you embed Antigravity's agent capabilities inside your own programs or infrastructure.
Agent
An AI process that Antigravity launches to carry out a task — it can read files, run code, browse the web, and make changes autonomously.
Manager Surface
The part of the Antigravity interface where you can launch, watch, and control several agents running different tasks at the same time.
Editor View
The traditional code-editor side of Antigravity, which supports AI tab-completions and inline commands for developers who prefer a hands-on coding style.
Artifacts
Structured outputs an agent produces — such as task lists, implementation plans, code diffs, screenshots, and walkthroughs — so you can review what it did before accepting the changes.
Skills
Packaged instruction files that teach an agent how to handle a specific kind of task; you can add them globally or per project.
Review-Driven Development
An Antigravity mode where the agent works independently but pauses at important steps so you can approve or reject significant changes before they are applied.
Plan mode
An agent mode where the agent first produces a written implementation plan for you to inspect and approve before it starts making any changes to your code.
Fast mode
An agent mode for small, single-step tasks where the agent acts immediately without stopping to show a plan first.
Project
A folder (or set of folders) you open in Antigravity that defines the workspace boundary — the files, tools, and permissions the agent is allowed to use.
Conversation
A message thread inside a project where you type instructions to the agent and see its replies; one project can contain many conversations.
MCP
Model Context Protocol — a standard way to connect external tools (databases, APIs, services) to an agent so it can use them during a task.
/browser
A slash command that tells the agent to open a real web browser and carry out a web-based action you describe.
/schedule
A slash command that sets up a task to run automatically at a fixed time or on a repeating schedule, without you having to start it manually.
Gemini 3.5 Flash
The default AI model powering Antigravity agents — Google describes it as four times faster than frontier models while outperforming them on most coding and agentic benchmarks.
SKILL.md
The required file inside a Skills package that contains both YAML metadata (so the agent knows when to load the skill) and Markdown instructions (telling it what to do).
GitHub Copilot
.py
The file extension for a Python source code file — any file ending in .py contains Python instructions the computer can run.
def
A Python keyword that marks the start of a new function definition — everything indented beneath it is the code that runs when you call that function.
Counter
A Python built-in class (from the `collections` module) that counts how many times each item appears in a sequence and stores the results as a dictionary.
DataFrame
A table of data provided by the pandas library — it has named columns and numbered rows, similar to a spreadsheet you can manipulate with code.
KeyError
A Python error that occurs when you try to access a dictionary or DataFrame column using a name that does not exist in it.
ValueError
A Python error that occurs when a function receives a value of the right type but an inappropriate content — for example, passing an empty list where data is required.
groupby
A pandas operation that splits a table into groups based on the values in a column (like splitting experiment rows by treatment condition) so you can calculate statistics for each group separately.
.div()
A pandas method that divides every value in a Series or DataFrame by a number or another Series — commonly used to convert raw counts into proportions.
pd.read_csv
A pandas function that reads a CSV (comma-separated values) file from disk and loads it into a DataFrame so you can analyse it with Python.
sns.heatmap(...)
A seaborn function that draws a colour-coded grid where each cell's colour represents a numeric value — useful for spotting patterns across many samples or genes at once.
method
A function that belongs to an object or class — for example, `.mean()` is a method on a pandas DataFrame that calculates the average of a column.
@
In GitHub Copilot Chat (VS Code), typing @ opens a list of chat participants — domain-expert agents such as @workspace or @github — that you can direct your question to for specialised help.
/
In GitHub Copilot Chat, typing / opens a list of slash commands — shortcuts for common tasks like /explain (explain selected code) or /tests (generate unit tests) — so you do not need to write a full prompt.

11See also

💬 Discuss this chapter

Ask, share, or report — over on the Heidelberg AI community forum.