Claude Code
Adding code to an unfamiliar repo
A merged change that matches the codebase conventions — and a plan + checks you could hand to anyone.
Make an AI agent reliable on a large, real codebase
A discipline (not a tool) for making an AI coding agent reliable on a large, real codebase — tool-agnostic, anchored on Cole Medin's open-source workflow.
A discipline, not a tool: how to get an AI coding assistant to work reliably on a big, real codebase instead of "vibe coding" one-offs. The core idea — popularised by Cole Medin — is a second "AI layer" checked into source control next to your code (a lean CLAUDE.md of rules, reusable commands, and later skills, subagents and MCP), driven by a tight Plan → Implement → Validate loop. → Unlike the AI coding assistants chapter (which tool to use), this chapter is about the workflow that makes any of them dependable at scale. Tool-agnostic, but Claude Code is the running example. → Next rung: Self-host on a private cloud — ship it yourself, safely, once it works.
When "vibe coding" stops working — the project is too big for the agent to hold in its head and new changes start breaking old things.
A version-controlled "AI layer" (a lean CLAUDE.md + reusable commands), and the Plan → Implement → Validate loop.
A CLAUDE.md file stores project rules that the AI layer reads to guide its output.
Add a version‑controlled AI layer so the agent can reliably work on a large repository
In the building‑complex‑codebases UI, open the existing repo large-app, type the request “Add a logging helper that follows the project’s conventions and update the related tests”, and submit it. Then create a file named CLAUDE.md at the repo root with the rule “All logs must use logger.info with tag [APP]”, commit the change, and repeat the exact same request.Paste the whole text into the chat input box of the building‑complex‑codebases tool. Watch how the first response guesses the logging style, while after adding CLAUDE.md the second response follows the rule exactly.
A repository is a shared folder plus its full edit history, and Gitea provides a self‑hosted Git forge where that repo lives.
Create a repository, push an initial file, and explore the dashboard UI
Click + New Repository, name it lab-notebook, tick 'Initialize Repository', then edit README.md directly in the browser and commit the change.No git command line needed for this first step — Gitea's web editor commits for you.
GitHub is a hosted platform built on Git that adds a web UI, pull requests, issues and AI integration on top of plain version control.
Create an account, push a repo to GitHub and observe the additional collaboration features it provides
Create a free account at github.com, click New repository, name it (e.g. lab-notebook), and initialize it with a README. Then either clone it locally (git clone <url>) or, if you already have a local repo, add GitHub as a remote: git remote add origin <url> && git push -u origin main.No git experience? GitHub Desktop or VS Code's Source Control panel do the same steps with buttons instead of commands.
A hierarchical set of CLAUDE.md files—global, repository‑specific and local—defines where the agent looks for rules.
Do this first Make an AI agent work on large codebases
Provide concise build, test and lint instructions plus repository rules for the agent at session start
In the repository root, create a new file named CLAUDE.md and paste these lines:
```
# Build Commands
./gradlew build
./gradlew test
./gradlew lint

# Directory Map
src/        – source code
tests/      – unit tests
docs/       – documentation
configs/    – configuration files

# Hard Rules
- Never modify files in `vendor/`.
- All new modules must include a corresponding test file.
- Lint must pass before any commit.
```
Save the file.
Open the File Explorer in the building-complex-codebases UI, click + New File, name it CLAUDE.md, paste the content and hit Save. Verify the file is under 150 lines to keep the prompt lean.
~/.claude/CLAUDE.md, repo‑specific rules in ./CLAUDE.md and optional notes in a git‑ignored local fileA branch is an isolated copy of the project, and a pull request (PR) proposes merging that branch back into main after review.
Do this first Create and explore your first repository
Create a pull request, examine its diff and merge it into the main branch
Create a branch called add-protocol-notes, edit a file on it, then open a pull request against main and leave a review comment on one line.PRs work the same whether the branch came from a person or an AI coding agent — review the diff either way.
A pull request (PR) on GitHub lets you propose changes from a branch, view a diff, comment and approve before merging into main.
Do this first Host a repository on GitHub
Open a pull request, review its file changes and merge it into the main branch
Create a new branch (git checkout -b fix-typo), edit one line — e.g. fix a typo in the README — commit and push it (git push -u origin fix-typo), then click Compare & pull request on GitHub.Or skip the terminal entirely: click the pencil icon on any file in the GitHub web UI, and it creates the branch and PR for you.
A /.claude/commands/ markdown file defines a slash command that can be invoked to load preset context.
Do this first Create a lean CLAUDE.md for your project
Create a shared, version‑controlled command that can be invoked from any session instead of retyping prompts
Create a markdown file at .claude/commands/prime.md with a short description and the steps to load the current ticket, the repository file tree, and recent git history. Save the file, then invoke the new command by typing /prime in a chat session.Paste this into the editor screen of the building‑complex‑codebases tool and click Save; ensure the file path is exactly .claude/commands/prime.md so it’s tracked by git. After saving, test the command by entering /prime in the chat.
.claude/ folder is the asset, not any single session.An issue tracks a unit of work—bug, task or question—and lives alongside the code with its own comment thread, labels and assignee.
Do this first Propose, review and merge changes
Create an issue, label it, and link it to a commit so it closes automatically when merged
Open a new issue titled 'Sample IDs inconsistent in batch import', add a label, assign it to yourself, and reference it in a commit message as Fixes #<issue-number>.Referencing the issue number in a commit or PR auto-closes it when merged.
#12) in a commit message or PR description to close it on mergeIssues on GitHub capture bugs, tasks or questions, while Projects provide a kanban board to organise those issues into columns such as To do, In progress and Done.
Do this first Host a repository on GitHub
Create a scoped issue, label it for filtering and place its card on a project board
Open your repo's Issues tab, click New issue, and write one concrete task, e.g. 'Add a unit test for normalize_counts()'. Add a label. Then open the Projects tab, create a board, and add the issue to it.Keep the issue to one clear, scoped task, not a vague wishlist — vague issues get vague pull requests, from humans and AI alike.
The Plan‑Implement‑Validate loop structures work into three phases where the agent plans, writes code and validates checks before finishing.
Do this first Create reusable, version‑controlled commands
Execute the Plan‑Implement‑Validate loop so the agent only finishes when all checks pass
In the **Plan** screen, type a Product Requirements Prompt that adds a function `calculate_stats(data: List[float]) -> Dict[str, float]` to *stats.py*, updates *requirements.txt* if needed, creates unit tests in *test_stats.py* (checking mean, median, stddev), and specifies lint and type‑check must pass. Then click **Implement**, paste the same PRP into the fresh implementation window and generate the code. Finally click **Validate** to run `/validate` and view the results.Paste the full PRP in the Plan dialog, then use the Implement button to start a new clean session and finally hit Validate; watch for any failing test or lint error—those indicate the loop isn’t complete yet.
Gitea Actions is a built‑in CI/CD system that runs YAML workflow files placed in .gitea/workflows/ on every push, compatible with GitHub Actions syntax.
Do this first File and link an issue
Wire up an automatic workflow that triggers on each push and observe its execution
Add .gitea/workflows/test.yml with a job that checks out the repo and runs your test command, then push — watch it run under the repo's Actions tab.An existing GitHub Actions workflow will usually run on Gitea Actions with no changes.
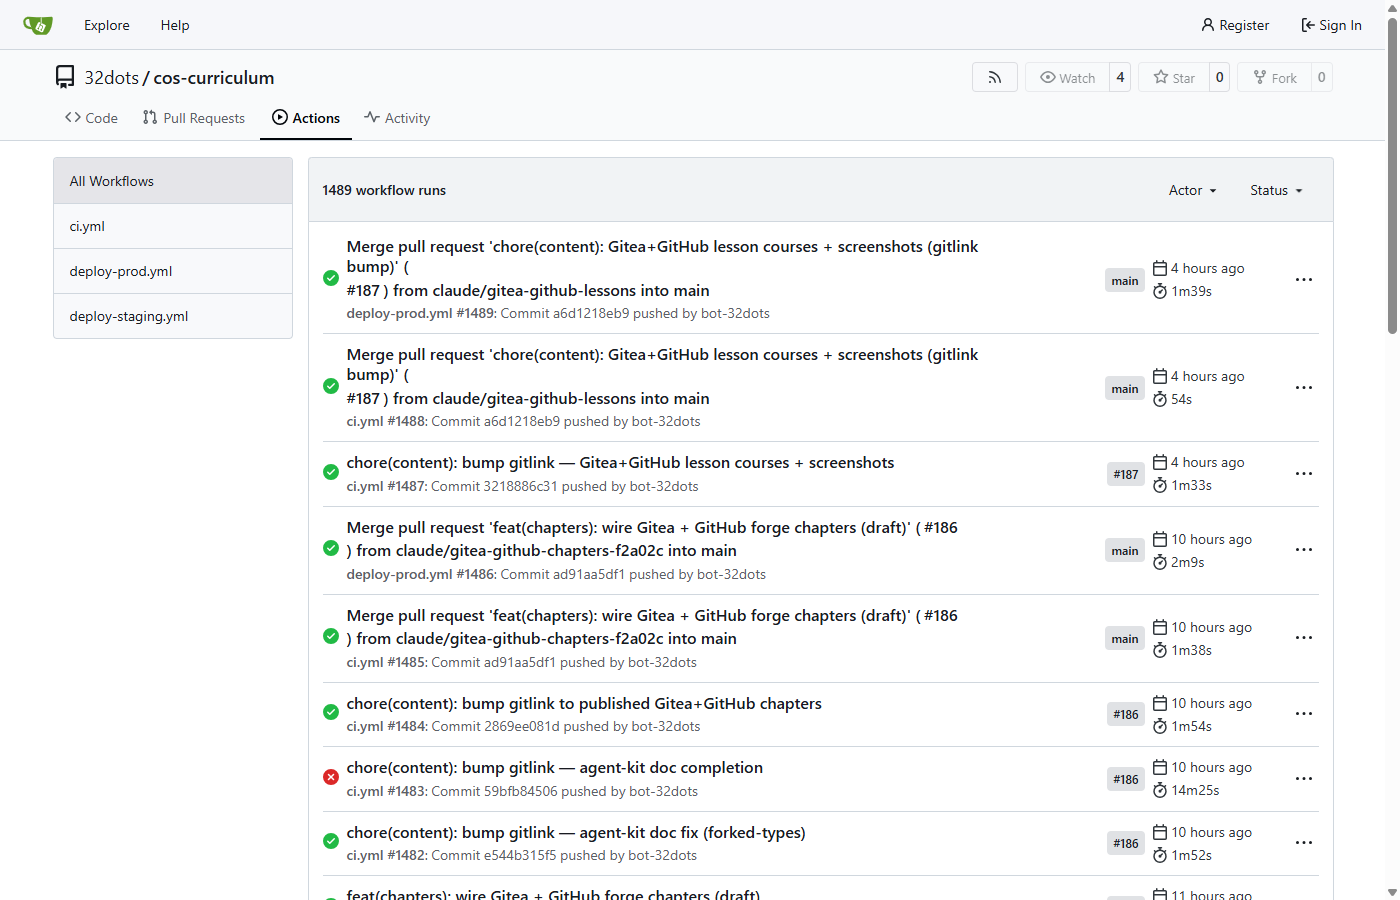
Best viewed on desktop — tap Enlarge to read the numbered controls.
.gitea/workflows/ defining the on: push trigger and steps such as checkout, install and testGitHub Actions runs YAML workflow files in .github/workflows/ on events like pushes, providing a fresh VM to execute steps such as tests, linting or AI‑driven checks.
Do this first Open, review, and merge a pull request
Run a CI workflow on every push and watch its result in the Actions tab
Create .github/workflows/test.yml with:

on: push
jobs:
  test:
    runs-on: ubuntu-latest
    steps:
      - uses: actions/checkout@v4
      - run: echo "Hello from Actions"

Commit and push it, then open the Actions tab.
Indentation matters in YAML — copy it exactly, or edit the file directly in the GitHub web UI to avoid whitespace mistakes.
A SKILL.md file describes a skill that can be referenced by the agent, while subagents and an MCP server extend functionality on demand.
Do this first Run a Plan‑Implement‑Validate loop on real code
Add heavier AI layers—skills, subagents and MCP—only when a concrete need is demonstrated
Create a file SKILL.md in the repository describing a ‘Data Cleaning’ procedure that removes rows with missing values from data.csv, then ask the agent to use this skill on data.csv.Paste the prompt into the Agent Console and hit Run; verify that the agent loads the new skill only for this task and does not add extra context otherwise.
Gitea ships as a single Go binary (or one Docker container) with no required external services — SQLite is enough for a small team. Self-hosting means your code, history, and CI logs never leave hardware you control.
Do this first Run CI automatically on each push
Stand up a self‑hosted Gitea instance with a single Docker command and the web installer.
docker run -d --name=gitea -p 3000:3000 -p 222:22 -v /var/lib/gitea:/data -e USER_UID=1000 -e USER_GID=1000 gitea/gitea:latestThen open http://
docker run command to start Gitea with a persistent volume.The Copilot coding agent is GitHub's autonomous AI contributor: assign it a GitHub Issue like you would a teammate, and it works in an isolated sandbox on its own copilot/* branch — plans the task into a checklist, writes code, runs tests, pushes commits — then opens a pull request for you to review. It runs on GitHub Actions infrastructure and cannot touch main or any protected branch directly. Beyond the coding agent, GitHub's official MCP server (github.com/github/github-mcp-server) lets any MCP-compatible AI tool — Claude included — read and write repos, Issues, and PRs directly, which is how agents outside GitHub's own UI can work the same loop.
Do this first File a scoped issue and track it on a project board·Run a CI workflow on every push
Create a scoped Issue, let Copilot generate a PR, and approve the changes
Open (or reuse) an Issue with one concrete, scoped task — e.g. 'Add input validation to load_csv()'. In the Assignees panel, assign it to Copilot. It reacts with an eyes emoji, opens a draft pull request within a minute or two, and starts working — check back to watch its checklist fill in.Coding agent needs a Copilot Pro, Business, or Enterprise seat — it isn't included on the free completions-only tier.
The prime → plan → implement → validate sequence orchestrates a full ticket lifecycle driven by AI commands.
Do this first Add skills, subagents and MCP only when required
Deliver a real ticket by executing prime → plan → implement → validate and improve the AI layer from any mistakes
run ticket 42 end‑to‑end: prime && plan && implement && validatePaste the command into the Command Console of the building‑complex‑codebases tool and press Enter; watch for any error messages so you can add a rule to CLAUDE.md when something fails.
53 outcomes in all — one per recipe below.
Adding code to an unfamiliar repo
A merged change that matches the codebase conventions — and a plan + checks you could hand to anyone.
Need a one‑word shortcut for the team’s review checklist
A `/review` command in `.claude/commands/` that anyone on the repo invokes in one word.
Need a feature that follows a short spec
A working feature plus the spec and checks that produced it, reusable the next time you add one.
My dependencies keep breaking when I upgrade
Up-to-date dependencies with a clear record of which bump broke what — not a mystery red build.
Adding a new feature to an internal tool
A new capability in the internal tool that ships without quietly breaking an existing workflow.
Need a one‑command firmware flash and test run
A `.claude/commands/test-target.md` that any engineer invokes in one word; the agent flashes, waits, reads the UART output, and reports which grip-state tests passed or failed.
Need to verify a refactored grip FSM
A refactored grip-control module with a written plan, a clean static-analysis run, and a UART test log confirming all six grip transitions passed on real hardware — ready for the ISO 13485 change record.
Tired of re‑explaining your codebase
A sub-100-line CLAUDE.md the agent loads every session — so you stop re-explaining the project.
Chaotic personal repo
A documented, lightly-tested project the agent can navigate, turning a fragile hobby repo into something extendable.
Multiple firmware in one repo risk HAL/ISR/RTOS violations
A version-controlled CLAUDE.md under ~120 lines that prevents the most destructive class of agent mistakes before they reach the compiler.
Analysis script keeps breaking on reruns
A pinned, tested, documented script someone else (or future-you) can actually re-run and trust.
Can’t get reviewers to run my code locally
A portfolio with live, deployable projects signals you can ship software from start to finish
Only let my script access repos
Create a token that only allows the permissions Codex needs
Sending final changes to repo
Push changes to a GitHub repo named portfolio-website-tutorial to start an automated build
AI forgets your codebase every time you start a new session
Checking the AI layer into git ensures every new session begins with the same context, eliminating repeated explanations
Typing the same prompt over and over
Turn any prompt you type more than twice into a reusable command to avoid retyping
Need to fire a multi‑step setup with one word
Invoke any saved command with a leading slash, turning multi-step setup into one word
Starting a new task and need all the context
A single `/prime` command can orient a fresh session by loading the ticket, file tree, and recent git history
Changing a command in a shared repo
Updating a command in the shared `.claude/` repo instantly upgrades the workflow for all team members
Want a full spec before any code is written
A PRP captures every step, file change, and test up front so the implementation can run unattended
Code drifts away from the plan
Implementing in a clean session keeps the agent focused solely on the plan's instructions
Need to verify generated code passes lint, type‑checking and tests
Running `/validate` runs lint, type-checking, and tests automatically, surfacing any failures before the agent declares completion
Jobs list many skills together
Keeping each skill focused prevents unnecessary context growth
Turn a repo ticket into a merged feature automatically
Running the full prime → plan → implement → validate loop on a real ticket turns isolated tricks into a single, repeatable system
Need a fresh repo but don’t want the command line
You can spin up a new repo directly from the web UI without using the command line
After creating a repo you can instantly see its files, rendered README, and recent commit count
Need to keep changes separate from main
Your edits stay separate from main until you explicitly merge them
Need to review a pull request and give feedback
Inline comments let reviewers give precise feedback before merging
Pull request stuck behind required checks
Merging only becomes possible after required checks pass, ensuring safety
Need to record a problem or request
Creating an issue captures the problem or request with rich formatting for later reference
Backlog is a jumble of issues
Labels turn a mixed backlog into searchable, filterable groups like bug or enhancement
Assigning an issue makes the owner visible via an avatar, clarifying who will handle it
When I want an issue closed by a commit
Referencing an issue number in a commit message automatically closes the issue when the commit merges
Can’t run CI pipelines on your own server
A registered Gitea Runner provides the compute needed to execute workflow jobs
Need CI to trigger on every push
Placing a correctly formatted YAML file triggers automated builds on each push
A green check mark on the latest commit confirms that all workflow steps passed
Want to host your own Git server
You can stand up a full Gitea instance with a single docker run command
Need a first admin user and storage configured
The web-based wizard lets you finish setup in minutes, choosing database and admin credentials
Don’t want to set up a separate database
Choosing SQLite in the wizard lets you run Gitea with no separate DB server
Need a free account and don’t want to enter a credit card
You can create a GitHub account without a credit card and start hosting repositories immediately
A GitHub repo shows a web UI with rendered files and navigation that a bare local repo lacks
Need to let a teammate edit the repo
GitHub lets you grant repository permissions to other users, a capability Git alone does not provide
Want others to review your changes
Opening a PR creates a reviewable diff and notifies reviewers
I need to define a concrete task for my team
A well-scoped Issue tells anyone (or an AI) exactly what needs to change and how success is measured
Want to see an issue move across columns
Linking the Issue to a Project creates a card you can move across columns as work advances
Want to change an issue’s state just by dragging its card
Moving a card reflects the current state of work without editing the Issue itself
New CI pipeline won’t appear after adding a file
Adding a YAML file to .github/workflows/ instantly registers a new CI/CD pipeline
Pushing a commit but the workflow never runs
A workflow set to run on push starts automatically after you commit and push the file
The echo command proves the workflow ran and lets you view custom log messages
Run a tiny CI on each push that just prints a hello message
A ready-to-use YAML shows the exact syntax needed to trigger on push and echo a message
You can locate and view the exact code that the AI builder saved for your app
It's the discipline of making an AI coding agent reliable on a large, real project, rather than relying on one-off prompts ("vibe coding"). The central idea, popularised by Cole Medin, is that every codebase needs a second "AI layer" checked into source control next to the code: a lean CLAUDE.md of rules, reusable slash commands, and — when needed — skills, subagents and MCP connections. Because that layer is version-controlled, your AI workflow improves like code does, and every session starts already knowing your project instead of guessing.
CLAUDE.md is a Markdown file the agent loads automatically at the start of every session — put your build/test/lint commands, a short directory map, and the hard rules specific to your codebase. Keep it lean: a model can only reliably follow so many instructions, and a bloated rules file hurts adherence. The practical test for each line is "would the agent be wrong without it?" — if not, delete it. There's also a hierarchy: a global file for your personal defaults, a project file for the repo, and a gitignored local file for personal notes.
It's a three-step loop for any real task. Plan first with no edits: have the agent write a plan complete enough to run in a fresh context window — steps, files, and the checks that must pass (Cole calls the comprehensive version a "Product Requirements Prompt"). Implement in a clean session that just follows the plan, so it doesn't drift on stale context. Validate against checks that have to pass — lint, types, tests, then review. A model asked "are you done?" will say yes; a failing test it cannot. When something breaks, fix the system (a rule or check) so that class of bug can't recur.
Skills package a procedure the agent loads only when relevant (a SKILL.md) so specialised know-how doesn't bloat every session — one skill should do one job. Subagents run in their own isolated context, useful for parallelising independent work without contaminating the main thread. MCP (Model Context Protocol) connects external systems like GitHub, a database or Jira so the agent reads real data. The key discipline is restraint: each costs context and tokens, so add them only on a demonstrated need — start with CLAUDE.md plus commands and grow from there.
The discipline is tool-agnostic — the AI layer and the Plan → Implement → Validate loop apply to any agentic coding tool. Claude Code is the running example here (and the one Cole's reference repo targets) because its CLAUDE.md, slash commands, skills, subagents and MCP map cleanly onto these ideas, but Cursor, Codex and similar tools have their own equivalents of project rules, reusable commands and external connections. Learn the habits once and you can carry them between tools.
From the Gitea dashboard click the "+ New Repository" button, enter a name and optional description, choose Public or Private, and optionally tick "Initialize Repository." Then confirm by clicking the Create button. The new repo appears immediately with its file list, README preview, and recent commit count.
A pull request (PR) asks to merge a branch back into the target branch and shows a diff view of the changes line‑by‑line. Reviewers can add inline comments or request changes before the PR is merged. The Merge button becomes active only after required checks pass, then clicking it completes the merge.
When creating or editing an issue, use the Assignee dropdown to select a user; their avatar appears on the issue card. This makes clear who is responsible for fixing the ticket. Labels can also be added to categorize the issue.
Gitea includes built‑in Actions that run workflow files placed in a ".gitea/workflows/" directory. A YAML file defines triggers (e.g., "on: push") and job steps such as checkout, install, and test. A registered Gitea Runner—a small Go binary—executes the jobs on your own server, and a green check mark shows successful execution.
You can start a full Gitea web/SSH service with a single Docker run command that launches the Gitea binary. After the container starts, open http://localhost:3000 and complete the five‑minute web wizard, which creates the first admin user and configures storage. Choosing SQLite in the wizard lets you run Gitea without setting up a separate database.
Create a personal access token (PAT) that only includes the scopes you need: Repository admin, Contents, and Pull requests. In GitHub settings, generate a new PAT with those permissions and use it in your script.
Push the code to a public GitHub repository and add a deployment link (e.g., Render, Vercel, Heroku). Reviewers can then open the repo online and click the live demo link to run the application in their browser.
Stage all changed files, commit them with a message (for example, "final"), and push the commit to the target repository such as portfolio-website-tutorial. The push event starts the automated build defined in your workflow.
No. You can sign up at github.com with just an email, username, and password, and you’ll immediately get a free account that can host repositories.
Go to Settings → Manage access in your repo, click Invite a collaborator, enter the person’s GitHub username, and assign them read/write or admin rights. They will then be able to push changes directly to the repository.
New self‑hosted Git service needs its first admin
The initial Gitea launch presents an admin creation form. Supplying a strong username, email and password creates the super‑user that can manage users, repositories, and server settings.
Need a copy of a GitHub project on my private server
Gitea’s “Migrate Repository” feature can clone a remote GitHub repository using a personal access token, preserving commits, branches, tags, and optionally issues/labels. This provides a quick backup or move of projects to your private server.
New self‑hosted Git server setup
When you first access Gitea’s web UI, you choose a lightweight SQLite DB (or PostgreSQL for larger setups), set the site title, domain, and SSH port, then create the first administrator account. This creates all internal tables and prepares the service for repositories.
Want a self‑hosted Git server on Windows without internet
Gitea is a lightweight, self‑hosted Git service that runs on Windows without internet access. By placing the executable and data folder together, running it once creates a web UI where you can configure a SQLite database, set the base URL to your machine's IP, and create users and repositories.
First run of a self‑hosted code server
The web installer creates the database schema, sets up an administrator, and lets you configure email, security, and registration options. Doing this once finalizes the installation.
Can’t push without typing a password
Adding your public key to your Gitea user profile enables password‑less authentication for pushes and pulls over SSH, improving security and convenience.
Need a fresh repo on my server
The Gitea UI mirrors GitHub/GitLab: a “New Repository” button opens a form where you set name, visibility, .gitignore, license and default branch. After creation the platform auto‑generates those files.
Need a local copy of a remote repo in VS Code
Gitea provides an “Open with VS Code” button that launches the desktop client, letting you pick a local folder for cloning. This streamlines the usual `git clone` workflow.
Team needs to review and merge code changes
Gitea supports branch creation, PR opening, labeling, assigning reviewers, and merging. This mirrors typical collaborative workflows on larger platforms.
Need a way to log and follow bugs
Gitea’s Issues panel lets you create tickets with titles, descriptions, labels, assignees, due dates, and time tracking, providing a lightweight bug‑tracking system.
Want a simple way to see task status at a glance
Gitea’s Projects feature offers a Kanban board where you can create columns (To‑Do, In Progress, Done) and drag issues or pull requests between them, enabling simple sprint planning.
Want reviewers to check and combine your changes
A PR lets you request that a branch be merged into another; reviewers can comment, approve, or request changes before the final merge.
Want to add files to a repo without the command line
The web interface lets you quickly add single or small groups of files by dragging them into the repo view and committing directly, useful for non‑technical uploads.
Password alone isn’t safe
2FA adds a second verification step (e.g., an authenticator app) after entering your password, protecting against credential theft.
Need a personal landing page on your profile
A repository named exactly after your username is treated as a special repo; its README.md is rendered on your profile, allowing you to showcase projects and personality.
Need online code storage
A repository is where your project’s code lives in the cloud, allowing you to back up and share it. Creating one on GitHub gives you a public or private container for your files.
Want to experiment without breaking the main line
A branch copies the current state of the main line of development, letting you experiment safely. Changes stay isolated until you decide they’re ready.
Finished feature branch ready to go
A pull request (PR) shows the differences between a feature branch and main, lets you review changes, and then merges them when approved.
Need teammates to check my code before it goes live
A PR lets teammates examine, comment on, and approve your branch before it merges into the main line, ensuring quality control.
Need to merge a feature branch into main
A pull request (PR) shows differences between branches, allows code review, and safely merges changes after approval.
You sign up at github.com by providing email, password, username and selecting the free plan. This gives you an online identity for storing repositories.
Want to start a new openSUSE package
Using the plus icon on src.opensuse.org you can start a new package with the provided template, which pre‑configures Git LFS support and basic metadata. This gives you a ready‑to‑edit repository for your software.
The same set on /recipes, filtered by tool and role.
Pairs with the 'Scale past one context' lesson: see what skills, subagents and MCP actually look like before you decide whether you need them.
A gentler, workflow-led companion: a concrete repeatable loop for starting a project, before you layer the full Plan → Implement → Validate discipline on top.
This is the talk the whole chapter is built on. Watch it once to see the full discipline in motion, then use the lessons to apply it to your own repo.
It's the discipline of making an AI coding agent reliable on a large, real project, rather than relying on one-off prompts ("vibe coding"). The central idea, popularised by Cole Medin, is that every codebase needs a second "AI layer" checked into source control next to the code: a lean CLAUDE.md of rules, reusable slash commands, and — when needed — skills, subagents and MCP connections. Because that layer is version-controlled, your AI workflow improves like code does, and every session starts already knowing your project instead of guessing.
CLAUDE.md is a Markdown file the agent loads automatically at the start of every session — put your build/test/lint commands, a short directory map, and the hard rules specific to your codebase. Keep it lean: a model can only reliably follow so many instructions, and a bloated rules file hurts adherence. The practical test for each line is "would the agent be wrong without it?" — if not, delete it. There's also a hierarchy: a global file for your personal defaults, a project file for the repo, and a gitignored local file for personal notes.
It's a three-step loop for any real task. Plan first with no edits: have the agent write a plan complete enough to run in a fresh context window — steps, files, and the checks that must pass (Cole calls the comprehensive version a "Product Requirements Prompt"). Implement in a clean session that just follows the plan, so it doesn't drift on stale context. Validate against checks that have to pass — lint, types, tests, then review. A model asked "are you done?" will say yes; a failing test it cannot. When something breaks, fix the system (a rule or check) so that class of bug can't recur.
Skills package a procedure the agent loads only when relevant (a SKILL.md) so specialised know-how doesn't bloat every session — one skill should do one job. Subagents run in their own isolated context, useful for parallelising independent work without contaminating the main thread. MCP (Model Context Protocol) connects external systems like GitHub, a database or Jira so the agent reads real data. The key discipline is restraint: each costs context and tokens, so add them only on a demonstrated need — start with CLAUDE.md plus commands and grow from there.
The discipline is tool-agnostic — the AI layer and the Plan → Implement → Validate loop apply to any agentic coding tool. Claude Code is the running example here (and the one Cole's reference repo targets) because its CLAUDE.md, slash commands, skills, subagents and MCP map cleanly onto these ideas, but Cursor, Codex and similar tools have their own equivalents of project rules, reusable commands and external connections. Learn the habits once and you can carry them between tools.
/prime/plan/implement/validate/reviewCLAUDE.md~/.claude/CLAUDE.md.claude/commands/SKILL.mdINITIAL.mdAI layerPIV loopPRPcontext windowsubagentMCPAsk, share, or report — over on the Heidelberg AI community forum.